Thanks to its open software and hardware designs, the Raspberry Pi is well-suited to demonstrating the core tenants of the IoT. On a Pi, a tinkerer has full control. They can connect actuators and sensors, process data, and send information over a WiFi connection.
It's the perfect platform to prototype new ideas, and to demonstrate how services like PubNub can be used in the IoT space to trigger things like notifications and alerts.
The key to the Raspberry Pi is initial simplicity with a high tolerance for increasing complexity. For IoT applications, PubNub Data Streams bring this same usability to inter-device communication, enabling even a beginner to create real-time, bidirectional communication between their own embedded devices.
From bare board to functioning system, this tutorial will walk through the construction of a simple proximity alarm that sends data over a PubNub data atream to a webpage. In the last step, we show how you can easily upgrade this basic device to communicate with a motion detector, stepping into the world of bi-directional IoT communication.
Before you start, you'll want to check out some resources for getting started with the Raspberry Pi, as this tutorial assumes a machine already running Raspbian:
Let's Build.
Project Overview
In the scope of this tutorial, we'll measure distances and trigger an alarm using PubNub Pub/Sub Messaging and Raspberry Pi. The alarm will send an alert to a web interface in real time when the motion sensor is triggered.
Section 1: Building the Hardware
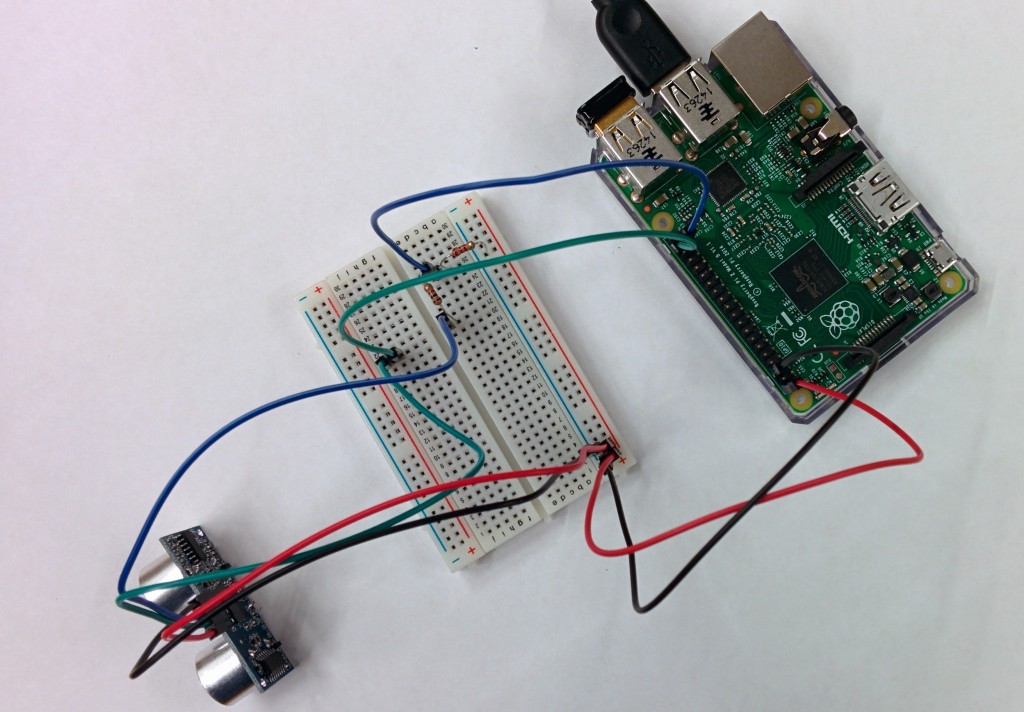
What You'll Need:
- Raspberry Pi 2, set-up, with accessories (power, wifi, m+kb, monitor, or setup via SSH) (See ReadMe)
- An HC-SR04 ultrasonic rangefinder
- 8 jumper wires in 4 colors, with 2 of each color
- 1 1k Ohm resistor
- 1 2.2k Ohm resistor
- A browser or internet-capable smartphone
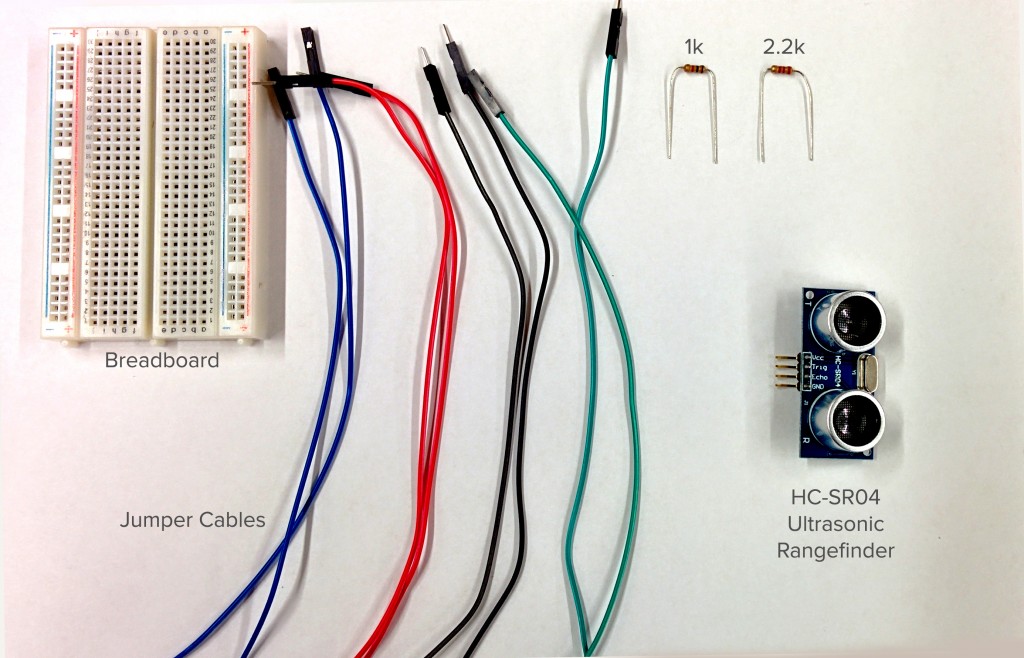
What You're Building and How It Works:
In this project, you'll build Pi-based ultrasonic rangefinder, which can be easily turned into a proximity alert with PubNub. We'll get to that later.
This system has two main elements: A Raspberry Pi and the rangefinder module itself. From a hardware perspective, this is a relatively simple system.
Upon trigger from the Pi, the module emits a 40kHz pulse for 8-10 microseconds. This signal, beyond the range of human hearing, will bounce off of solid objects, and some of those bounced waves will return to the rangefinder.
An element on the module is sensitive to this frequency, and when the reflected pulse is detected, it sends a signal back to the Pi. In code, the time elapsed between signal emission and reception can be put through simple math to find the distance of the reflecting object.
Electronically, there are a few quirks to be aware of when building our circuit. First, while many of the jumper wirescould be connected directly from Pi to Module, we've used a solderless breadboard partially for ease of use.
We have to pay attention to voltage. The ECHO signal comes at 5 volts but the GPIO pin it will be transmitted through on the Pi is only rated at 3.3v. Sending this higher voltage into an unprotected pin can damage our Pi, so our circuit design will have to adjust the voltage of the signal with a voltage divider.
Step 1: Wiring up the Range Finder
Take a bit to check out the circuit diagram for the whole device:
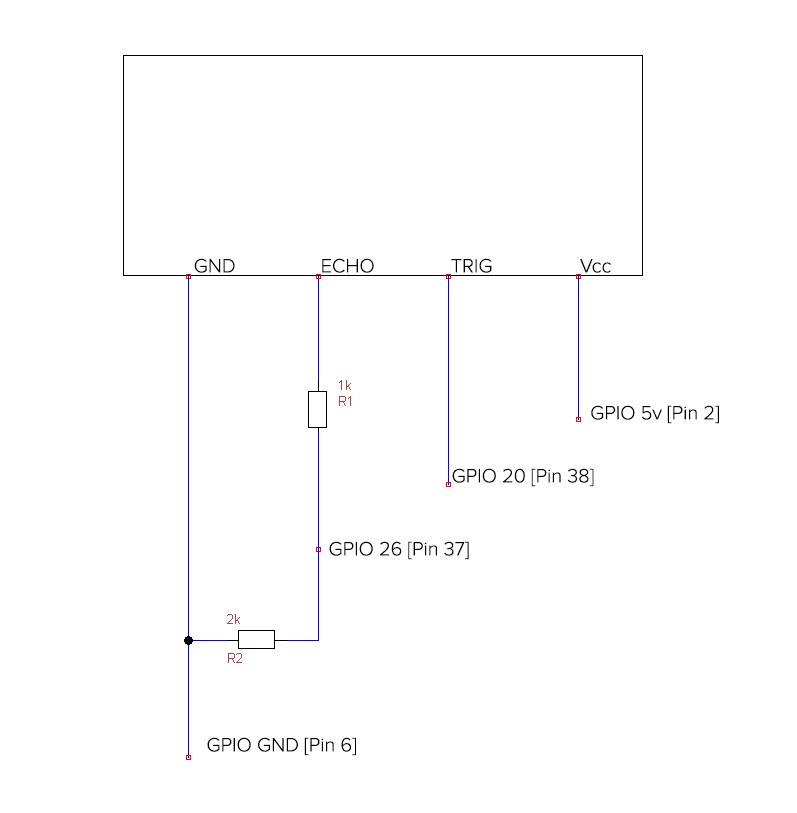
Paying attention only to the top section for now, you'll see that the rangefinder sensor has four pins: Vcc (power), TRIG, ECHO, and GND (ground).
Vcc powers the module, and GND is used to ground it.
TRIG allows the sensor to recieve a signal from the Pi, which then triggers the emission of an ultrasound pulse.
ECHO transmits back a signal when the sensor detects the reflected pulse.
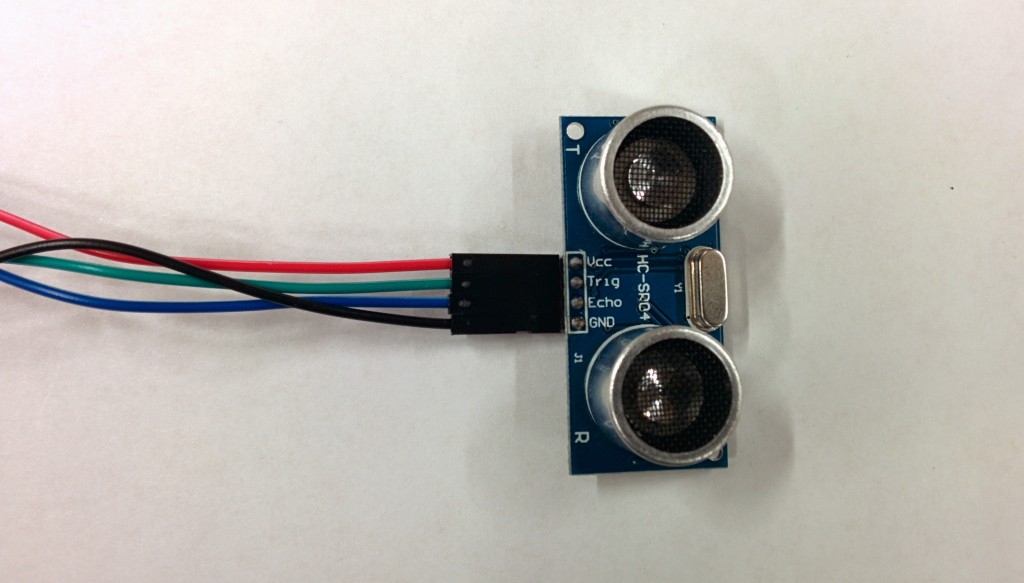
For now, pick four male-female jumper wires, each a different color, and attach them to the sensor. It should look similar to this:
Step 2: Wiring Power and Ground Pins on the Pi
Leaving the sensor alone for a moment, let's wire up the system from the Pi side.
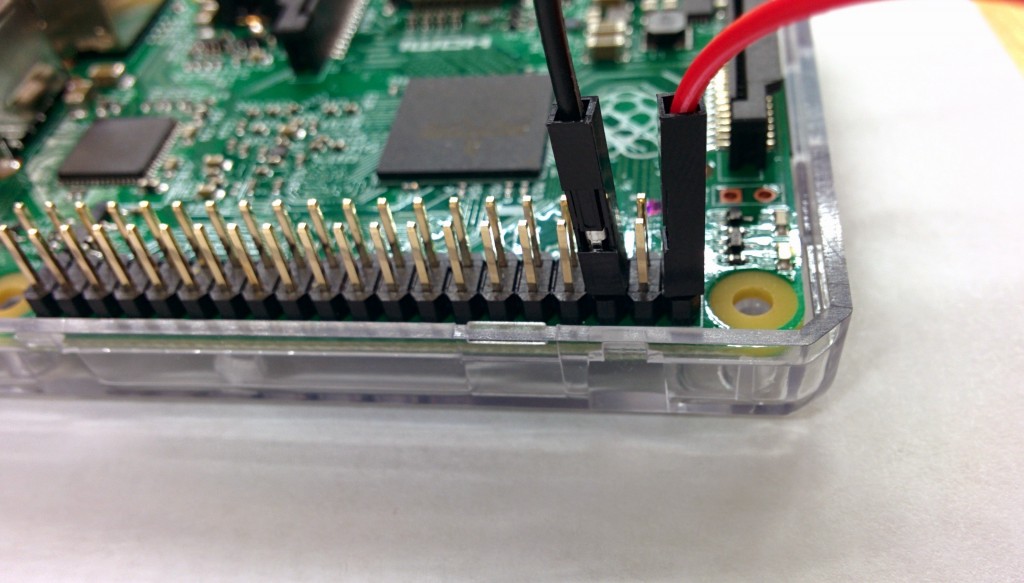
First, attach a wire each to the 5v and GND GPIO pins. In our case, we used Pin 2 for power and Pin 6 for ground. To keep things organized, your power wire should be the same color as that attached to the sensor's Vcc pin, and likewise for your GND wires.
This is a useful diagram for reading the Pi's pin layout:

One configuration may look like this:
Step 3: Wiring Input and Output Pins on the Pi
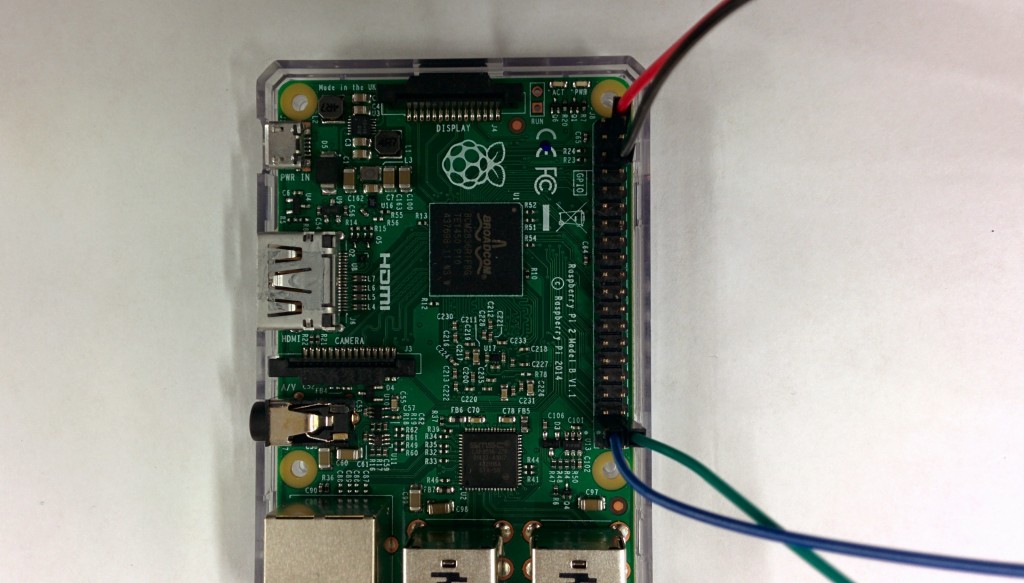
Next, we will attach wires to two GPIO pins in order to send and recieve signals from the sensor module. Select a wire that matches that attached to the sensor's ECHO pin, and attach it to pin 37 (GPIO26). Next, match your TRIG wire and attach it to pin 38 (GPIO20).
It should look something like this (ECHO = blue; GPIO26, TRIG = green; GPIO20):
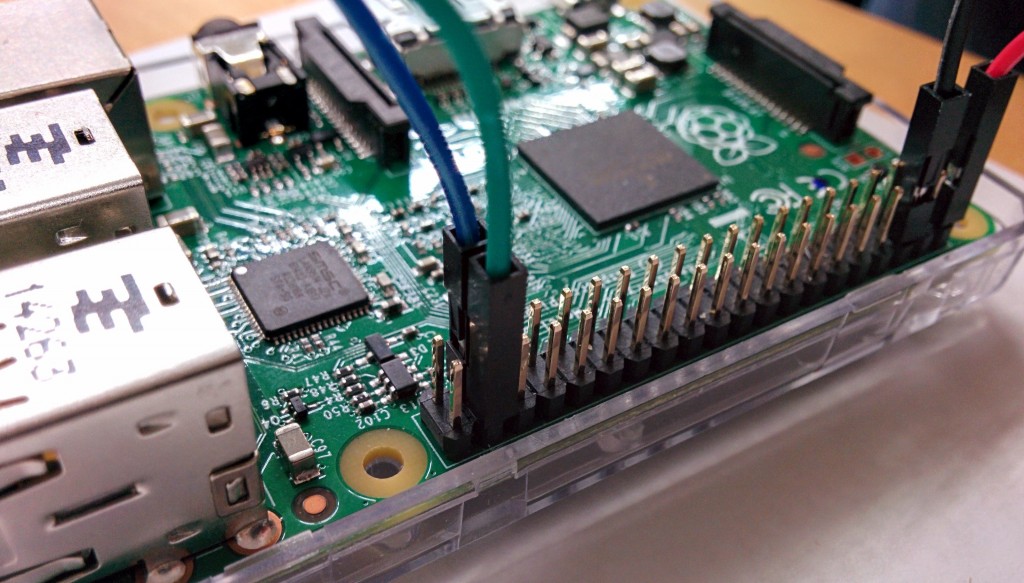
After steps 2 and 3, check to make sure your Pi's GPIO pins resemble this layout:
Step 4: Linking PWR and Ground from the Pi to the Sensor
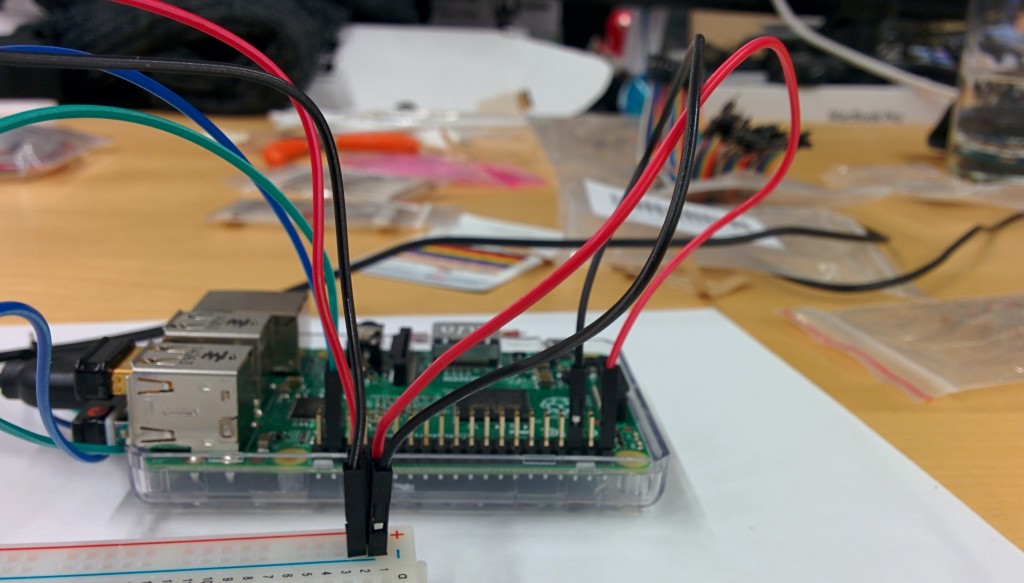
First, connect your Pi's Power to the space in the first row of the breadboard's positive rail. In the second-row space on that rail, connect the sensor's Vcc cable.
Once that's done, connect your Pi's Ground wire to the first row of the negative rail. In the second-row space on this rail, connect the sensor's GND wire.
It should look something like this:
Step 5: Linking TRIG to GPIO
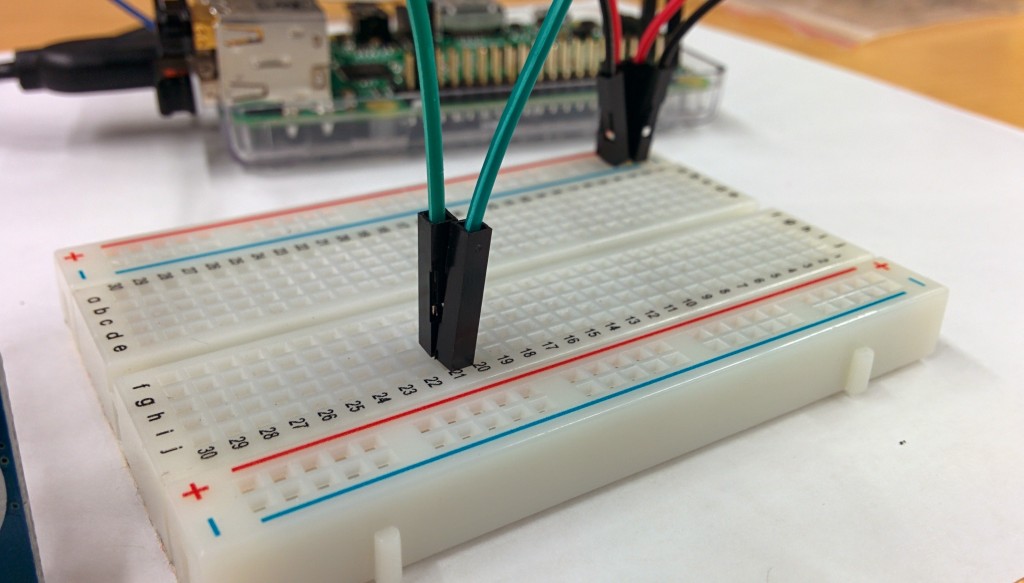
Find a blank rail on the breadboard, and plug in your TRIG wire (from the sensor) and GPIO20 wire (from the Pi). These should be the same color.
Step 6: Linking ECHO to GPIO
This is the trickiest step of this construction, but it isn't too difficult.
We can't simply attach the sensor's ECHO wire to the Pi's GPIO pin, as the sensor module would be outputting a 5v signal to a pin rated only for 3.3v, and this could result in damage to the Pi.
With resistors, we can create a voltage divider to bring the voltage down to an acceptable level. A voltage divider consists of two resistors (R1 and R2) in series connected to an input voltage (Vin), which needs to be reduced to our output voltage (Vout). In our circuit, Vin will be ECHO, which needs to be decreased from 5V to our Vout of 3.3V.
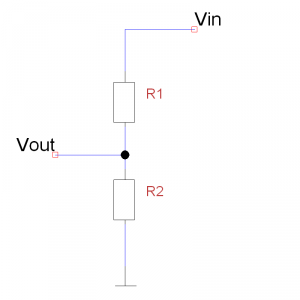
For our purposes, we will use a 1k oHm resistor for R1 and a 2.2k oHm resistor for R2. Should you be interested, the inspiration for this tutorial, linked at the bottom, has a good explanation of the math involved.
Actually building the voltage divider:
- Plug your ECHO wire into a blank rail
- Use your R1 resistor (1k) to link that rail to another blank rail.
- Link this rail to the breadboard's Ground with your R2 resistor (2.2k), leaving at least one space between your R1 and R2 elements.
- In the blank space between resistors, plug in the Pi's GPIO26 wire, linking ECHO to your Pi.
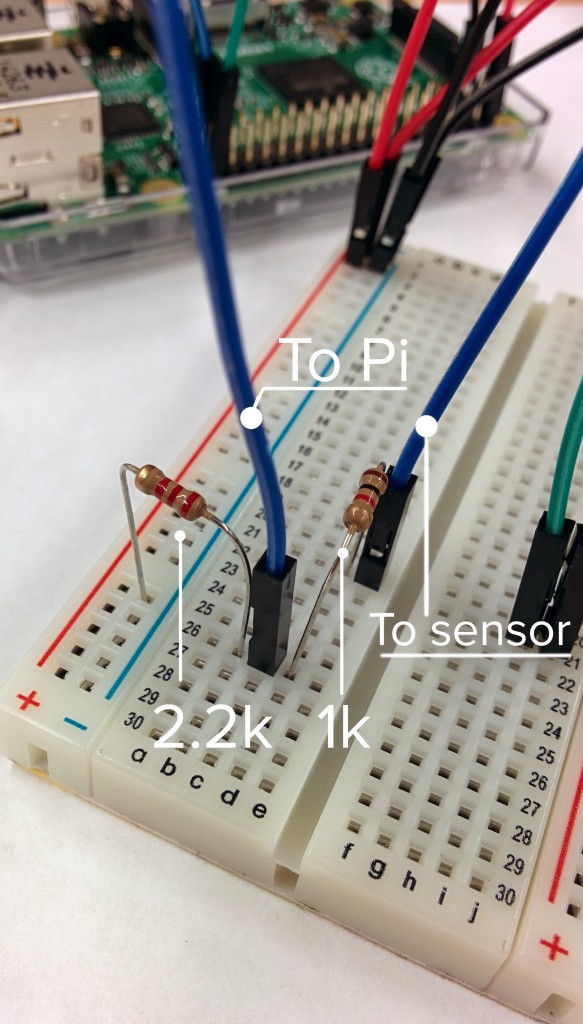
That's the entirety of our hardware construction. Now, you're ready to write some code!
Based on “HC-SR04 Ultrasonic Range Sensor on the Raspberry Pi”
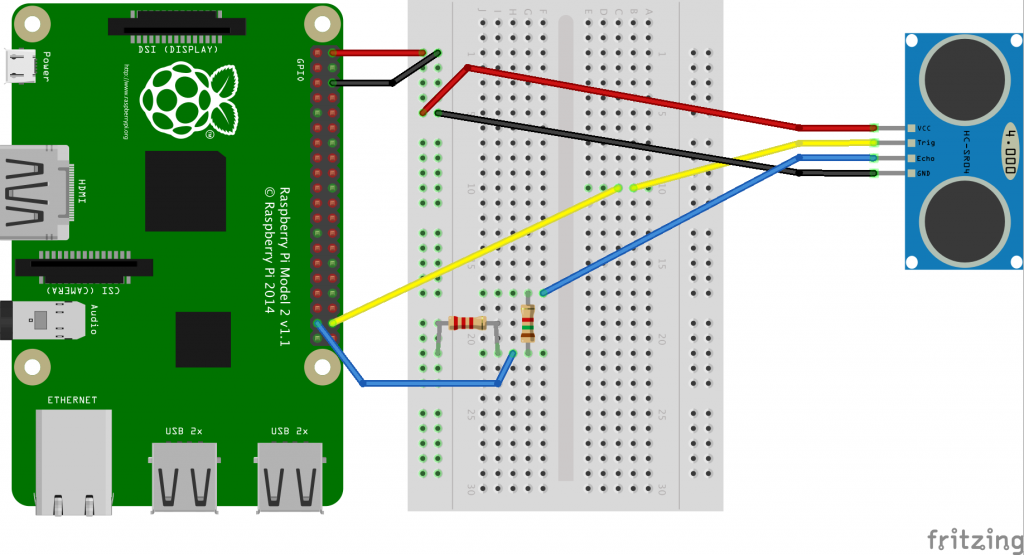
If you are using a mini breadboard, your circuit should look like this:
Section 2: Writing the Code
Our device, when completed, will act as a proximity alarm by publishing alert data and distance to a webpage, which can be accessed on any browser-capable device.
A Word About PubNub
To get there, the overall design of our device has to accomplish 3 main tasks:
- Find the range of an object with a pulse of ultrasonic waves
- Keep track of when an object enters its proximity
- Publish range and alarm data over a PubNub channel
With PubNub and GPIO libraries, this is simpler than it seems.
1. Setting up the Code
a. Libraries
We'll be importing three libraries to build our device's functionality: GPIO, PubNub, and time. We'll also take the opportuntiy to create a global variable that we'll use to track the number of rangefinding “shots” fired as the program runs.
b. PubNub setup
With the libraries imported, we can now call and calibrate them as we need for our device.
To set up PubNub Pub-Sub messaging, the project's communication infrastructure, start by adding this code:
If you have a PubNub account, replace the string ‘demo' in Publish_key and subscribe_key, with your own keys. If you don't have a PubNub account, to get your unique pub/sub keys, you’ll first need to sign up for a PubNub account. Once you sign up, you can get your unique PubNub keys in the PubNub Developer Dashboard. Our free Sandbox tier should give you all the bandwidth you need to build and test your messaging app with the web messaging API.
The channel variable can be named whatever you like. Your Pub key, sub key, and channel name will all be used to transmit and keep track of the data from your Pi.
c. GPIO Pin Setup
The sensor module communicates with the Pi by sending electrical signals to specific pins. When recieving no signal, a pin is read as LOW. When a signal is recieved, that pin switches to HIGH. This binary operation is at the heart of any digital I/O device, including LEDs and stepper motors. For now, we'll deal with it in its simplest form.
First, we have to point our code to the pins we're using. To do so, add the following to your code:
The GPIO.BCM option means that you are referring to the pins by the “Broadcom SOC channel” number, rather than to the pin number. The BCM numbers are those after the “GPIO” in the board overview diagram:

In our hardware construction, we plugged our TRIG cable into pin 38 (GPIO 20) and our ECHO cable into pin 37 (GPIO 26). So, in our code, we'll add variables to easily reference these values:
And then we'll configure the correct pins for input and output:
“TRIG” will be the pin on which a signal is sent to the sensor module, which will trigger the ultrasonic pulse. It's an Output.
“ECHO” receives a signal when the module detects the reflected soundwave, flipping from LOW to HIGH. It's an Input.
Each shot works by sending a 10-microsecond pulse at around 40khz, marking the time at which the pulse is sent and then, subsequentially, when the reflected signal is detected. To ensure accuracy, we must first settle the trigger and wait:
We then send the pulse.
Because we want to continuously check for range, we nest the entirety of the rangefinding functionality within a ‘While' loop:
Here, we're calling GPIO.output to control a previously defined output pin. In this case, we first pass ‘TRIG' as an argument to the function. By calling “True” as the second argument, we turn the pin to HIGH and send a signal.
After waiting for 10 microseconds, we call GPIO.output again, but this time set the second argument to False, halting the signal and turning the pin to LOW.
3. Waiting for the Echo And Recording the Signal
Just after we send the pulse, we will create the variable “pulse_start” and set it equal to the current time, all in order to mark the beginning of the time between signal sent and recieved.
When the signal is recieved, our ECHO pin flips to HIGH, reading out as ‘1' rather than ‘0' in our code. At this point, we take another time.time reading with a variable named “pulse_end.” We find the final duration by subracting pulse_start from pulse_end.
4. Calculating Distance and Sending Data
Using known values, we can easily turn our pulse_duration value into a measure of distance.
At sea-level, the speed of sound is 34300 centimeters/second, Or: Speed = Distance/Time. Our time, contained inpulse_duration, actually represents the time to and back from the detected object. To get the distance from the sensor to that object, we'll need to divide our time in half. So:
34,300 = Distance/Time/2, or, simplified and flipped: Distance = 17,150 * time
In code:
We then round out the value, for neatness, and print it with the current “shot” number:
We publish distance to our own log.
We use the function pubnub.publish to publish to our channel, which is passed via the variable we created as an argument.
The very, very last step is to clean out the pins and halt the process:
On the Pi terminal, run the code with the command: sudo python your-program-name.py.
Watch for your message data. If a reading takes too long, or if a number seems too high, there may be a few problems. Check your wiring, and make sure the object you're measuring is within 4 meters- the effective range of this particular sensor.
Section 3: Connecting to the IoT
So far, we've turned a Raspberry Pi into a local range-finder, which can measure the distance between a sensor module and an object fairly accurately within a moderate vicinity.
It uses PubNub to send data over the internet to an end-user device, allowing you to monitor a space watched by the device.
But, this doesn't realize the full promise of the IoT. To do that, our proximity alarm would have to communicate with other devices. Their statuses and outputs would have to be readable and actionable by our device.
Luckily, with PubNub, we can do this with less than 20 lines of code. By adding a subscription function to our code, we can easily reconfigure this device to communicate bi-directionally with other connected machines.
For the purposes of this tutorial, we'll connect our rangefinder through PubNub to a motion detector. When that machine detects motion, the rangefinder will fire, sending an alert when an object gets too close.
Whereas in the above code we run the rangefinding code automatically and only published to a PubNub channel, we now want to detect range only after receiving a flagged message from another device.
1. Setting up subscription
Leave the library import code and the setup of pins as it was. In the PubNub setup code bloc, you'll need the subscribe key of the device you want to ‘listen' to.
From the dashboard, pick a motion detector's data stream. Copy the device's Subscribe Key, and paste it in your code:
Under your variable ‘channel,' add another channel variable (with a human-readable name!):
2. Connecting RF Code to Motion Detection
The PubNub subscription API requires the definition of 5 functions: callback, error, connect, reconnect, and disconnect. In general, using the data in a PubNub message will mean putting code in the Callback function.
Inside of
Add a conditional statement waiting for the proper flag. In this case, we assume a motion detector will publish a message with a key “motion” set to either 0 or 1, depending on whether it detects motion.
Check the dashboard to see what kind of values your chosen device is publishing.
Then, nested within that conditional statment, paste the entirety of the While Loop created in Section 2.
3. Instantiating Subscription
Skip down several lines, past the definition of the disconnect function. Here, we're now at the beginning of the code that will actually be run.
As before, settle the sensor and wait.
Then, call the pubnub.subscribe function, passing in the variable for your subscription channel:
