Raspberry Pi can enable you to create a crazy amount of IoT prototypes. Ever wanted to build your own smart garage door or mirror? How about a smart receptionist or virtual assistant?
This 6 step tutorial will get you started!
We’ve published several Raspberry Pi tutorials and demos recently. However, many of them were aimed at folks who already had a bit of experience with Raspberry Pi. This is for all of you who are fairly new to Raspberry Pi.
So welcome to Internet of Things 101, where we’ll get started with Raspberry Pi and take the baby steps to prototyping your ideas!
Let’s get started!
What Can You do with Raspberry Pi?
One of the first questions often brought up is how Raspberry Pi differs from other boards like Arduino, Atmel MCU, or Tessel. Raspberry Pi is a fully-functional single-board computer with a Broadcom processor, while others are microcontroller-based physical computing platforms. On Raspberry Pi, you can run operating system like Linux, FreeBSD, and even Windows 10 from a micro SD card. Plug it into a monitor, keyboard, and a mouse, you have a full graphical user-interface of an OS of your choice. You can think of Raspberry Pi as a low-cost little computer with programmable I/O pins where you can attach physical devices and sensors, so you can prototype your dreams, a smart home, for instance, all on your own.What You Need to Get Started
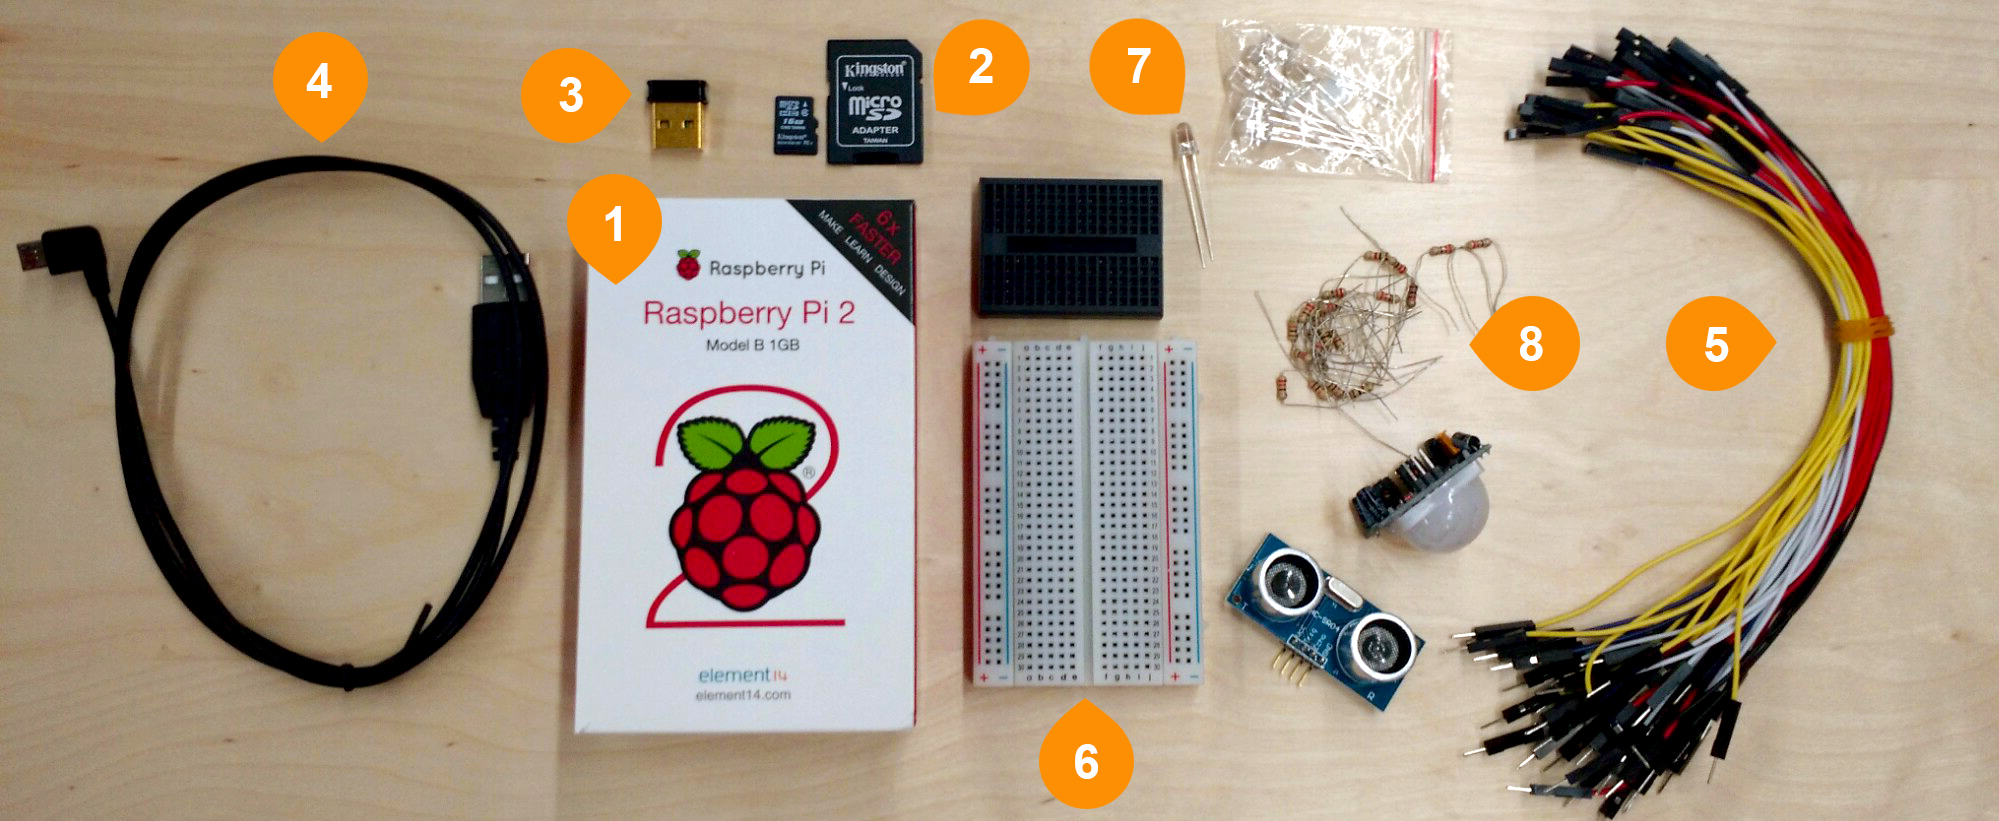
First of all, you need to get yourself some fun toys to get started. Assume you already have a monitor with an HDMI input and cable, a USB mouse and a keyboard. Here is the list of what you’ll need- Raspberry Pi 2
- Micro SD card (and an adaptor)
- Mini Wi-Fi adapter
- Micro USB cable
- Wires
- Breadboard
- LED
- Resistors
Step 1| Setting Up Raspberry Pi
First, you need to format and load it with an operating system (let's get Raspbian). Then, connect all the peripherals to your Pi and install the OS. I created a documentation for how to set up on GitHub based on our Pi Workshop we put on at IoT Stream Conf in April. (Follow @PubNub for up-to-date info, if you would like to attend our next workshop!) Go ahead, and follow the Step 0 (Skip this step if you bought your kit from CanaKit, because your SD card is pre-loaded).
Step 2 | Hello World: First Coding from Pi
Let's start coding from Pi! You can program in multiple languages like C++, Java, etc with Pi, but let's walk through with Python for now.Setting Up PubNub Python Library
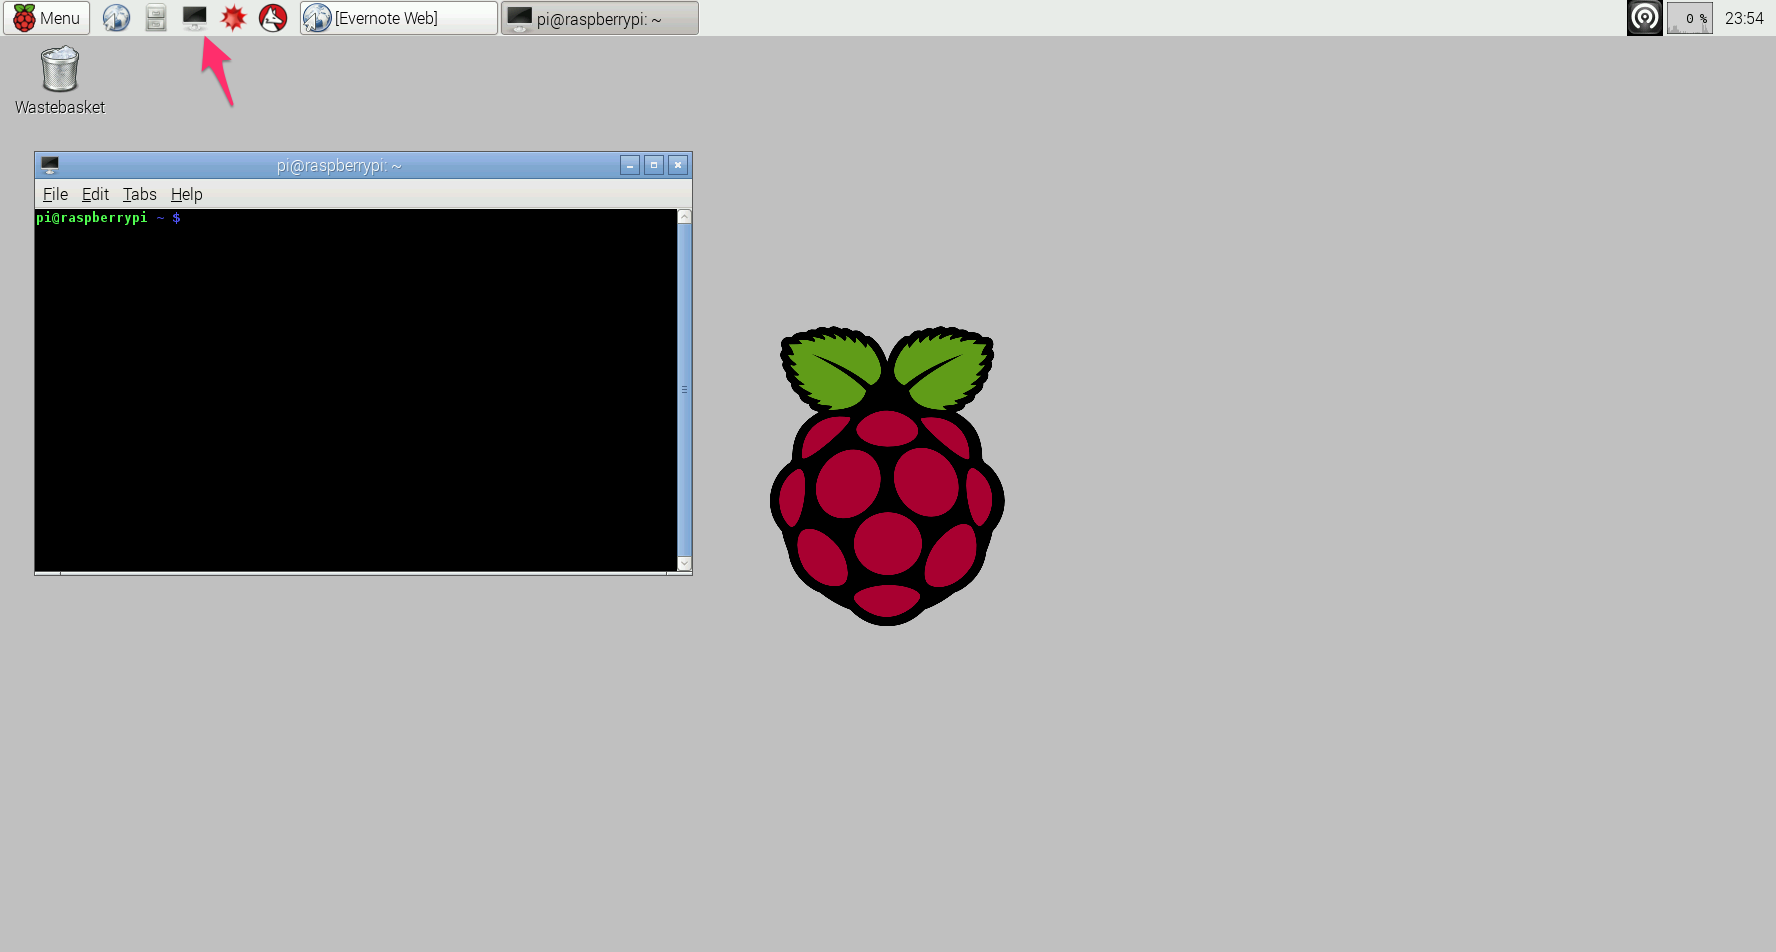 Open LXTerminal, and download and install the following: Install Python:
pi@raspberrypi ~$ sudo apt-get install python-dev Install pip:pi@raspberrypi ~$ sudo apt-get install python-pip install PubNub:pi@raspberrypi ~$ sudo pip install pubnub Hello World with PubNub Python APIs
If you haven't gotten your PubNub account, create a free account! Open Python 2 IDE. Then, in Python Shell, open a new window. (File > New Window). In the new window, write your first hello world: Let's save it as hello.py, and try running the script: On terminal, run this code:$ sudo python hello.py This sends a Hello World message to PubNub data stream. To monitor the data streaming to PubNub Data Stream Network, use Debug Console. Now, you know how to send data from Pi to PubNub network. Later, in this series of Raspberry Pi articles, you will use some sensors to get data from the real world. You can publish the data in the same manner. Next, you are going to wire up with a LED. Step 3 | Turning on LED: Hello World of Hardware
Assembling a Circuit
To get started with wires and a breadboard, make a simple circuit that connects a Pi's 3.3v pin to an LED to light it up. What you need:- 1 LED light (Somewhere around 1.9V - 3.2V, depending on the color of your choice)
- 1 Resistor ~200Ω
- Breadboard
- 2 M-to-F jumper wires, 2 colors
- Black wires for ground
- Red wires for voltage
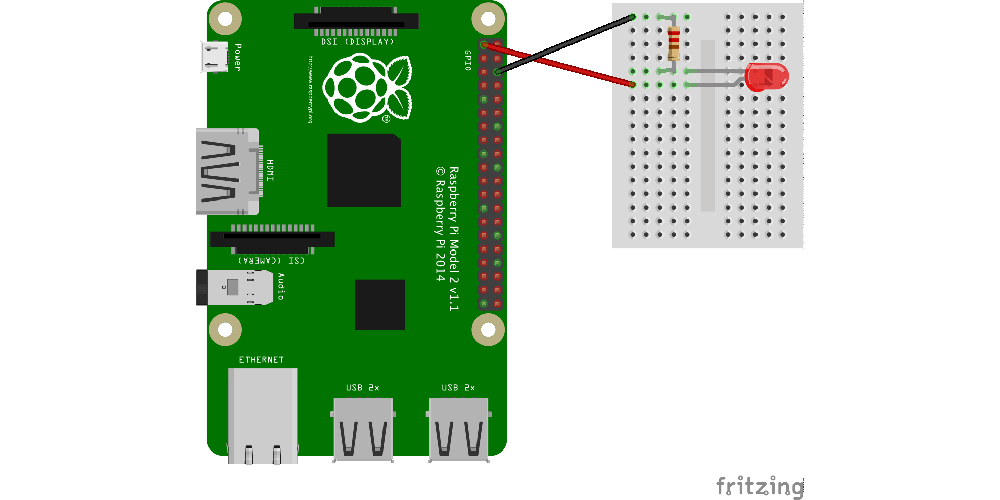
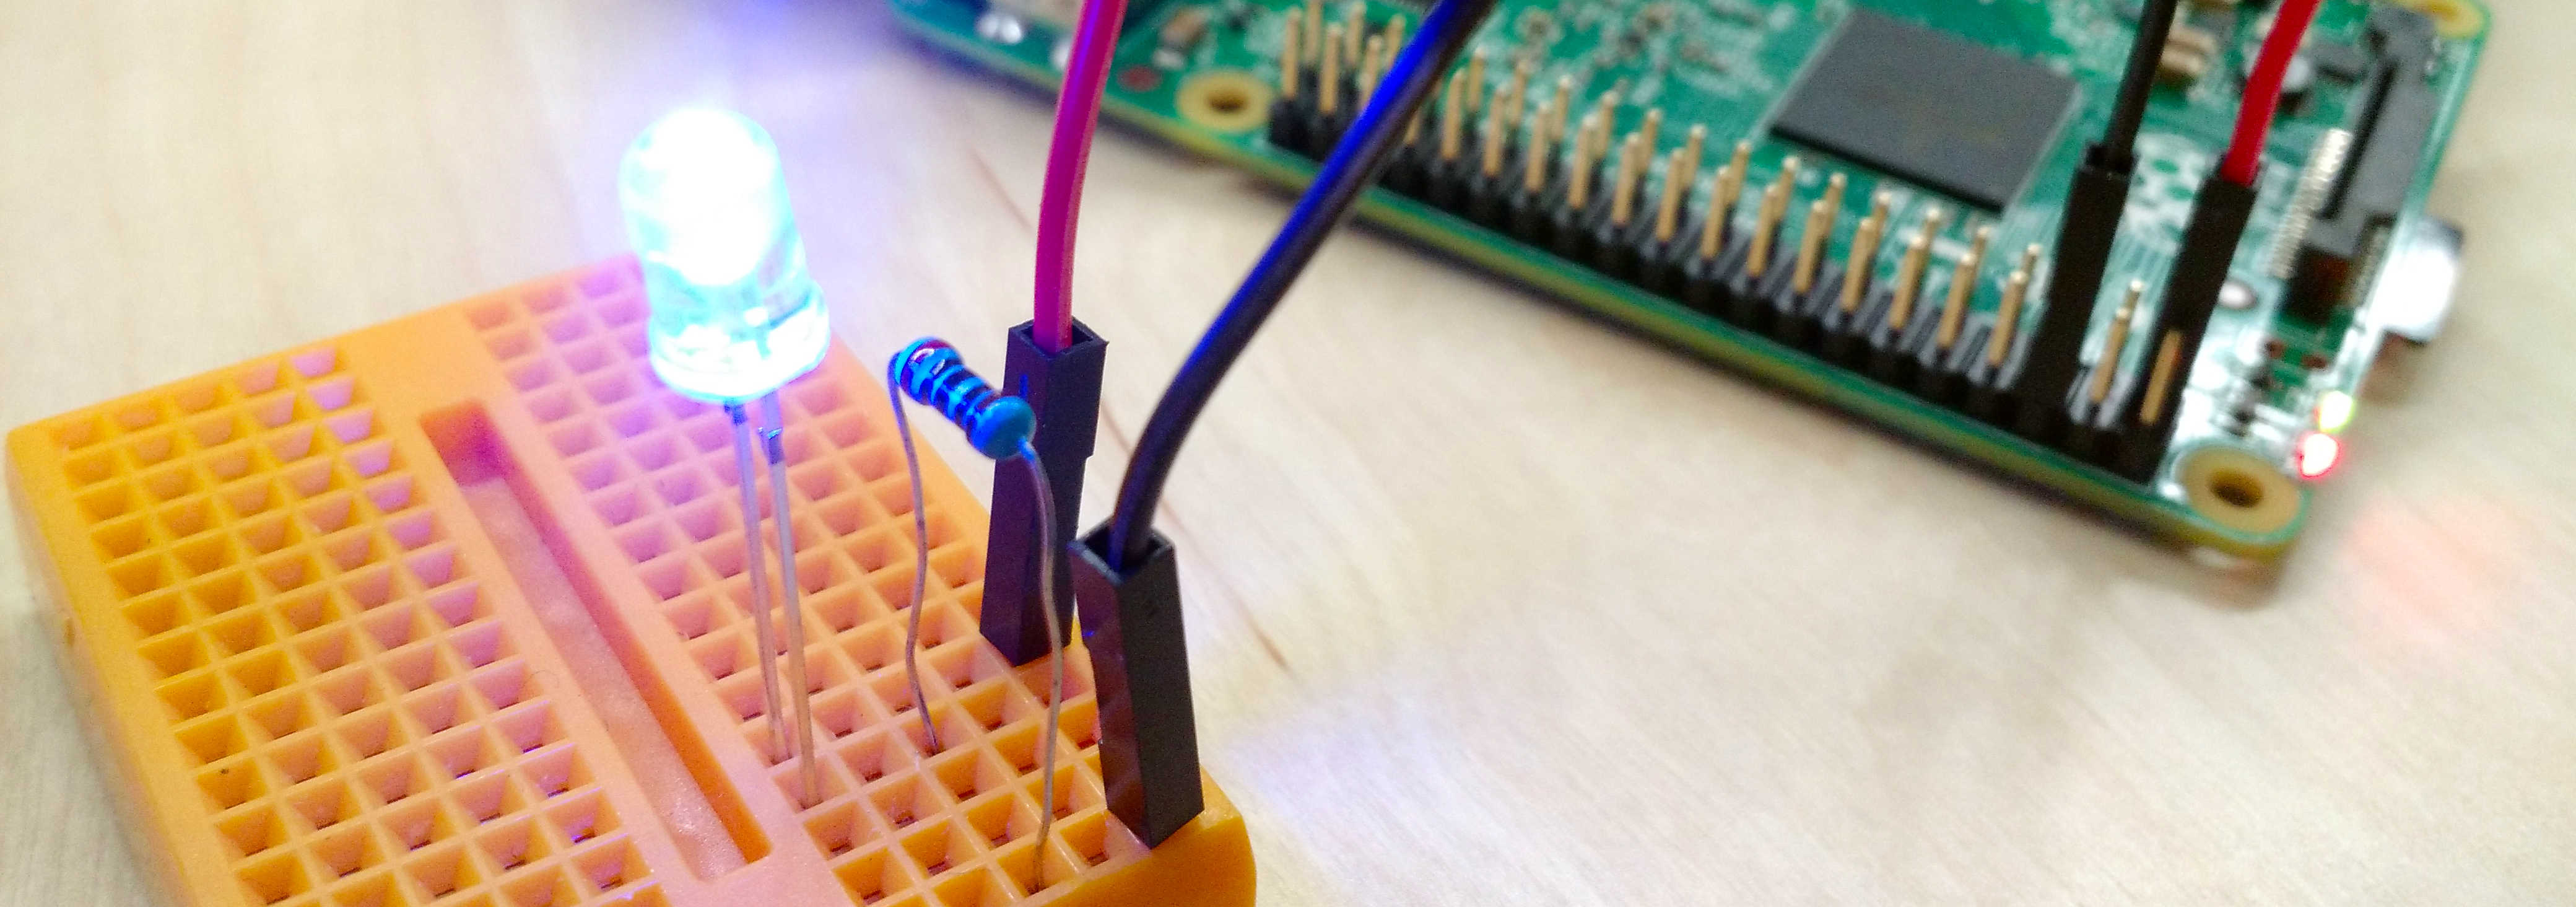 Next step is you make the LED circuit programmable. Take the red wire off the 3.3V, and re-wire it to a GPIO pin (in this example, GPIO 4, at Physical pin 7; There are two different pin number schemes!)
 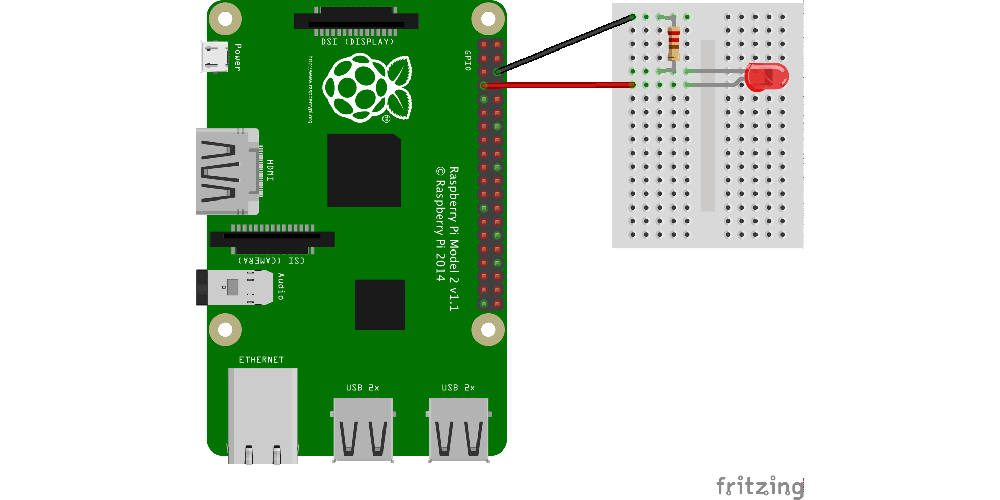 You can find a step-by-step instruction on how to wire with photos on the GitHub repo mentioned earlier.
 Step 4 | Programming The LED With Python
Once you connect the LED to GPIO 4 pin, program it to blink. This is the entire code: Let's walk through the code- Line 1 and 2: RPi.GPIO is a library of commands used to easily control the Pi's GPIO pins, and time is a common library, used here to create delays of specific length. Line 4 and 5: Set the pin designation type to GPIO.BCM to use BCM numbering convention. Then tell the program that the LED to connected to GPIO 4 (You can switch to GPIO.BOARD if you rather use the physical pin number). Line 7: GPIO pins act as either digital inputs or outputs, so you need to tell Pi to switch the pin from LOW to HIGH, outputting a signal. Set the LIGHT to be an output. Line 9 and the rest: Blinking the LED by toggling the state true (send HIGH signal), and false (LOW). Save it as led.py and run the program:$ sudo python led.py The LED should keep blinking until you kill the program. Step 5 | IoT-fying the LED: Remote-controlling from Web Interface
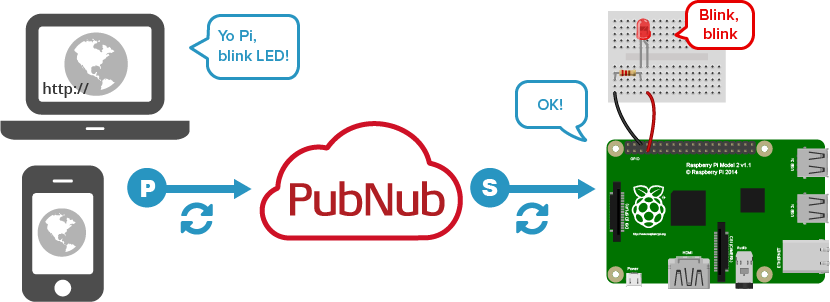
Now, let's transform it to a remote-controllable LED using PubNub APIs! You are writing two independently operated programs:- Web/mobile interface to remotely blink the LED in HTML and JavaScript. disco.html
- Pi to physically blink the LED in Python. remote-led.py
Publishing Data from Web
Now you are building a web interface to communicate your Pi via PubNub Data Stream Network, using PubNub JavaScript APIs. First, include the latest pubnub.js in your HTML: Let's make it really simple- the web interface only has a button that a user will interact with. There are more sophisticated ways to send the state of the light, but for this exercise, let's just simply send a trigger each time a user press a button. In JavaScript, add a click event handler to the button, and when the event is fired ("clicked"), send data to PubNub as a trigger so that python code can receive the data and talk to Raspberry Pi. Once initialized PubNub, you can just publish the trigger ("Button is pressed!"): The entire source code with CSS is on github repo, also you can preview the UI on GitHub pages too.Step 6 | Subscribing The Data To Pi
Whenever a button is clicked by a user, browser sends{led: 1} to PubNub server, then a python code to talk to Pi receive the data and triggers the LED. Let's modify the led.py. Then at the success callback (_callback), blink the LED: The entire source code is on github, so you can take a look at. Last Step/Recap
Okay! Once you are ready, open the html file in a browser and press the button. Voilà, your LED should blink six times! Just follow these 6 steps and you’ve got yourself a functioning prototype.This is a very simple operation, however, it should open up your imaginations for your next projects. Let us know what awesome prototypes you create by commenting below or hit us up on Twitter! Okay! Once you are ready, open the html file in a browser and press the button. Voilà, your LED should blink six times! This is very simple operation, however, it should open up your imaginations for your next projects. Share with us when you come up with awesome ideas!Read more: Motion-controlled Servos with Leap Motion & Raspberry Pi
