Create a IoT UV Index Monitor with Mobile Push Notifications
Sunburns are terrible for you. The high energy UVB rays from the sun can cause mutations in your genes, and a single sunburn is enough to increase your risk for melanoma. As few as five sunburns nearly doubles your risk for melanoma. The damage to your DNA stacks up over time, and it's important you use protection when you go outside to mitigate the damage to your skin. Unfortunately, sunscreen sucks. It’s sticky, oily, and somehow you always manage to miss a spot on your back only to painfully realize it later. What if there were another way? What if you knew when it was safe to be outside in the open and when to retreat to the shade?
These questions occurred to me recently as I patiently fished on the beach on the Outer Banks of North Carolina while slowly baking myself in the sun’s rays. Initially, it was easy to consider not using sunscreen. Who in their right mind likes to lather on greasy and stinky sunscreen, and why does every brand of sunscreen lie about not being this awful? It didn’t take long for my shoulders to sting in the hot summer sun. After taking cover in the shade, I give up and submit to putting on a tiny amount of the dreadful white goop, despite how badly I didn’t want to. In order to avoid putting on more sunscreen, I needed a plan.
Each time a sizable cloud passed over the sun, I could feel a tangible relief from the harsh rays. When I had enough sun, I took cover under a canopy and waited for the clouds to bring relief again. This game of solar chicken continued for the duration of my fishing trip. What I needed was a way to track the intensity of the sun in real time. Knowing this information would make it simple to avoid the sun and plan around solar conditions.
Getting Started

First, we need a way to transmit and retrieve UV index values. PubNub provides an easy way to get IoT projects, like this one, working with minimal effort by allowing us to simply publish our data to the PubNub service and then subscribe to retrieve it in real time. PubNub supports over 70 SDKs and has features like mobile push notifications and Project EON that we can take advantage of in this project.
Developers use PubNub’s Pub/Sub for:
- Chat messaging applications.
- Real-time updates like GPS location for ride-share apps.
- IoT device signaling.
- Real-time monitoring dashboards.
- Live audience interaction for classrooms and televised events.
PubNub lets you focus on building a functional solution for the issue instead of taking the time to set up a backend. Now that we have a method to transmit and receive UV index values, we can break the UV Index Monitor into a few main components:
- UV sensor that publishes the UV index to PubNub.
- RGB LED UV Index Indicator. The LED should change color with the current UV index value it retrieves by subscribing to PubNub.
- Project EON powered dashboard showing UV index updates in real time.
- An iOS and Android app built in React Native with Mobile Push Notifications.
This tutorial will walk you through how to create the main components of the UV Index Monitor. The full GitHub code repository can be found here. If you’re looking for a quicker way to get started, you should check out the readme.
Setup Arduino and PubNub Arduino SDK for UV Sensor and Indicator
You’ll first need to sign up for a PubNub account. Once you sign up, you can get your unique PubNub keys from the PubNub Admin Dashboard.
PubNub offers an Arduino SDK that’s perfect for the sensor and indicator parts of this project. Two ESP8266 development boards, an Analog UV Light Sensor, an RGB LED (common cathode), two breadboards, and some jumper wires are all we need for both our sensor and UV indicator.
- Download the latest Arduino IDE.
- Install Silicon Labs CP210x USB to UART Bridge driver for your OS.
- Update the Arduino Board Manager with a custom URL. Open up Arduino and then go to the Preferences (File > Preferences). Then, towards the bottom of the window, copy this URL into the “Additional Board Manager URLs” text box:
http://arduino.esp8266.com/stable/package_esp8266com_index.json
- Navigate to the Board Manager by going to Tools > Boards > Boards Manager. Search for ESP8266. Click on that entry, then select Install.
- Connect your ESP8266 Development board and select it by going to Tools > Boards menu. You may need to select the correct port.
- Verify that everything works by uploading the blink sketch. The built-in led should be blinking.
- Install the PubNub Arduino SDK by going to Sketch > Include Library > Manage Libraries. Search for PubNub. Click on that entry, then select Install.
- Test the ability for your ESP8266 Development board to connect to PubNub by uploading this gist to your development board with the Arduino IDE. Replace “your-ssid” and “your-password” with the SSID and password for your WiFi network. Get your unique PubNub keys from the PubNub Developer Portal. If you don't have a PubNub account, you can sign up for a PubNub account for free. Replace “pub-key” and “sub-key” with your keys.
Build the UV Sensor
The UV index sensor should read the current UV index level once per minute and publish the value to PubNub when the value changes and at least once every 10 minutes.
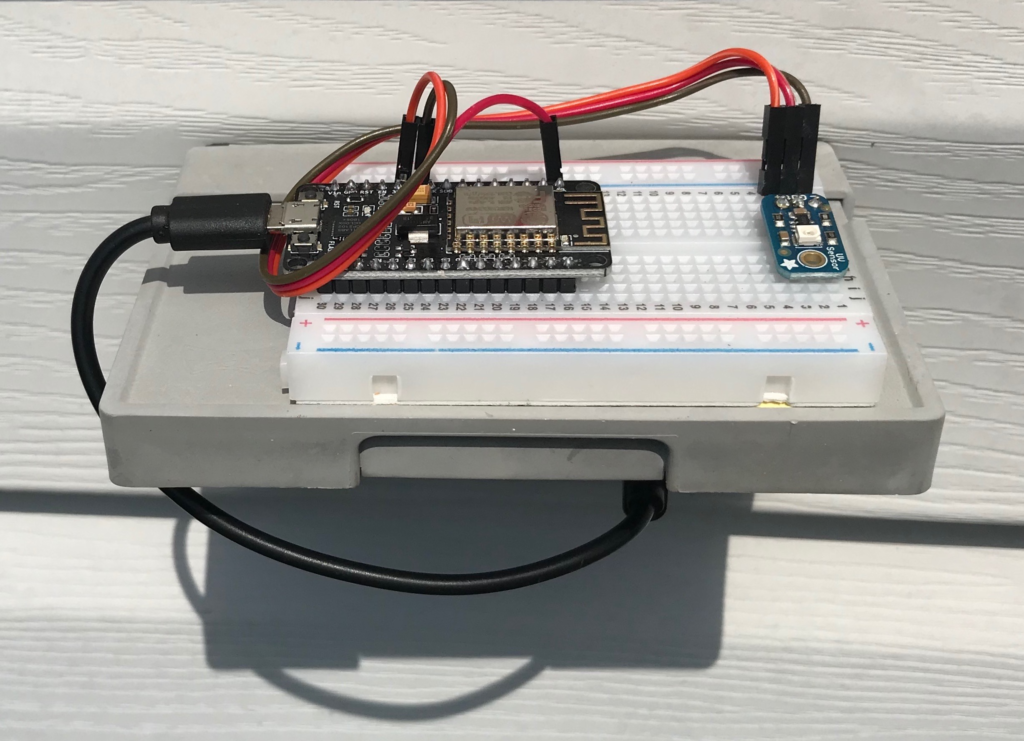
Connect the positive pin of the UV sensor to a 3.3v pin on your development board and connect the ground pin of the UV sensor to a ground pin on your development board. Connect the output of the UV sensor to the analog input on your development board (A0).
Test the sensor by going to File > Examples > 01.Basics > AnalogReadSerial. Upload the sketch and check the Serial Monitor for values.
Create a new sketch by going to File > New.
Include the ESP8266 and PubNub libraries. Declare WiFi config, variables for storing the UV index values and variables for timing when values are published to Pubnub. Add before the setup() function. Change “Sensor Network” and “sens0rpassw0rd” to match your WiFi settings.
#include <ESP8266WiFi.h>
#define PubNub_BASE_CLIENT WiFiClient
#include <PubNub.h>

const static char ssid[] = "Sensor Network";
const static char pass[] = "sens0rpassw0rd";
int sendTimer;   // Timer used to control how often messages are published. Sends a new message once every 10 minutes.
int sensorTimer; // Timer used to control how often sensor is checked. Checked every 60 seconds.
float sensorValue; // Value from sensor.
int lastuvindex; // UV index on previous loop.
int uvindex; // Value from sensor converted to UV index.
In the setup() function you’ll need to begin a WiFi session and then initialize PubNub. Get your unique PubNub keys from the PubNub Developer Portal. If you don't have a PubNub account, you can sign up for a PubNub account for free. Replace “pub-key” and “sub-key” with your keys.
void setup() {
    Serial.begin(9600);
    WiFi.begin(ssid, pass);
    if(WiFi.waitForConnectResult() == WL_CONNECTED){
        Serial.println("WiFi connected.");
        PubNub.begin("pub-key", "sub-key");
    } else {
        Serial.println("Couldn't get a wifi connection.");
        while(1) delay(100);
    }
}
In the loop() function, create a timer to check the sensor every 60 seconds and a second timer to send a message at least once every 10 minutes.
Next, read the sensor value, convert it to UV index, and then publish it to the “uvindex” channel with PubNub.
void loop() {
    sensorTimer = (sensorTimer + 1); // Add a second to the sensor timer.
    if (sensorTimer == 60) { // Check sensor.
      sensorTimer = 0; // Reset timer.
      sendTimer = (sendTimer + 1); // Add a minute to sendTimer.
      if (sendTimer == 10) { // Reset timer after 10 minutes.
        sendTimer = 0; // Reset timer.
      }
      sensorValue = analogRead(A0); // Read sensor. Convert to UV index.
      if ((sensorValue >= 0) && (sensorValue < 20)) {
        uvindex = 0;
      }
      else if ((sensorValue >= 20) && (sensorValue < 65)) {
        uvindex = 1;
      }
      else if ((sensorValue >= 65) && (sensorValue < 83)) {
        uvindex = 2;
      }
      else if ((sensorValue >= 83) && (sensorValue < 103)) {
        uvindex = 3;
      }
      else if ((sensorValue >= 103) && (sensorValue < 124)) {
        uvindex = 4;
      }
      else if ((sensorValue >= 124) && (sensorValue < 142)) {
        uvindex = 5;
      }
      else if ((sensorValue >= 142) && (sensorValue < 162)) {
        uvindex = 6;
      }
      else if ((sensorValue >= 162) && (sensorValue < 180)) {
        uvindex = 7;
      }
      else if ((sensorValue >= 180) && (sensorValue < 200)) {
        uvindex = 8;
      }
      else if ((sensorValue >= 200) && (sensorValue < 221)) {
        uvindex = 9;
      }
      else if ((sensorValue >= 221) && (sensorValue < 240)) {
        uvindex = 10;
      }
      else if (sensorValue >= 240) {
        uvindex = 11;
      }
      if ((lastuvindex != uvindex) || (sendTimer == 0)) { // Send a new message if sendTimer was reset or if UV index has changed.
        lastuvindex = uvindex; // Save the UV index.
        sendTimer = 0; // Reset timer.
        PubNub_BASE_CLIENT *client;
        Serial.println("publishing a message");
        char msg[64] = "{\"eon\":{\"uvindex\":";
        sprintf(msg + strlen(msg), "%d", uvindex);
        strcat(msg, "}}");
        client = PubNub.publish("uvindex", msg);
        if (!client) {
            Serial.println("publishing error");
            delay(1000);
            return;
        }
        while (client->connected()) {
            while (client->connected() && !client->available());
            char c = client->read();
            Serial.print(c);
        }
        client->stop();
        Serial.println();
      }
    }
    delay(1000);
}
Upload the sketch. Use the Serial Monitor to verify you're able to connect to WiFi and publish your sensor readings to PubNub.
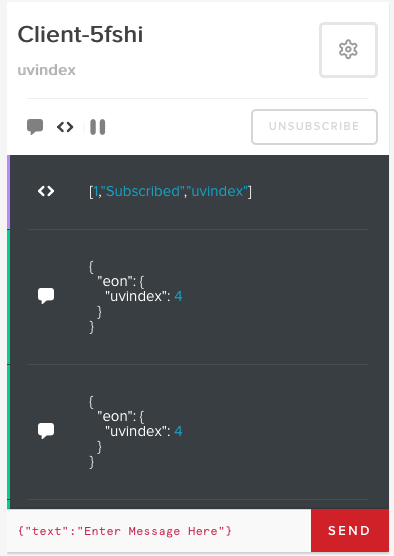
Verify the sensor readings are making it to PubNub by going to your PubNub Admin Dashboard, select the keys you created previously, and create a client in the Debug Console. Set the “Default Channel” to “uvindex” and leave the other fields blank. Click “ADD CLIENT”. You should see a message with the current UV index within 10 minutes or if the sensor reading changes. You can also reset the development board to force it to resend the current UV index value after a 60-second delay.
Move your UV index sensor to a sunny location within range of WiFi. If you need to place your sensor in a place without power, you could use a USB power bank to deliver power to your development board.
Find the complete version of the sketch in the GitHub repo.
Build the UV Index Indicator
The UV Index Indicator subscribes to the “uvindex” channel and displays the UV index value using color. 0 = off, 1-2 = green, 3-5 = yellow, 6-7 = orange, 8-10 = red, and 11+ = purple.
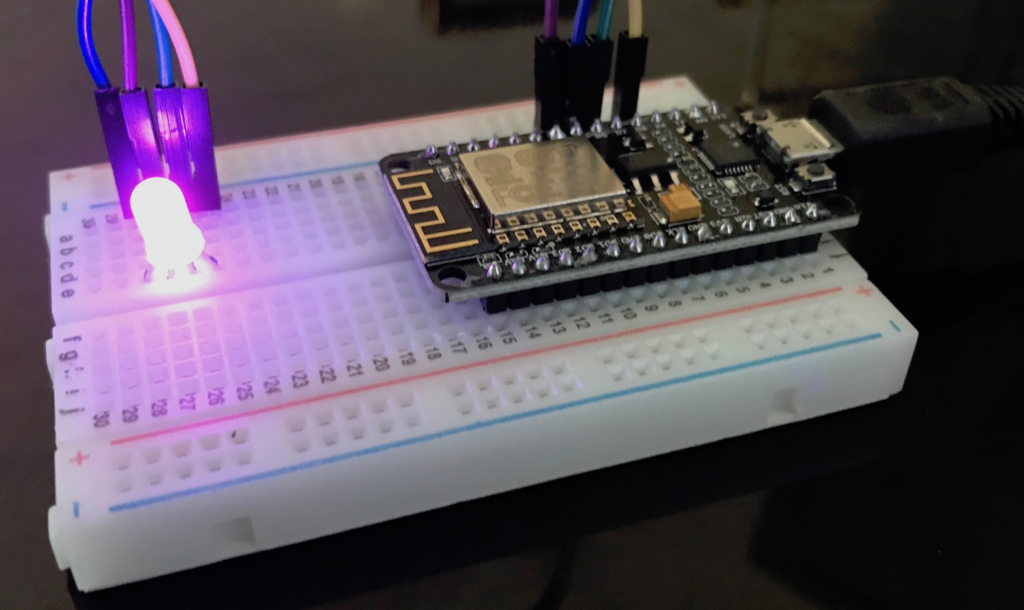 Connect the common ground on the RGB LED to ground on your development board. Connect the red pin to pin 14, green pin to pin 12, and blue pin to pin 15.
Create a new sketch by going to File > New.
Include the ESP8266 and PubNub libraries. Declare WiFi config, set the pins for the LED, and create a variable for storing the UV index value.
#include <ESP8266WiFi.h>
#define PubNub_BASE_CLIENT WiFiClient
#include <PubNub.h>

const static char ssid[] = "Sensor Network";
const static char pass[] = "sens0rpassw0rd";
int sendTimer;   // Timer used to control how often messages are published. Sends a new message once every 10 minutes.
int sensorTimer; // Timer used to control how often sensor is checked. Checked every 60 seconds.
float sensorValue; // Value from sensor.
int lastuvindex; // UV index on previous loop.
int uvindex; // Value from sensor converted to UV index.
In the setup() function, you’ll need to begin a WiFi session and then initialize PubNub. Get your unique PubNub keys from the PubNub Developer Portal. If you don’t have a PubNub account, you can sign up for a PubNub account for free. Replace “pub-key” and “sub-key” with your keys.
void setup() {
    Serial.begin(9600);
    WiFi.begin(ssid, pass);
    if(WiFi.waitForConnectResult() == WL_CONNECTED){
        Serial.println("WiFi connected.");
        PubNub.begin("pub-key", "sub-key");
    } else {
        Serial.println("Couldn't get a wifi connection.");
        while(1) delay(100);
    }
}
In the loop() function, you’ll need to subscribe to the “uvindex” channel, extract the UV index from the messages you receive, and set the color of the light.
void loop() {
    PubNub_BASE_CLIENT *client;

    Serial.println("waiting for a message (subscribe)");
    PubSubClient *pclient = PubNub.subscribe("uvindex"); // Subscribe to the UV index channel for values.
    if (!pclient) {
        Serial.println("subscription error");
        delay(1000);
        return;
    }
    String message;
    while (pclient->wait_for_data()) {
        char c = pclient->read();
        //Serial.print(c);
        message = message+String(c); // Append to string.
    }
    pclient->stop();
    // Get UV index value.
    if(message.indexOf("uvindex") > 0) { // Ensure the message contains the UV index (prevents a unexpected message from turning off the led).
      uvindex = message.substring(19, message.length() - 4).toInt(); // Remove characters before and after value.
    };
    // Set the color of the led based on the UV index.
    if ((uvindex >= 0)  && (uvindex < 1)) { // None 0 Off
        analogWrite(rled, 0);
        analogWrite(gled, 0);
        analogWrite(bled, 0);
    } else if ((uvindex >= 1) && (uvindex < 3)) { // Low 1-2 Green
        analogWrite(rled, 0);
        analogWrite(gled, 255);
        analogWrite(bled, 0);
    } else if ((uvindex >= 3) && (uvindex < 6)) { // Moderate 3-5 Yellow
        analogWrite(rled, 255);
        analogWrite(gled, 255);
        analogWrite(bled, 0);
    } else if ((uvindex >= 6) && (uvindex < 8)) { // High 6-7 Orange
        analogWrite(rled, 255);
        analogWrite(gled, 120);
        analogWrite(bled, 0);
    } else if ((uvindex >= 8) && (uvindex < 11)) { // Very High 8-10 Red
        analogWrite(rled, 255);
        analogWrite(gled, 0);
        analogWrite(bled, 0);
    } else if (uvindex >= 11) { // Extreme 11+ Purple
        analogWrite(rled, 85);
        analogWrite(gled, 0);
        analogWrite(bled, 85);
    };
    Serial.print("UV Index: ");
    Serial.print(uvindex);
    Serial.println();
    delay(5000);
}
The GitHub repo contains a complete version of the sketch and includes an example of how to parse JSON to get the UV index value. Follow the instructions in the comments for how to enable the JSON parsing library.
Setup the Dashboard
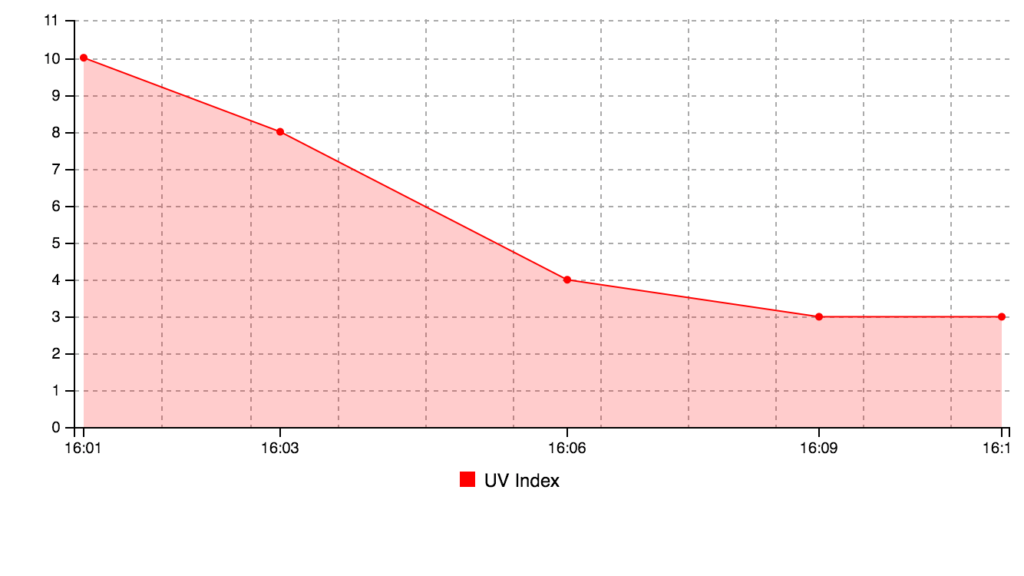
The dashboard is powered by Project EON and shows the last five values from the UV index sensor. To set up your own dashboard, you'll need to fork this repo and set up a new gh-pages site. Alternatively, you can host index.html in another location and follow step 3 below to configure.
 Fork this repo and clone.
Switch to the gh-pages branch:
git checkout gh-pages
Get your unique PubNub keys from the PubNub Admin Dashboard. If you don't have a PubNub account, you can sign up for a PubNub account for free. Edit index.html and replace the subscribe key with your key.
Commit to your gh-pages branch to update your subscribe key and trigger a page build.
git add index.html
git push origin gh-pages
Your copy of the dashboard should now be online. Learn more about how to set up a GitHub Pages site here.
Create the React Native App
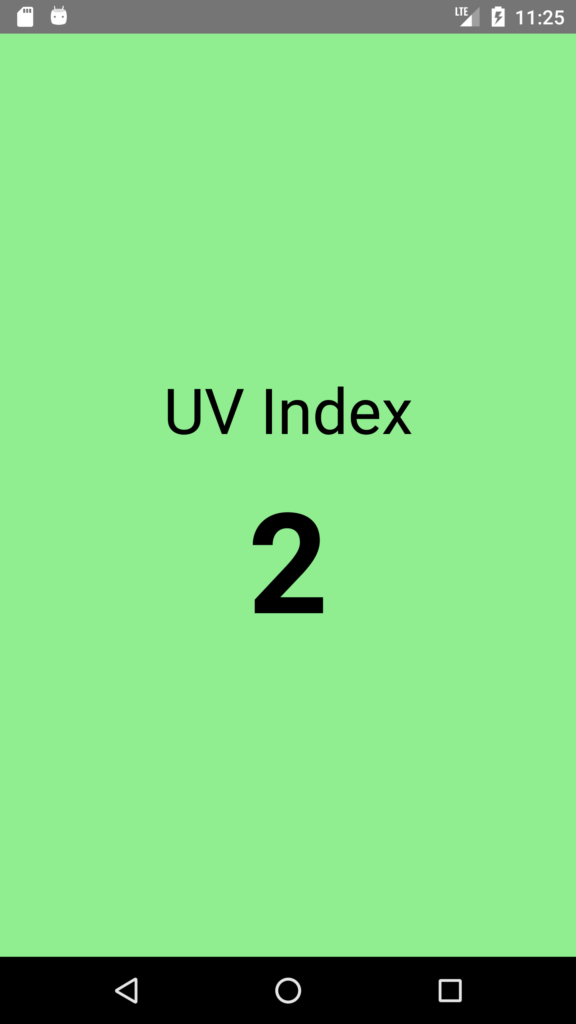
When the app is first opened, it retrieves the last UV index value and displays that value, so the user doesn't have to wait for the sensor to send a new message. Then each time the UV index is updated, the app should refresh to display the new value. The app also displays the dashboard chart when the app is in landscape orientation.
Install React Native. Be sure to follow the guide for “Building Projects with Native Code” to be able to install on a device.
Create a new React Native project.
react-native init UVINFO
Move into the project directory and install PubNub React SDK.
cd UVINFO
npm install --save pubnub pubnub-react
Edit App.js and remove the instructions constant, any existing views inside render(), and any existing styles. The result should be a blank project template.
import React, {Component} from 'react';
import {Platform, StyleSheet, Text, View} from 'react-native';
type Props = {};
export default class App extends Component<Props> {
  render() {
    return (
    );
  }
}
const styles = StyleSheet.create({
});
Update imports to include the libraries used in this project.
import React, {Component} from 'react';
import {StyleSheet, Text, View, Dimensions, WebView} from 'react-native'
import PubNubReact from 'pubnub-react';
Initialize state and PubNub. Add the constructor inside the App component and before the render() function. Get your unique PubNub keys from the PubNub Admin Dashboard. If you don't have a PubNub account, you can sign up for a PubNub account for free. Replace “sub-key” with your key.
constructor(props) {
    super(props);
    this.state = {
         uvindex: 0,
         uvindexcolor: '#90EE90',
         hidewebview: false,
      }
    // Init PubNub. Use your subscribe key here.
    this.pubnub = new PubNubReact({
        subscribeKey: 'sub-key'
    });
    this.pubnub.init(this);
  }
Add views to the render() function. Replace “” with the url for your dashboard.
//Display the UV Index
<View style={[styles.container, {backgroundColor: this.state.uvindexcolor}]} onLayout={(event) => this.DetectOrientation()}>
  <Text style={styles.welcome}>UV Index</Text>
  <Text style={styles.uvindex}>{this.state.uvindex}</Text>
  {
    this.state.hidewebview ?
    <View style={styles.webcontainer}>
      <WebView
        style={styles.webview}
        source={{uri: 'https://uvindex.chandlermayo.com/'}}
        scalesPageToFit
        javaScriptEnabled
        domStorageEnabled
        startInLoadingState/>
    </View> : null
  }
</View>
Add styles for the views.
container: {
  flex: 1,
  justifyContent: 'center',
  alignItems: 'center',
},
welcome: {
  fontSize: 45,
  margin: 10,
  paddingTop: 25,
  color: '#000000',
},
uvindex: {
  fontSize: 100,
  marginBottom: 15,
  fontWeight: 'bold',
  color: '#000000',
},
webcontainer: {
  top: 0,
  left: 0,
  bottom: 0,
  right: 0,
  position: 'absolute',
  alignItems: 'flex-start',
},
webview: {
  top: 0,
  left: 0,
  position: 'absolute',
  height: '100%',
  width: '100%',
},
Add functions to subscribe, unsubscribe, and retrieve history for the “uvindex” channel. Add function to update text label and app background color. Finally add a function to hide and show the webview based on the device orientation. Add inside the App component, after the constructor, and before render().
componentWillMount() {
  // Subscribe to uvindex channel and get messages.
  this.pubnub.subscribe({
      channels: ['uvindex']
  });
  // Update when a new value is received.
  this.pubnub.getMessage('uvindex', (msg) => {
    this.UpdateUV(msg.message.eon.uvindex)
  });
  // Get and display last UV Index value.
  this.pubnub.history(
    {
        channel: 'uvindex',
        count: 1,
    },
    function (status, response) {
      if (status.statusCode == 200) {
        this.UpdateUV(response.messages[0].entry.eon.uvindex)
      }
    }.bind(this)
  );
}
componentWillUnmount() {
  // Unubscribe to uvindex channel.
  this.pubnub.unsubscribe({
      channels: ['uvindex']
  });
}
componentDidMount(){
  // Check the device orientation on load.
  this.DetectOrientation();
}
DetectOrientation(){
  // Hide and show webview.
  if(Dimensions.get('window').width > Dimensions.get('window').height) // Landscape - Show webview.
  {
    this.setState({
      hidewebview: true,
    });
  } else { // Portrait - Hide webview.
    this.setState({
      hidewebview: false,
    });
  }
}
// Update the UV Index label and set background color.
UpdateUV(uvindex){
  this.setState({uvindex: uvindex})
  if (uvindex < 3) { // Low 0-2
    this.setState({uvindexcolor: '#90EE90'}); // Green
  } else if ((uvindex >= 3) && (uvindex < 6)) { // Moderate 3-5
    this.setState({uvindexcolor: '#FFFF00'}); // Yellow
  } else if ((uvindex >= 6) && (uvindex < 8)) { // High 6-7
    this.setState({uvindexcolor: '#FFBE4D'}); // Orange
  } else if ((uvindex >= 8) && (uvindex < 11)) { // Very High 8-10
    this.setState({uvindexcolor: '#FF9999'}); // Red
  } else if (uvindex >= 11) { // Extreme 11+
    this.setState({uvindexcolor: '#FF99FF'}); // Purple
  };
}
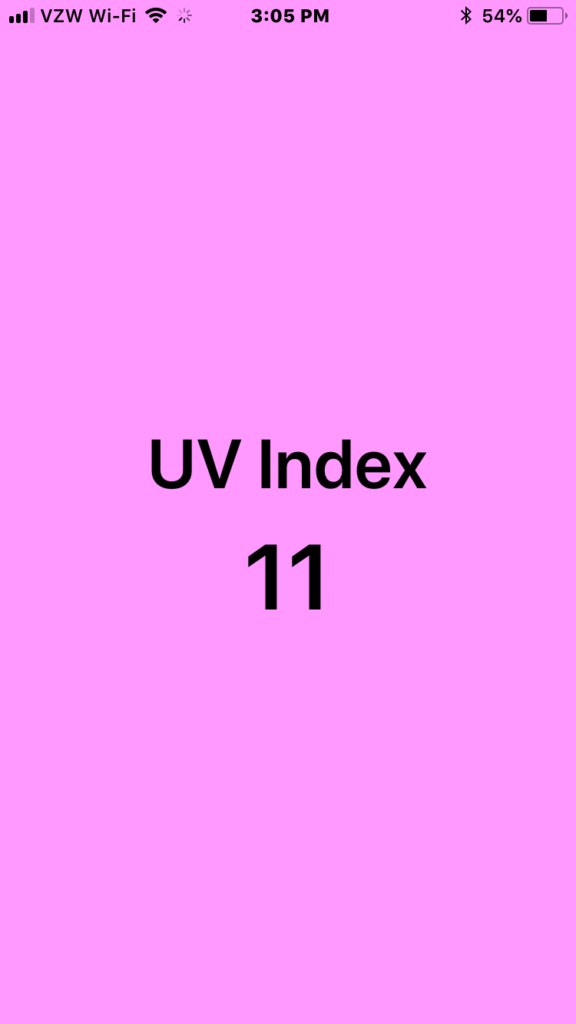 Test the app in the iOS simulator. It may take some time to build the project.
react-native run-ios
Follow this guide to install on your device (iOS or Android).
See the complete version of the app in the GitHub repo.
Setup Sensor for Push Notifications
Update the sensor sketch to send a push notification if the UV index is very high (>7) and a maximum of once every 15 hours.
Add a variable for the timer used to control how often a push notification can be sent.
int alertTimer; // Timer used to control how often a push notification can be sent.
Subtract a minute from alertTimer each time the sensor is checked.
if (alertTimer > 0) {
   alertTimer = (alertTimer - 1); // Remove a minute from the alertTimer.
}
Replace strcat(msg, “}}”); in loop() to send a message with push notification content if the UV index is very high (>7) and no notification has been sent in the last 15 hours.
For Android Push Notifications
if ((uvindex > 7) && (alertTimer == 0)) { // Send a push notification if the UV index is very high and no notification has been sent in the last 15 hours.
  alertTimer = 900; // Wait 15 hours before sending another push notification.
  strcat(msg, "},\"pn_gcm\":{\"notification\":{\"body\":\"The UV index is very high. Avoid the sun.\"}}}");
}
else {
  if (alertTimer > 0) {
    alertTimer = (alertTimer - 1); // Remove a minute from the alertTimer.
  }
  strcat(msg, "}}");
}
For iOS Push Notifications:
if ((uvindex > 7) && (alertTimer == 0)) { // Send a push notification if the UV index is very high and no notification has been sent in the last 15 hours.
  alertTimer = 900; // Wait 15 hours before sending another push notification.
  strcat(msg, "},\"pn_apns\":{\"aps\":{\"alert\":\"The UV index is very high. Avoid the sun.\"}}}");
}
else {
  if (alertTimer > 0) {
    alertTimer = (alertTimer - 1); // Remove a minute from the alertTimer.
  }
  strcat(msg, "}}");
}
Configure iOS Push Notifications
Bridge native PubNub publishing with Apple Push Notification Service for iOS push notifications with React Native. Requires paid enrollment in the Apple Developer Program.
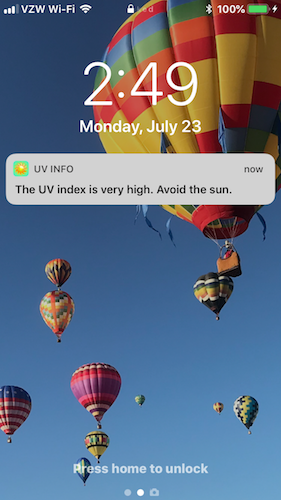 Provision APNS and PubNub with tokens.
Manually link the PushNotificationIOS library.
Get the token and register to a channel. Add inside componentWillMount().
 // Get token and subscribe for push notifications.
PushNotificationIOS.addEventListener('register', function(token){
  //console.log('You are registered and the device token is: ',token)
  this.pubnub.push.addChannels(
  {
    channels: ['uvindex'],
    device: token,
    pushGateway: 'apns'
  });
}.bind(this));
PushNotificationIOS.requestPermissions();
Install the app on a iOS device to test push notifications.
Configure Android Push Notifications
Bridge native PubNub publishing with Firebase Cloud Messaging for Android push notifications with React Native.
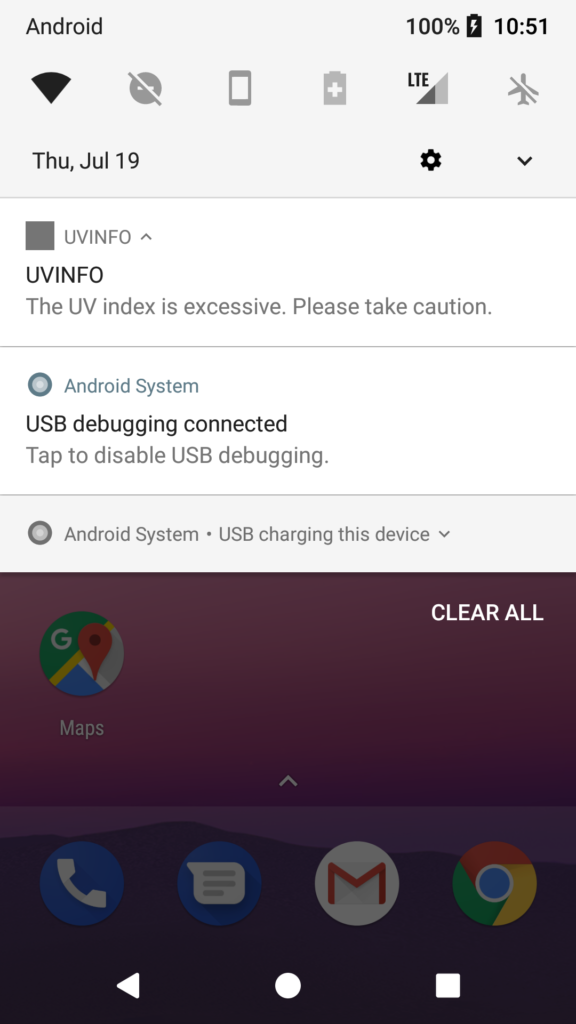
Please see our documentation for Android Mobile Push Notifications for full FCM set-up instructions for your app
Visit the Firebase console.Add a new project.
Enter project details and press the continue button.
Go to your PubNub Admin Dashboard and enable Mobile Push Notifications for your keyset. Enter the API key from the project you created in the Firebase console. You can find your API key under in the project settings.
Get the token and register to a channel. Add inside componentWillMount(). Refresh token when needed. Add inside componentDidMount(). Run the app in the Android Emulator or on a device to test push notifications.// Get token and subscribe for push notifications.
RNFirebase.messaging().getToken().then(fcmToken => {
if (fcmToken) {
// console.log(fcmToken)
this.pubnub.push.addChannels(
{
channels: ['uvindex'],
device: fcmToken,
pushGateway: 'gcm' // apns, gcm, mpns
});
}
});
// Get refreshed token and subscribe for push notifications.
this.onTokenRefreshListener = RNFirebase.messaging().onTokenRefresh(fcmToken => {
  // console.log(fcmToken)
  this.pubnub.push.addChannels(
  {
      channels: ['uvindex'],
      device: fcmToken,
      pushGateway: 'gcm' // apns, gcm, mpns
  });
});