In this tutorial, we’re going to show you how to create a simple IoT Twitter bot in five simple steps using Functions. However, before we do so, let’s explain what an IoT Twitter bot is and why someone would want to use it.
What Is an IoT Twitter Bot?
A Twitter bot is essentially software that controls a Twitter account via the Twitter API. This can perform actions like tweeting, liking, retweeting, and many more.
At PubNub, we have created a Twitter BLOCK that automatically creates a Twitter bot for you in Functions. This means that all you have to do is include the PubNub SDK into your code and fire your Function to post whatever you want to any of your Twitter accounts.
Some common Twitter Bot examples vary from simple bots that tweet the weather or when a new deal at a store, to bots that artificially interact with real users.
Why Are They Useful?
All you need is the PubNub SDK to use our Twitter BLOCK. This means that you can start having your IoT devices and their data interact with the unique globalization that social media offers. By this, I'm indeed implying that there is a difference between globalizing your IoT data through Twitter than other social mediums: a difference that is advantageous in many situations.
IoT Twitter Bot Example Use Case
Consider a scenario where you installed an IoT device for your own ride-share business that published geo-locations every 10 minutes. Now, every one of your clients can monitor your car fleet's traffic and availability by simply following your Twitter account. This reduces the friction involved in distributing the data, as your clients need only to press a follow button rather than install a front-end application.
Additionally, Twitter is a service already populated with many active users, and so distributing your data there is much easier than forwarding people to your custom front-end. Both of these factors maximize your data's audience and simplify digestion.
Let's Get Coding!
Below is a tutorial explaining how to connect a temperature/humidity sensor (or any IoT sensor) and Raspberry Pi with a Twitter Bot in five steps.
Here is this project's GitHub link for instructional reference.
What You'll Need

Step 1: Configure Your Sensor
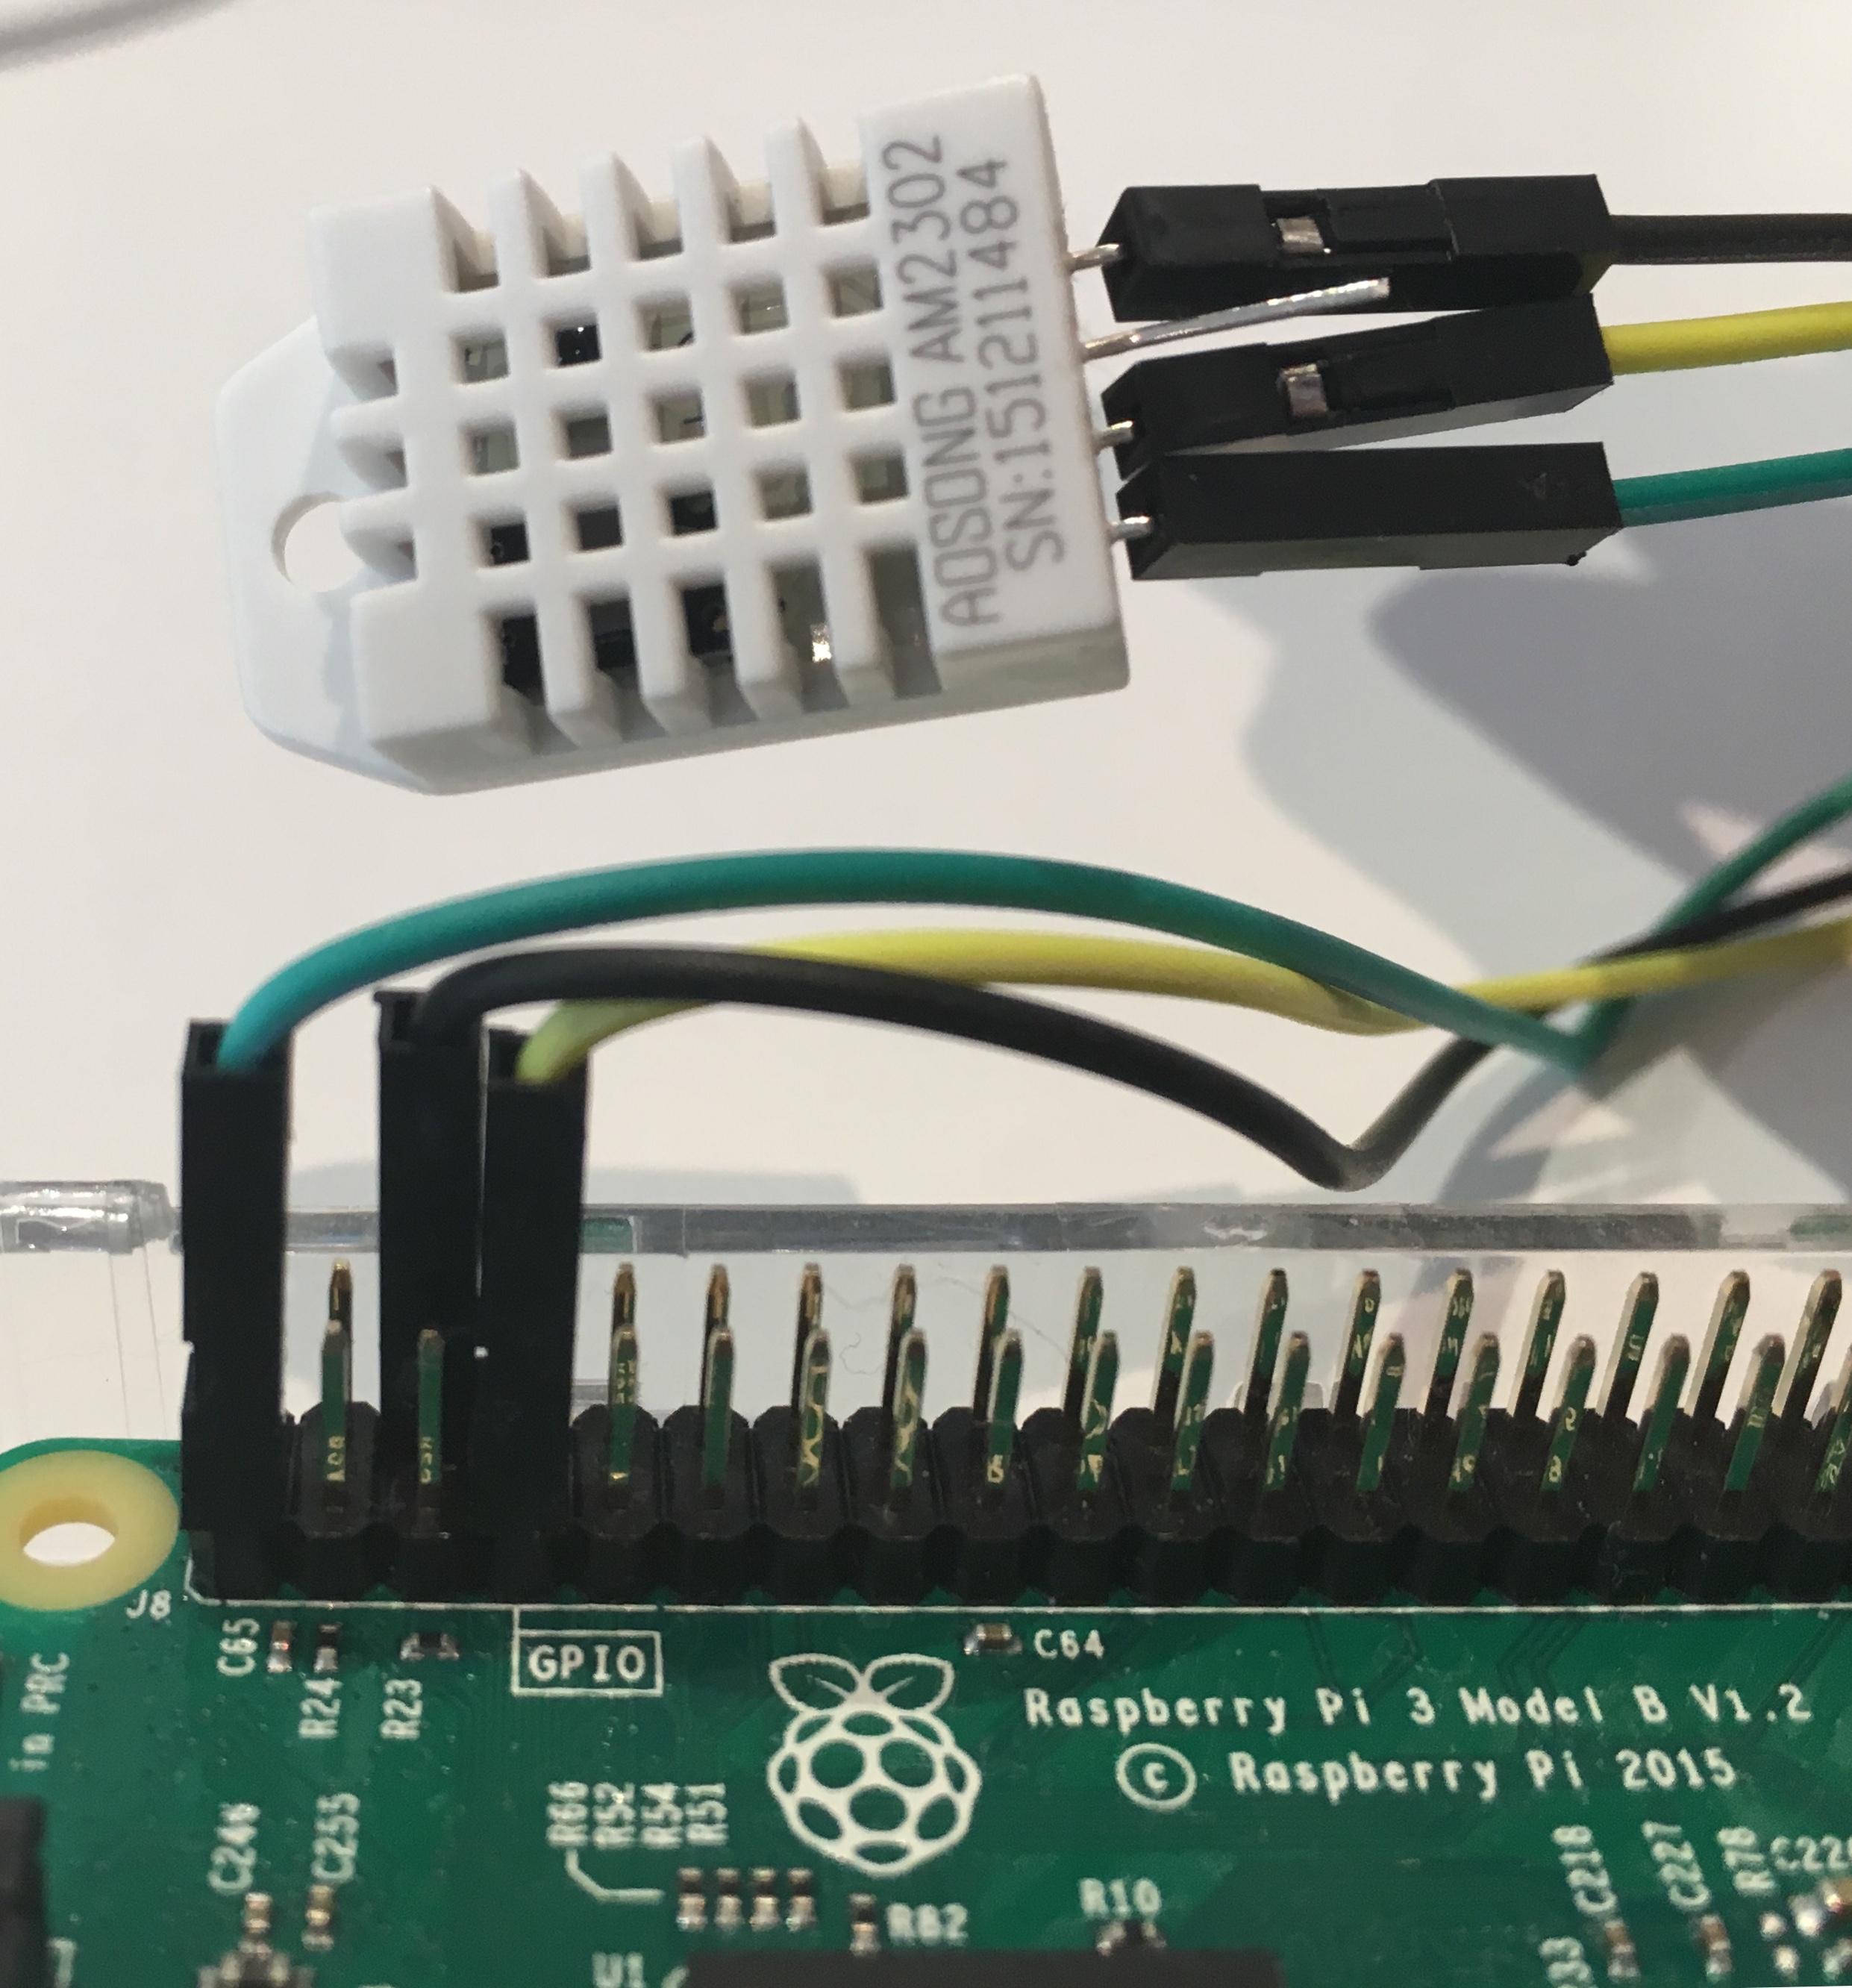
To connect the sensor to the RPI, use the jumper wires to:
- Connect the sensor's PIN 1 (Vd) to the RPI's PIN 1
- Connect the sensor's PIN 2 (GND) to the RPI's PIN 6
- Connect the sensor's PIN 4 (Data out) to the RPI's GPIO4 pin 7
Step 2: Enable SSH
The next step is to enable something called Secure Shell (SSH) on your RPI, which allows you to connect to your RPI's terminal remotely from your computer. While this is not a necessary step, enabling SSH on your RPI is good practice for programming embedded systems, which you will see why in step five.
To enable SSH on your RPI, follow the simple and quick instructions.
Step 3: Install Your Sensor's RPI's Libraries
The trick to programming embedded devices and sensors is not to. Instead, Google the specific device's library. For this demo, I Googled the library for the AM2303 Sensor and found this website for the following instructions.
Before you begin this step, make sure you have GitHub installed on your computer as well as the npm package manager. Open up your terminal and enter the following.
npm install git
In your project's directory, clone and enter the sensor's code repository.
git clone https://github.com/adafruit/Adafruit_Python_DHT.git
cd Adafruit_Python_DHT
Install some Python dependencies.
sudo apt-get upgrade
sudo apt-get install build-essential python-dev
Now, install the sensor's library.
sudo python setup.py install
This should compile the code for the library and install it on your device so any Python program can access the Adafruit_DHT python module.
If you want to quickly test the sensor to see if the sensor works enter these commands:
cd examples
sudo ./AdafruitDHT.py 2302 4
You should see a reading similar to this:
Step 4: PubNub
This is where the magic begins! In order to have your sensor data publish data to a Twitter account, you'll first have to sign up for a free PubNub account here.
Next, follow this link to access the Twitter BLOCK, which allows you to access Twitter's REST API through your own Function.
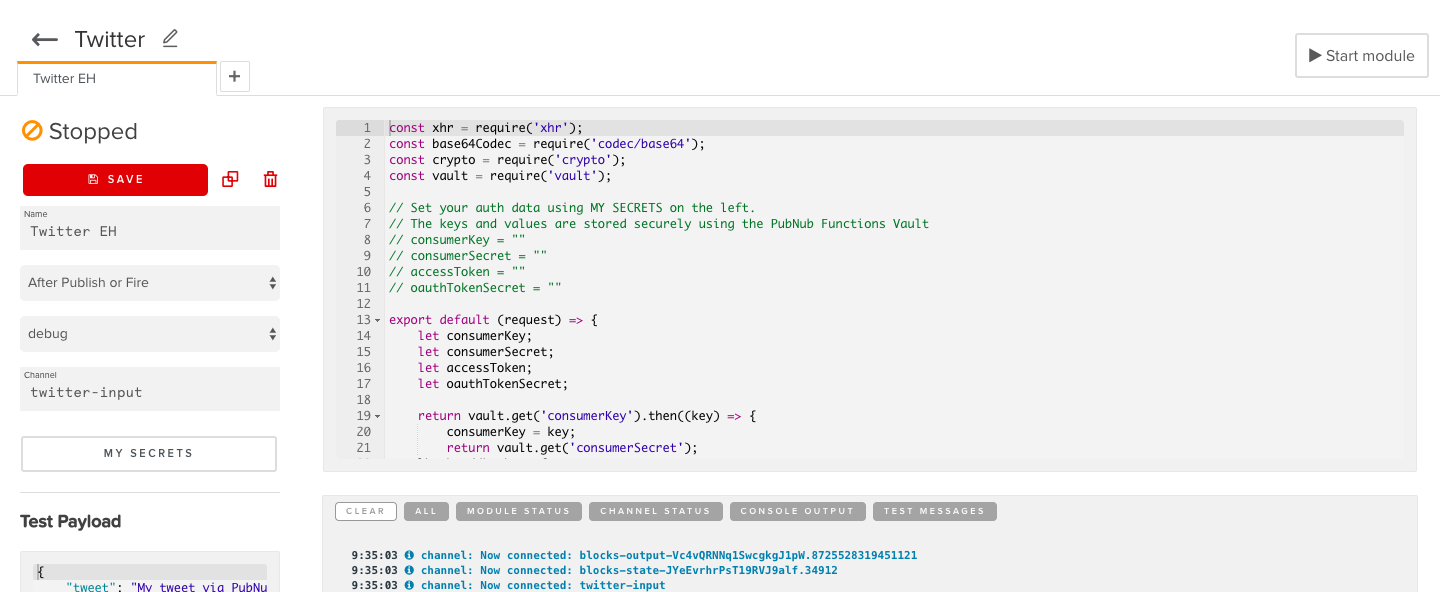
Once you've created your Function, open up your Function and you should see something like this:

Like the comments describe, you're going to need to fill in the keys and values in the “My Secrets” section to connect the Function with your Twitter account.
To get the keys and values, go here and create a Twitter app.
NOTE: For help on creating a Twitter app, follow this article.
In the “My Secrets” tab, enter in your keys like so,

NOTE: Make sure that you press the play button in the top right of the Function editor when you're done
The last step of implementing PubNub with your sensor is to add the PubNub SDK into your device's code to allow it to use the Twitter BLOCK.
Currently, the example code we used in step 3 uses bash commands to get sensor data. To keep things quick and simple, we're going to make a new file in the examples directory of our project and use the essential components of the example file to write barebones code for our Twitter Bot.
In the new file, include PubNub's SDK by adding this to the top of the top of your code
import pubnub
from pubnub.pnconfiguration import PNConfiguration
from pubnub.pubnub import PubNub

pnconfig = PNConfiguration()
pnconfig.subscribe_key = "sub-c-a667485c-757f-11e8-9f59-fec9626a7085" //your subscribe key
pnconfig.publish_key = "pub-c-cb2e18e3-a8b0-486a-bf82-2d9e9f670b7e"   //your publish key
pnconfig.ssl = False

pubnub = PubNub(pnconfig)
def publish_callback(result, status):
    pass
    # Handle PNPublishResult and PNStatus
Looking back at the example code, we can see that we can simply set-up the sensor pins on the RPI by using these parameters:
#22 represents the sensor we are using (Adafruit_DHT.DHT22)
sensor = 22
#4 represents the GPIO pin we are using on the RPI
pin = 4
Then we can see that we need to include this line to actually take sensor readings.
humidity, temperature = Adafruit_DHT.read_retry(sensor, pin)
Lastly, we can save and format the data readings to a single “tweet” variable and then publish it to our Twitter BLOCK to post to Twitter.
#Format for publishing a tweet
tweet = ('Temp={0:0.1f}*  Humidity={1:0.1f}%'.format(temperature, humidity))
#publish to Twitter Block
pubnub.publish().channel('twitter-input').message(tweet).async(publish_callback)
Step 5: Upload the Code
Now you get to see why we set up our SSH earlier in step 2.
First, create a GitHub repository to house your code. Then in your terminal enter in these commands to push the code to the repository.
git init
git add .
git commit -m "first commit"
git remote add origin <your repository URL>
git push -u origin master
Then SSH into your RPI buy typing this into the terminal
ssh pi@<YOUR RPI IP ADDRESS>
You are now in the RPI's terminal. The last step is to install the dependencies on the RPI and pull the code from the repository
sudo apt-get install python
sudo apt-get install git
sudo apt-get upgrade
sudo apt-get install build-essential python-dev
git clone <YOUR REPOSITORY URL>
Now, whenever you want to edit your code or add updates, you can just push the code from your machine to your repository, SSH into your RPI, and then pull the code using:
git pull
Now just run your code and check your Twitter!

Hopefully, this project has helped you understand the power and simplicity of Functions, especially when coupled with an IoT device.
If you liked this article or are interested in exploring various other IoT projects, check out these articles below!