Getting Started: iOS Location Tracking & Streaming w/ Swift

Since we wrote this tutorial, we’ve released a new, completely-redesigned version of our iOS SDK (4.0). We rebuilt the entire codebase and took advantage of new features from Apple, simplifying and streamlining the SDK.
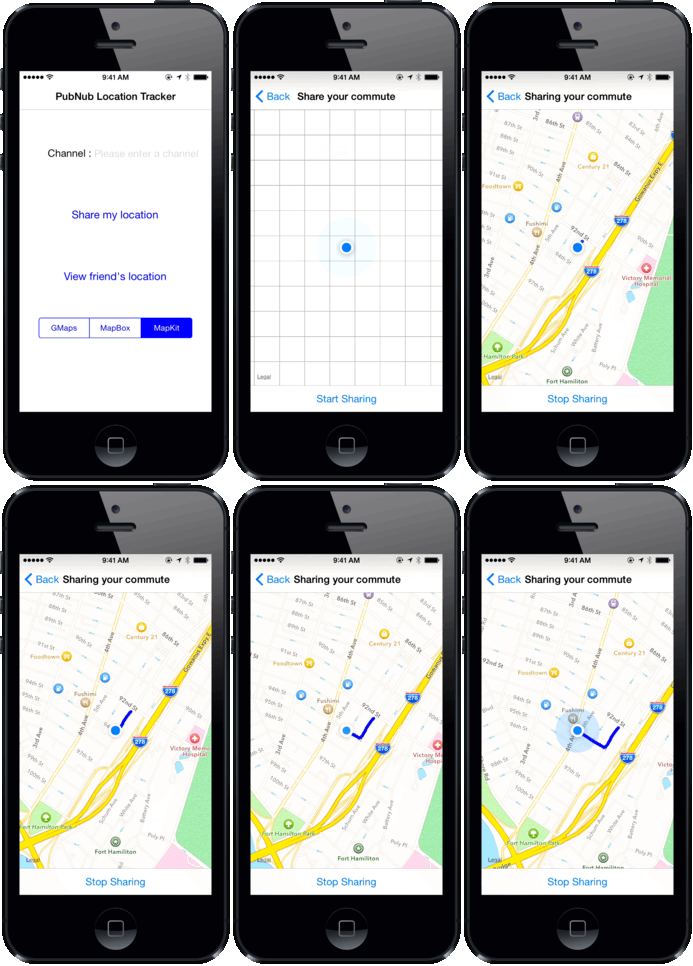
Let's get started with iOS location tracking using Apple's sleek, new programming language…Swift! In this tutorial (and subsequent posts), we're going to show you how to build geolocation tracking and publishing with Swift, and share that data in real time.
In this series overview, we're building the location broadcaster. This tutorial will show you how to:
- Use Apple's CoreLocation library to detect current location in Swift
- Use PubNub to broadcast location data in real time
Our sample application will detect the user's position then stream that location data in real time using PubNub, to a live-updating map. This is necessary technology to present and future transportation, navigation, and fleet management apps just to name a few!
Click to download the full source code for the entire project here.
In the next couple blog posts, we'll show you how to receive that data using various map SDKs (MapBox, MapKit, Google Maps) to view the location and trace the commute sent by your friends!
Let’s get right into it!
The code from this tutorial still works great, but we recommend checking out our new SDK. We've included a migration guide to help you move from 3.x to 4.0, and a getting started guide to help you create a simple Hello World application in minutes.**

Getting Started
Let’s start by setting up our project. We will want to use the PubNub SDK for iOS. To do so we will be using cocoapods. If you don’t use it yet, you’re missing out. Easy installation and starter’s guide here!
In your project’s root directory:
Your podfile should look like:
You can make sure you are using the latest version of PubNub here.
Now you just need to type:
Close Xcode, and open the YourProject.xcworkspace.
That wasn’t too hard right? It’s not quite over though.
Use Objective-C Libraries in Swift
The PubNub library is written in Objective-C, but we are coding in Swift. All you need to do now is to build a bridging header. Create a new Objective-C header in your project called YourProject-Bridging-Header.h for good practice, and type:
4
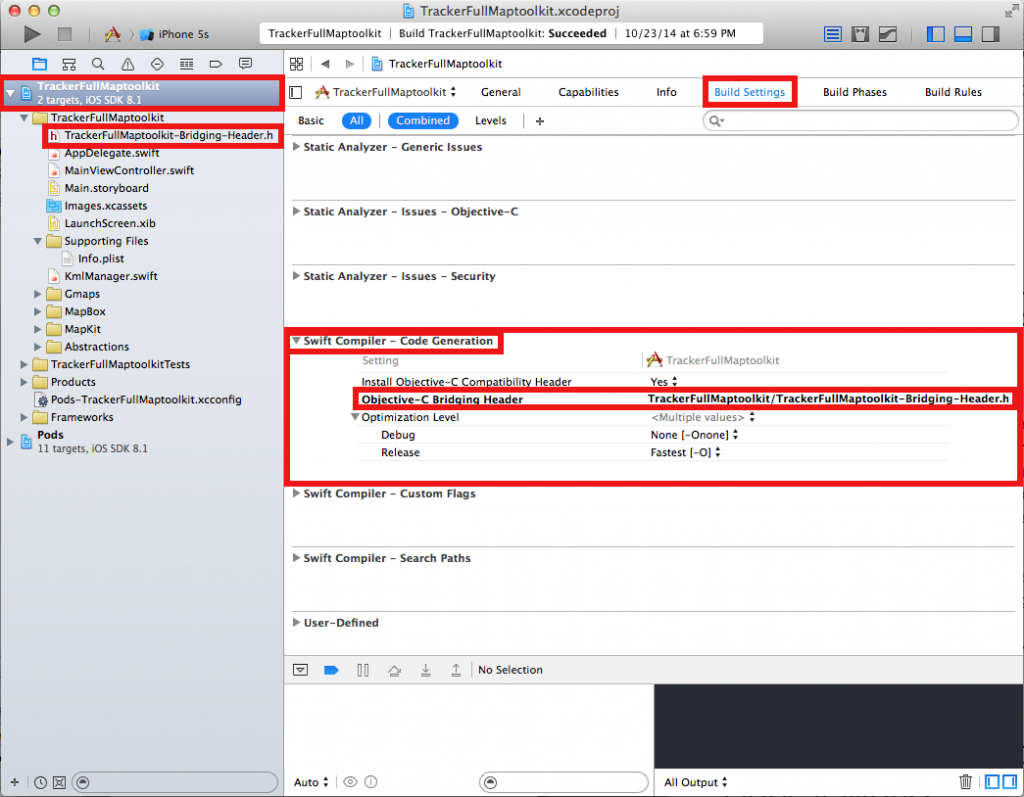
Now in your project’s configuration panel, go to build settings and scroll down to the “Swift Compiler – Code Generation” section.
Set the “install Objective-C Bridging Header” to Yes and in “Objective-C Bridging Header” type the path from your project’s root directory to your bridging header. It’ll be something like “YourProject/YourProject-Bridging-Header.h”

At this point, we should be all set! We can finally start coding! Let’s roll.
Getting Your Current Location
In this tutorial, we will only focus on the bare bones of the application, so we won’t get into how to do the user interface. That’s all up to you and your imagination. We know you’ll making something beautiful.
Hence, the code snippets in this tutorial can be used as you wish. For the sake of simplicity, we will act as if we had a single view controller, and the app starts as soon as it loads. As a result most of the code snippets will be stored into the viewDidLoad method. In your app, you’ll probably want to use buttons to start the detecting of the position and the sharing of the information over PubNub.
Using the CLLocationManager
In order to detect your position, we will use the CLLocationManager. You’ll be surprised how easy it is to use.
First things first, let’s import our libraries.
We are going to starting adding the following property to our ViewController class:
Let’s edit our viewDidLoad method to get our location manager instance started!
Notice how we set a delegate? Here we identify our current ViewController class as being the location manager’s delegate. This means we will have to override callback methods inside of our ViewController. These methods are being called as soon as the location manager detects a new location for example. We’ll look more into this later. The key element is to understand that our class will have to implement these callbacks. As a result, we need to define our class properly:
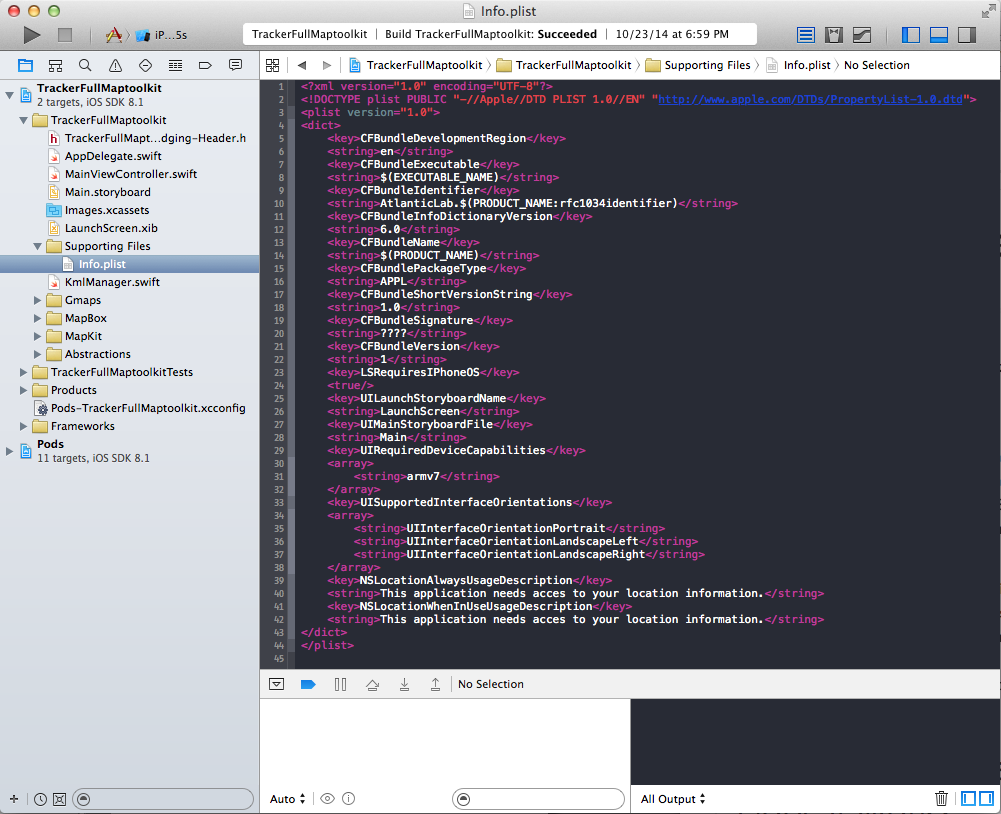
Regarding the last line of our viewDidLoad method, for iOS 8 or more, it is necessary for the app to request the user’s authorization to use location tools. This line usually will not suffice. You have to manually add a couple lines in the info.plist file which is located in the “Supporting Files” directory. If you right click on it and open it as “Source Code”, you want to make sure you add these lines inside the “<dict>” markup.
When the user first starts the app, a pop up dialog box will ask the user to authorize location services along with the string we just defined.

We can finally start detecting our position. In the viewDidLoad method, add:
We first set an accuracy, which will define how frequently and how precisely our location will be detected. It’s up to you to choose this value depending on your app’s needs. Simply remember that the “Best Accuracy” setting also has the highest energy consumption.
Now that we have started updating locations, the location manager will fire events that will trigger callbacks. We need to implement those in our class.
The first type of event that may be called is a failure message. We simply decide to handle this callback with an alert dialog box. Feel free to handle the event as you wish. You may also want to ignore this callback.
The next callback however is the key element to our application:
The method we have just overridden will be called every single time our iOS device detects a new location. You can implement it as you wish. In this snippet we just print our current location.
However, now that we have seen how to use the location manager, we will now look into broadcasting the information via PubNub. Hence, we will implement our location manager differently!
This part is really the key to make your own real-time location sharing application!
Using PubNub to Broadcast and Share Your Position We will need to add 2 variables to our class: [gist id="904c436f86647ae81ad8" file="13.swift"] When a user connects to PubNub, he is identified with the content of this PNConfig object. To get your unique pub/sub keys, you’ll first need to sign up for a PubNub account. Once you sign up, you can get your unique PubNub keys in the PubNub Developer Dashboard. Our free Sandbox tier should give you all the bandwidth you need to build and test your messaging app with the web messaging API.
In the viewDidLoad method, we will also start PubNub. Add these lines and don’t forget to set your class as a PNDelegate:
Here we set PubNub’s delegate, configured our connection to PubNub and started it. Once we are connected, we set a PubNub Channel variable and subscribed to this channel.
As a result, there is a long list of callbacks we can implement. Look here for more information. To keep it simple they are methods called when the connection succeds, fails, or more interestingly when a message is sent on the channel we are subscribed to.
In this tutorial we will mostly focus on broadcasting.
Our app will function the following way. We initialize both our location manager and our connection to PubNub in the viewDidLoad method. We also immediately start detecting our location. As soon as the location manager detects our position, its callback will be triggered. We will implement this callback in order to broadcast our location onto the PubNub channel previously defined.
Messages sent on the channel are JSON objects. All we will have to do is build a JSON object as a string which we will send on the channel! Here it goes:
How simple is that? One line to build the JSON string, and one line to send it on the channel!
I hope you liked it. The next step is to receive this information! We will see this in following tutorials focusing on receiving the data and plotting your friend’s position on a map! We will be using both the Google Maps SDK, MapBox SDK and MapKit SDK for iOS.
Looking forward to see you there!