Getting Started with the Microchip PIC32 Microcontroller
We love the embedded world here at PubNub, and the Microchip PIC32 line of microcontrollers is no exception. With bidirectionally data streaming via the PubNub Data Stream Network, the Internet of Things use cases are endless.
What is Microchip and where does PubNub fit in?
Microchip manufactures microcontroller, memory and analog semiconductors. They offer a line of powerful 32-bit microcontrollers (their PIC32 line), for embedded projects, and a number of software tools for easy development and deployment. PubNub on the other hand streams the between connected devices, from 1-to-1 (unicast), or 1-to-many (broadcast).
Combining PubNub with Microchip, you can build real-time, cloud connected embedded systems, for example, remote control of devices, monitoring and data collection from a network of sensors, and home automation.
Now, onto the tutorial!
Project Overview
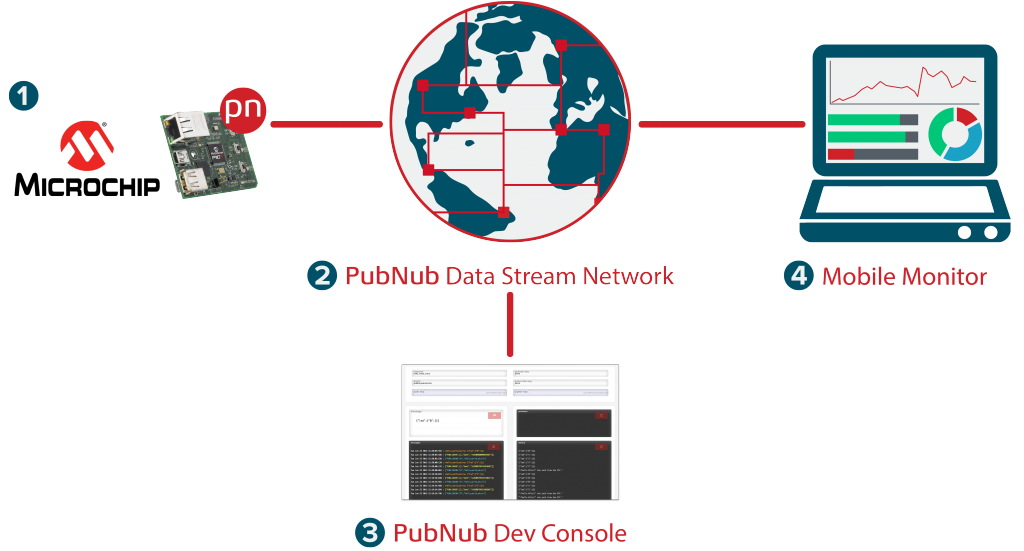
This tutorial will get you started with real-time data streaming for a Microchip microcontroller, facilitating real-time communication between our MCU and any other device (another MCU(s), mobile app, or web app). Overall, we'll create a bidirectional flow of data between different endpoints.
Specifically in this demo, we'll control LEDs using the Ethernet Starter Kit from a PC or mobile device, and send messages from the chip to our other devices.
Here's the design:
- The Microchip Ethernet Starter Kit runs PubNub.
- The PubNub code running on the chip enables it to publish the sensor reading, in real time, to any other chip or device subscribing to the same channel as a data stream.
- Using the PubNub Developer Console, you can receive this stream of information from as many sensors as you like in real time.
- Since the board is also subscribed to the data channel, you can send control messages to the board from the console.
- Using the EON JavaScript framework, you can also visualize the data received from the sensor in real time through graphs and charts.
Project Requirements
Hardware
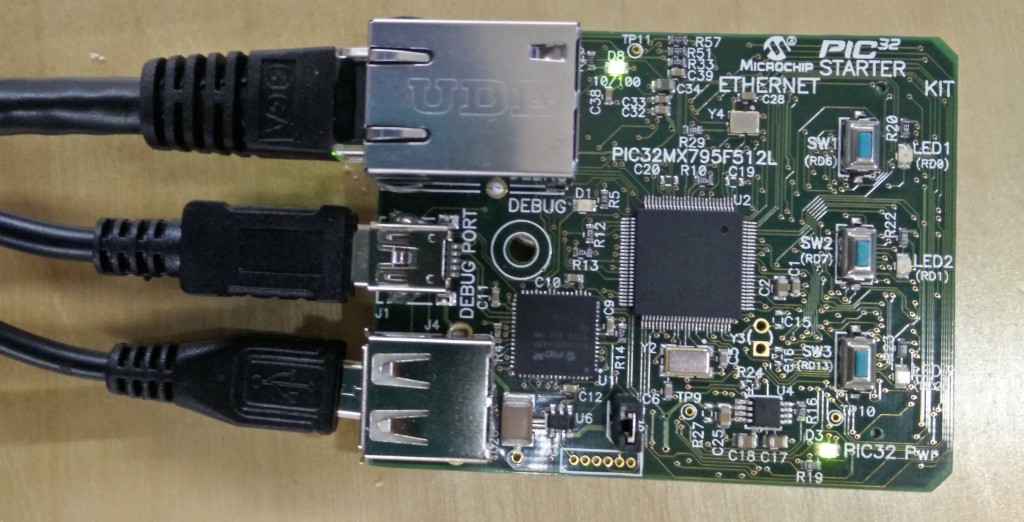
- PIC32 Ethernet Starter Kit – The PIC32 Ethernet Starter Kit provides the easiest and lowest cost method to experience 10/100 Ethernet development with PIC32. The chip used on the board is PIC32MX795F512L.
- Standard A to mini B cable for debugger
- Standard A to micro B cable for USB application development
- Ethernet cable
- Hardware setup needs to be as follows:
Software
- PubNub PIC32 client library on GitHub for the Microchip Harmony framework. You can download the zipped file from the latest release.
- MPLAB X IDE is a software program that runs on a PC (Windows, Mac OS, Linux) to develop applications for Microchip microcontrollers and digital signal controllers. It is called an Integrated Development Environment (IDE), because it provides a single integrated “environment” to develop code for embedded microcontrollers.
- MPLAB Harmony is a comprehensive, interoperable, tested software development framework for Microchip's PIC32 microcontrollers. The framework integrates both internal and 3rd party middleware, drivers, peripheral libraries and real time operating systems, simplifying and accelerating the 32-bit development process.
MPLAB harmony is included to the IDE to simplify the development process for the PIC32 microcontrollers.
Running PubNub on the Microchip MCU
Prerequisites
On your computer, install the following:
- MPLAB X IDE – v3.00.
- MPLAB Harmony – v1.03.01.
- MPLAB XC32 C/C++ Compiler
Including MPLAB Harmony Configurator within MPLAB IDE
MPLAB Harmony provides a MPLAB Harmony Configurator (MHC) MPLAB-X IDE plug-in that can be installed in MPLAB X IDE to help you create your own MPLAB Harmony applications.
To create a new MPLAB Harmony application with MHC, follow these steps:
- Start MPLAB X IDE and select Tools -> Plugins.
- Select the downloaded tab and click Add Plugins…, and then navigate to the MHC com-microchip-mplab-modules-mhc.nbm plug-in file, which is located in /utilities/mhc, and then click Open.

- Ensure that the Install check box for the plug-in is selected and click Install.
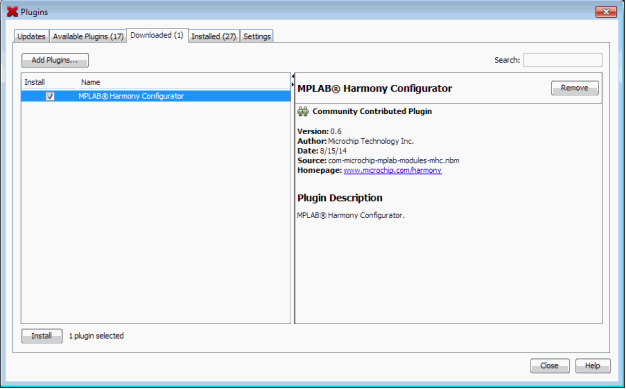
- Follow the prompts from the installation and continue until the installation completes. (Don't be concerned if the version you're installing is signed but not trusted, simply click Continue). Once the installation has finished you can close the Plugins dialog.
- To verify the installation, select Tools > Plugins and select the Installed tab. The MHC plug-in you installed should be included in the list.
Running the PubNub PIC32 Harmony project
To add PubNub PIC32 Harmony library to your project, you have several options:
- Add the library project
- Add the generated library file
- Add the files from the library
In this tutorial, we'll go with the first option. You'll have to link against the Harmony library because that is what the PIC32 Harmony library uses. We use the TCPIP, TCPIP_DNS, SYS_TMR, and, optionally, TCPIP_SSL modules from Harmony.
- Go to the Pic32 GitHub repository and download the zip file.
- Unzip/copy the contents of the library package to your Harmony apps directory.
- For example, on Linux this would be:
`~/microchip/harmony/v1_03_01/apps` - On Windows, this would be:
`c:\microchip\harmony\v1_03_01\apps`
- For example, on Linux this would be:
This will create following basic directory structure under apps:
pubnub_client
    |
    +--pubnub_pic32_client
        |
        +--lib
        +--firmware
The lib directory contains the PubNub client Harmony (static) library. The firmware directory contains a sample project you can load to your MPLABX IDE and try it “out of the box”.
- Running the PubNub client directly on the MPLAB IDE:
- Choose menu File|Open Project
- In the dialog that pops up, go to directory:c:\microchip\harmony\v1_03_01\apps\pubnub_client\pubnub_pic32_client\firmware
- Then just click on the “pubnub_pic32_client.X”.
- When it loads (it will take a few seconds, you can monitor the progress in the status bar at the bottom of the window).
- First select the right configuration. The easiest way to do it is to go to the “command bar” (just under the menu) and click on the drop down box that is between the “Redo” and “Build Project” icons. You'll see three options:
pic32mx_eth_sk : choose this if you're using PIC32 Ethernet Starter Kit
pic32mx_eth_sk2 : choose this if you're using PIC32 Ethernet Starter Kit II
pic32mz_ec_sk : choose this if you're using PIC32MZ EC Starter Kit - Right click on the project name –
pubnub_pic32_client, choose properties. Make sure the options chosen are as shown in the image below.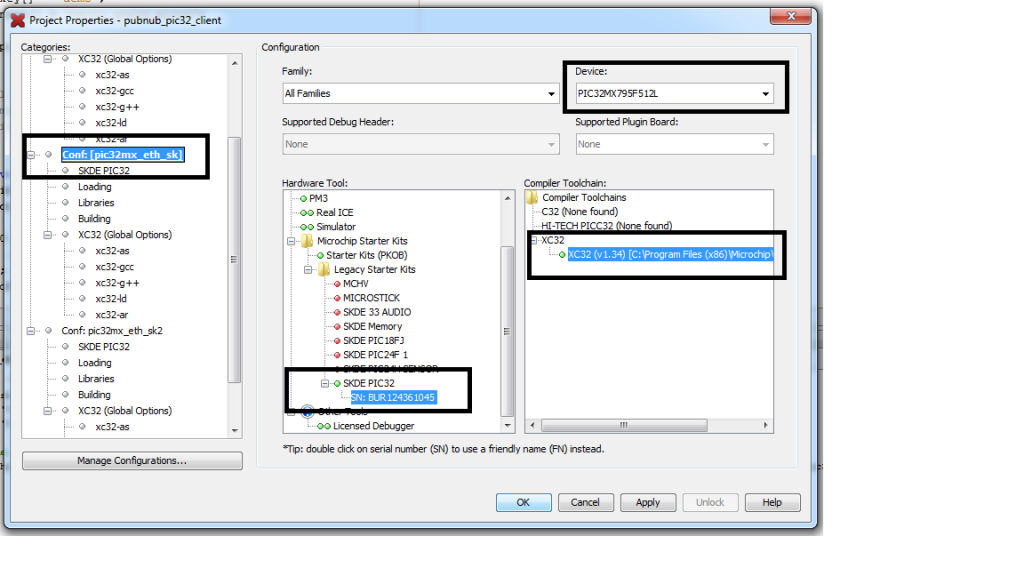
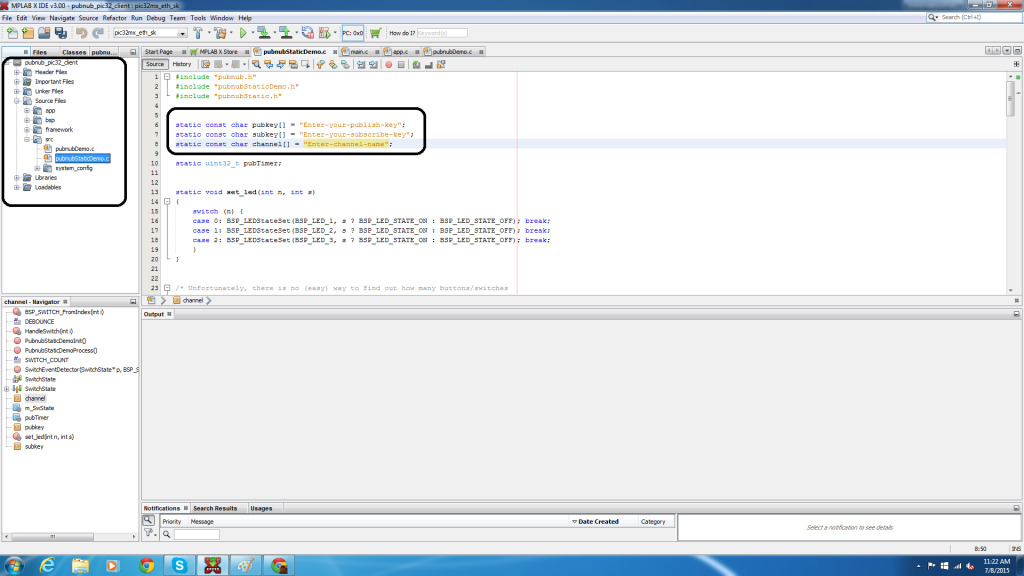
- In order to receive and send messages through the PubNub Data Stream Network, you'll need to set your publish/subscribe keys in the program.
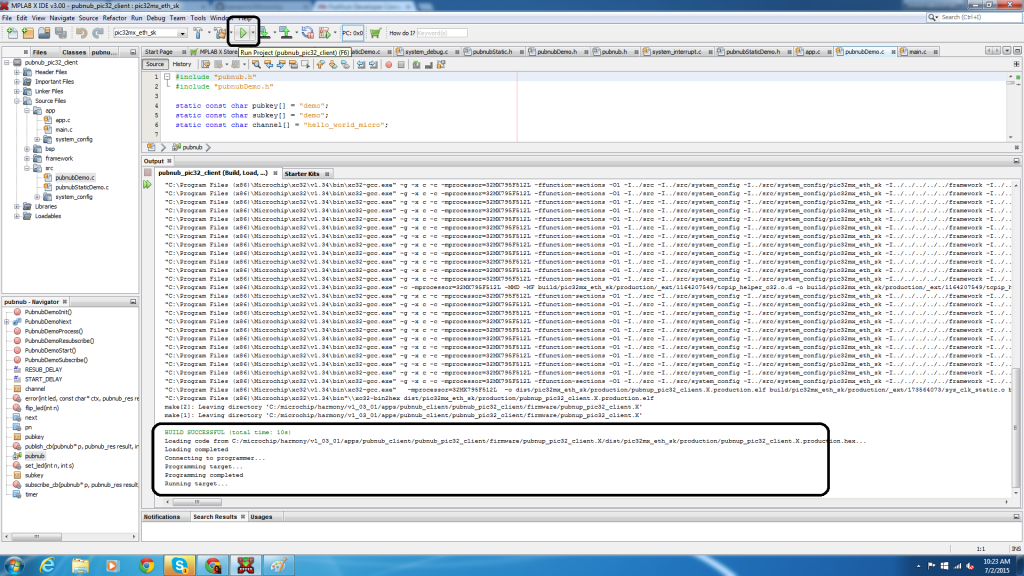
- You should be all set up. Now choose menu Run|Run Project. It will build and then upload the firmware to the board and then reset it (so that FW starts executing). You can monitor this in the “Output” window, below the code editor window.
Static vs Dynamic API
The PubNub Harmony library has two APIs – static and dynamic.
- Static (simple) for low traffic/low communication complexity setups. This example performs a continuous publish and subscribe.
- Dynamic (complex) for all other setups. The dynamic example performs a single publish and a continuous subscribe.
By default, this demo runs the static version. But changing it from static to dynamic is as simple as linking:
- pubnubDemo.c instead of pubnubStaticDemo.cand change calls from:
- PubnubStaticDemoInit() to PubnubDemoInit()
- PubnubStaticDemoProcess() to PubnubDemoProcess().
Output
In order to see the output of this demo, open the PubNub Developer Console, put in the same channel and the pub/sub keys as that in the code running in the IDE.
Note: You will find the channel and pub/sub keys in pubnubStaticDemo.c or pubnubDemo.c depending on whether you use the static or dynamic version.

PubNub Publish
If all went well, then after a few seconds, you will see constant messages from the MCU.

The MCU publishes messages (purposely set to do every few seconds), which is received by the console. Publish is broadcasting a message onto a specific channel. Options contains channel name, message, and callback values.
This is PubNub publish from the board to any other device.
PubNub Subscribe
You may send the following message:
{"led":{"2":1}}
to turn the LED number 2 ON.
So, in general, the first number (quoted) is the number of the LED (on most boards there are LEDS 0 – 2), the second is 0 to turn OFF, or 1 to turn ON.
So this should blink the LED 1:
{"led":{"1", 0}}
{"led":{"1", 1}}
{"led":{"1", 0}}
{"led":{"1", 1}}
This is the board subscribing to any other device.
Complete Output
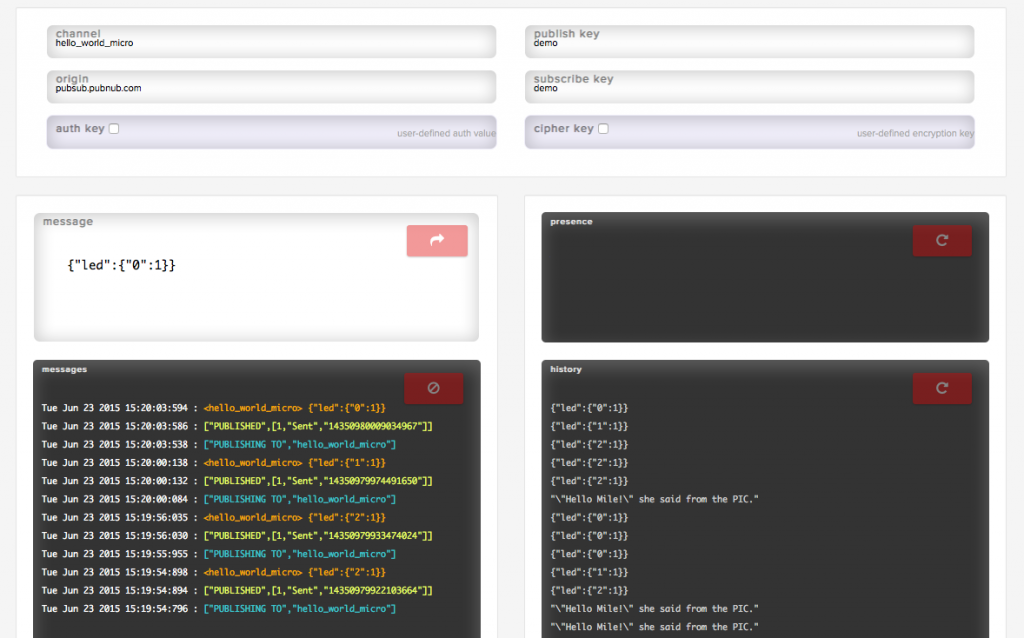
As you can see, I have set the channel key, publish key and subscribe key. The ‘message' box shows me the messages I have sent, and ‘history' displays the messages sent and received on the channel that I have set.
Using the ‘message' box, I am able to send messages to the MCU to turn on and off the LEDs on the board itself.
Wrapping Up
And that's it! We're remotely controlling our Microchip MCU from a web UI (in this case, our Developer's Console). Now, go forth and create powerful IoT applications!
PubNub runs on 70+ SDKs, letting you choose from a wide variety of platforms to communicate with the Microchip hardware. And if you need some more inspiration, check our all our real-time embedded tutorials here.
