Sending RFID Events in Real time w/ Tessel RFID Module
RFID stands for radio-frequency identification, which is the wireless use of electromagnetic fields to transfer data for tracking and identifying objects.
And it's created some pretty sweet use cases. In this day and age the RFID chip has become so cheap that Coca Cola uses RFID embedded cups to authenticate refills. With unique tags RFID can be used to track manufactured parts, such as the Boeing case studies performed in the early 2000s . RFID could even be used to unlock your front door.
So let's get started with RFID, in this case, using the Tessel, a microcontroller that runs JavaScript. In this case, we're going to create our own authentication network.
This blog post is the first half of our Tessel RFID module tutorial. In this part, we'll use the Tessel to detect a RFID scan and send the information in real time. In our second part, we'll retrieve the RFID signal and inform the user whether the RFID is authorized or not.

Above is the attached Tessel RFID module. The module can read anything with an RFID chip. This isn’t to say that the code is going to mean anything in the context, but it can read it. This allows for a plethora of possibilities. One of those possibilities is to send the registered UID over the PubNub Data Stream Network in real time.
Let's get started!
Preparation
First you need to clone the repository:
Note: You need to have the Tessel connected to WiFi for the PubNub code to work.
The repository contains many other useful Tessel snippets, and you can see all our Tessel demos here.
The file of interest is the examples/pubnub_rfid_send.js. This file allows us to publish messages through PubNub’s secure network. Those messages can be received by the listener when they are subscribed to the channel. This is the result of the fully functional code.

The Code
in the base pubnub-tessel directory, you need to install the base dependency for the RFID reader.
If you would like to view the source code, it is available on Github. https://github.com/tessel/rfid-pn532
If you have any trouble refer to the Tessel documentation. https://tessel.io/docs/rfid
In order for the JavaScript to work, the RFID module needs to be attached to port ‘A’, like so:

The next line defines the channel name.
For the purposes of testing you should use tesseldemo, though this channel name could be anything. You will define the channel name as one of the arguments when running the tessel code.
The code then initializes PubNub with your unique pub/sub keys. To get your unique pub/sub keys, you’ll first need to sign up for a PubNub account. Once you sign up, you can get your unique PubNub keys in the PubNub Developer Dashboard. Our free Sandbox tier should give you all the bandwidth you need to build and test your messaging app with the web messaging API.
After initialization the code turns the RFID on and reads the data.
Run
Connect the Tessel to a compatible WiFi network.
Run the code for pubnub_rfid_send.js

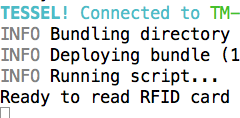
The console will then tell you that it is ready to read the RFID card. The tessel package comes with a card insert. You can also use other common cards that have an embedded chip.
The card needs to be held within close proximity to the module. A small tap of the card should work.

You will then see the console register the card as being read. A yellow LED on the right side of the module will blink when a card is read. This lets you know the device is functioning properly.
Cool! We're done this part. In our next part, let's do something with that data, ie. let's act on the RFID being read!