How to Add Language Translation and Abusive Language Filtering to Your Unreal Engine Game
As you implement your real-time chat for your Unreal Engine game, you’ll need to ensure you add an inclusive and welcoming environment for all of your players. Language translation allows players from all over the world to interact with each other in real time, rather than isolating players that do not understand the language in these video games. Implementing abusive language filtering for your chat ensures that your players can chat freely without being subjected to abusive and profane messages during gameplay. Both of these features allow players to interact with each other in a positive environment, helping foster a sense of community and strengthening player engagement.
While language translation and abusive language detection are vital in game development for your chat, incorporating these features in your Unreal Engine project is easier said than done. To start from scratch, it takes a lot of resources to build, maintain, and scale when your players increase. You also need to intercept these messages in real time to translate and filter, as online games need messages to be efficiently delivered to communicate properly. Luckily, PubNub has made it the easiest way for game devs to inject real-time functionalities at runtime into Unreal Engine games with our real-time, low-latency API platform. We take care of the infrastructure layer of your apps so that you can focus on your application. Whether you're developing for Windows, Mac, or going cross-platform, our Unreal Chat SDK and Unreal SDK have you covered.
Continue reading to learn how to add language translation and abusive language filtering to your real-time chat in your Unreal Engine game utilizing our Unreal SDK, starting from understanding how to initiate a connection to PubNub from your Unreal project, learning about PubNub Functions, and the different integrations with third-party services that allow you to filter and translate messages in real time. We strongly recommend you follow our real-time chat how-to guide which teaches you about how to implement real-time chat utilizing our Unreal Chat SDK. This guide is more focused on the language translation and moderation aspects of chat messages.
If you would like to see an example of how to implement language translation and moderation in a UE game to use as a reference when following along with this guide, be sure to check out our Unreal Engine Showcase Game.
Getting Started with PubNub
Before you begin to understand how to set up language translation and moderation for your chat messages in real time, you’ll need to understand PubNub and how to configure your application to take advantage of the platform’s features.
Overview
PubNub is based on the Pub/Sub (Publish/Subscribe) model. A user will publish a message, which is essentially a payload that contains all relevant information, to the PubNub network. Users who want to receive or listen to the message and other generated events will subscribe to the PubNub network and parse the message. Event listeners are used to catch messages and events generated in the PubNub Network and trigger based on an action taken place. The message can contain anything you’d like, as long as it’s under 32 KB (and preferably in JSON).
To ensure the message gets to the right recipients, channels are used as the mechanism through which the data is transmitted from one device to another. Channels are required each time a device wants to publish and subscribe to the PubNub network. While a user can only publish one message at a time, a user can subscribe to many different channels at a time.
Install and Configure the PubNub Unreal SDK
To begin, you'll need to install any PubNub dependencies and config the PubNub Unreal SDK to connect your application to the PubNub network. While you can use either the core Unreal SDK or the Unreal Chat SDK, we will be utilizing the core Unreal SDK. Learn more about the difference between the Unreal Chat SDK and the Unreal SDK by reading this blog. The best part about either of these SDKs? You can either use You can either use the visual scripting language Blueprints or C++ to perform this workflow! For the sake of simplicity, we will be focusing on the Blueprints approach.
Download Unreal Engine 5.0 or higher.
Create or open an existing UE project.
Clone the content of the Unreal SDK repository into the Plugins folder. Change the SDK folder name to Pubnub.
Generate C++ project files (as we need to add the SDK to the build file) by right-clicking on your
.uprojectfile.Both private module dependencies have already been added for you in
Source/_{YourProject}_/_{YourProject}_.Build.cs.Build the solution.
Open the
PubNubLyra.uprojectin UE.Click Edit > Plugins and ensure that the PubNub SDK is enabled.
In the same plugins folder, ensure the JSON Blueprint Utilities Plugin is enabled. It should be by default.
Click Edit > Project Settings and scroll down to the Plugins section and click Pubnub SDK.
Add your publish and subscribe keys obtained in the next step and save. Ensure the Initialize Automatically Checkbox is checked.
Create or sign in to your PubNub Account. You are now in the Admin Portal.
Click on the generated app and keyset or create your own App and Keyset by giving them a name.
Ensure Stream Controller is enabled.
Click on save changes and add your keys to the plugin settings mentioned in step 10.
Send and Receive Messages
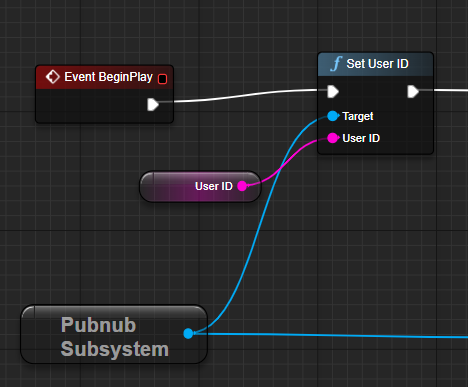
Once you have initialized the PubNub Unreal SDK, you’ll need to set a unique user ID (sometimes referred to as uuid), which is required for all PubNub SDKs before you can send and receive messages. In some part of your project, such as the PlayerController or GameInstance, we’ll add the PubNub functionality to send and receive messages.
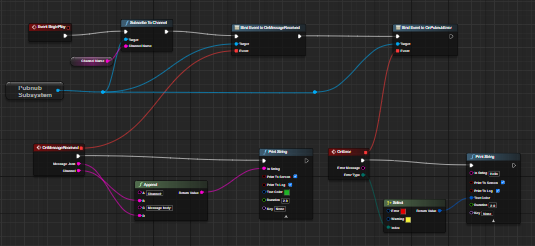
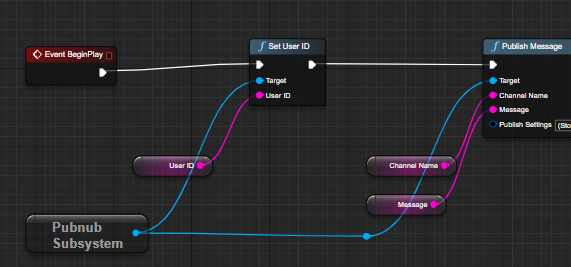
Note: For the sake of the how-to, the blueprint images are pasted below. However, you can directly copy the Blueprints from our docs page for each method instead of having to search and connect the nodes yourself.

You’ll then need to subscribe to the channel and then listen for any events emitted on a particular channel that will be received through the callback function OnMessageReceived. Let’s name the channel moderation.{userId}, where userId is the User ID you set up earlier. For live apps, you can utilize wildcard subscribe to subscribe to a hierarchical list of channels:

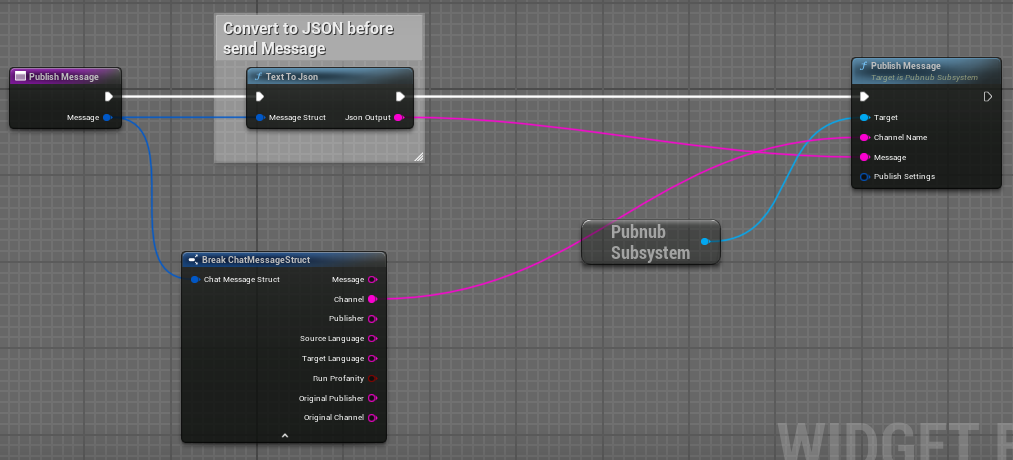
All messages transmitted through the Unreal SDK are in JSON format, so you’ll need to parse this information using either the JsonUtility classes in C++ or enable the built-in Json Blueprint Utilities plugin:

Finally, publish a message to all channel subscribers of a particular channel. In this case, you’ll want to publish to the moderation.{userId} we set up earlier.

Remember, you’ll need to format all of the information you want in JSON before you publish the method. It’s recommended to create a struct of the payloads you want to send, including publisher, message, channel ID, and other relevant metadata. This could include information such as the recipient player’s source language, if they have any settings that toggle profanity filtering, etc:

Once you’ve published a message to a channel you are listening for, the PubNub Function will intercept the message before it reaches another player.
Intercept Messages in Real Time: Functions
Functions allows developers to create and execute business logic on the edge to route, filter, transform, augment, and aggregate real-time messages as they route through the PubNub network. You can host this business logic without needing to spin up your server, where you can integrate with one of our trusted third-party integrations (which are already set up to work with Functions and include instructions on getting started) or write your code and use your custom REST endpoints. Regardless of which route you go, you can safely store your API keys in our Vault module, which encrypts and obscures your keys after you initially add the key. You can also choose to intercept messages before or after delivery of messages. You can learn more about Functions in detail by diving into our documentation.
With both language translation and moderation, you want to intercept all messages before they are delivered to other players in your game. You’ll be able to capture the event as soon as a player hits send and can perform this logic to transform and send it back to your game once you’ve finished filtering/translating the message, as well as even potentially banning or even being able to blacklist users.
To be able to use Functions, you’ll need to perform some more setup in the Admin Portal:
Navigate to the Admin Portal.
Click on the Functions tab on the left-hand side of the portal.
Select the App and keyset you created in the previous section.
Click on Create New Module.
Give the module a name.
Enter a description of what the Module is doing.
Select the keyset you created earlier to add the Module. Click Create (you can either separate the translation and abusive language filtering into different Functions or combine them in one. This tutorial keeps them together).
Give the Function a name.
Select the Before Publish or Fire event type, as you will need to intercept the messages before they reach other players.
Enter the channel name you wish the Function to intercept or update after a message is published (this can be adjusted later as well). You’ll be using a channel name consisting of the Wildcard Subscribe character
*:moderation.*Click the Create button.
You will be brought to the Function overview page, where you can change settings, test, and even monitor the Function when it is interacting with your game for each Function. In the middle of the screen, there should be automatically generated JavaScript code. This is a sample "Hello World" function to showcase an example of how a function would work and where you can either host your code or execute the business logic of a third-party integration.
We’ll discuss how to implement the logic for both abusive language detection and translation in the next two sections. Once you have finished implementing the business logic, press the Save button and then click on Restart Module to run the modules, as well as any time you make changes to the code.
Translate Languages in Real Time
Implementing language translation is a daunting task if implemented yourself, as it takes a lot of resources to ensure that messages are properly translated: computing power, database mapping of languages, and validity of the translated messages all need to be considered and carefully crafted.
We recommend using one of our ready-to-use language third-party integrations, specifically Amazon Translate. Amazon Translate removes the complexity of building translation capabilities into your applications with a simple API call. While there are over 5,550 supported language combinations in Amazon Translate, consider narrowing down your supported translation list, especially if used in conjunction with a moderation service such as Tisane (more on that in the next section).
We recommend starting with the walkthrough of getting started with the Amazon Translate integration, as you’ll need to obtain two API keys: an AWS Access Key and an AWS Secret Key. Once you’ve added the block to your keyset by clicking on the “Try it Now” button, there will be a lot of configuration code.
Focus on the block of code that is setting up the event payload, as you’ll need to set up the payload with a few different fields. We recommend replacing this code with what is used in the Unreal Engine Showcase Game’s payload configuration and then returning the result:
const payload = request.message;
    if (payload) {
        return vault.get('AWS_access_key').then((AWS_access_key) => {
            return vault.get('AWS_secret_key').then((AWS_secret_key) => {
                let translate = payload;

                let opts = {
                    path: '/',
                    service: 'translate',
                    region: 'us-east-2',
                    headers: {
                        'Content-Type': 'application/x-amz-json-1.1',
                        'X-Amz-Target': 'AWSShineFrontendService_20170701.TranslateText'
                    },
                    host: 'translate.us-east-2.amazonaws.com',
                    body: JSON.stringify({
                        "Text": translate.text,
                        "SourceLanguageCode": translate.source,
                        "TargetLanguageCode": translate.target
                    })
                }

                signAWS(opts, { accessKeyId: AWS_access_key, secretAccessKey: AWS_secret_key });
                const http_options = { 'method': 'POST', 'body': opts.body, 'headers': opts.headers };

                return xhr.fetch('https://' + opts.host, http_options).then((response) => {
                    const body = JSON.parse(response.body);
                    //Able to translate text
                    if (body.TranslatedText) {
                        request.message.text = body.TranslatedText;
                        //message has been translated, mark both the source and the target as the same.
                        request.message.source = translate.target;
                    } else {
                        translate.error = body['Message'];
                    }

                    return request.ok();
                }).catch((error) => {
                    console.log('Error:', error);
                });
            });
        });
    }
Every event payload requires the translate field to contain the following three fields:
text: The message to be translated.
source: The language that the message originates from.
target: The language the message needs to be translated to.
The event payload can now be sent via the Amazon Translate API to translate the message. In the above code, if the message has been translated, the message of the text is replaced with the translated text and marks the source language to indicate that the message has been properly translated (so your game doesn’t send the message back again to be translated). If the message cannot be translated, then the message is simply sent back.
You should consider edge cases such as not needing to translate a message when the source and target languages are the same (to save time, resources, and send the message to the recipient faster), as well as to handle when a message has been properly translated. You can publish the message in the Function code to a different channel that you are specifically subscribed to in your game to receive translated messages by checking that the source and target languages are the same, which means that the message has been translated.
You can add a setting to your settings page to default to a language and allow them to change it to update their game’s language. You can then store the user’s language setting using the App Context API, which allows you to store and retrieve metadata about your players. Once a player updates their language, you can catch the change via the Objects Event Listener or retrieve the intended player’s metadata to obtain their language. Anyways, to keep things simple, you can simply hard code the language codes when testing, such as “es” or “en”.
If you would like to see an example of language translation in action, view our Unreal Engine Showcase Game, specifically in Content/PubNub/Chat/WB_ChatBox.uasset. Look at the function HandleReceivedMessage in the graph to see how a message is received and determine if translation/abusive language filtering is necessary.
Filter Profane & Abusive Text: Abusive Language Filtering
Filtering profane and harmful chat messages has always been a struggle for developers to implement properly for online games. New ways of entering profane and harmful text continue to increase and you need to ensure you protect your players from these negative interactions.
While you certainly can implement your own moderation logic to execute and intercept chat messages in real time, we recommend using one of our language third-party integrations, specifically the Tisane Labs Natural Language Processing integration.
The Tisane Labs Natural Language Processing Block analyzes real-time data streams and reveals not only why the text is positive or negative and provides extensive grammar tagging and parse tree output. The unique aspect of Tisane is that it can detect this content in over 27 languages. This means that you can send the block a message that is in any of the supported languages and still have it filter for abusive content, which is extremely useful when used in conjunction with language translation.
We recommend starting with the walkthrough of getting started with the Tisane Labs integration. You’ll need to sign up for a Tisane Labs account and obtain the API key to add to the Vault of the Function you created earlier. It will also generate the business logic block of code for you, so you’re ready to get started implementing moderation for your own game’s use case. Be sure to follow Tisane’s documentation for specific and other useful details.
As an actual use-case example, our Unreal Engine Showcase Game utilizes Tisane Labs to moderate abusive content in multiple languages so we can filter and mask any abusive words it flags. Here is the Function code we use in our game:
const xhr = require('xhr');
const vault = require('vault');
export default (request) => {
    let message = request.message.text;
    let language = request.message.source;
    const getAPIKey = new Promise((resolve) => {
        //use the MY SECRETS on the left after you've got your API Key from Tisane of vault
        vault.get('tisaneApiKey').then((key) => {
            resolve(key);
        });
    });

    return getAPIKey.then((tisaneApiKey) => {
        return xhr.fetch('https://api.tisane.ai/parse', {
            'method': 'POST',
            'headers': {
                'Ocp-Apim-Subscription-Key': tisaneApiKey
            },
            'body': JSON.stringify({
                'language': language,
                //content is what is checking - the message itself. The string is in the message.text
                'content': message,
                'settings': { 'snippets': true }
            })
        });
    }).then((reply) => {
        //reply here is from Tisane as a JSON
        let responseJson = JSON.parse(reply.body);
        //any form of abuse will be returned in reply.body.abuse as an array for each type of abuse

        if (responseJson.abuse) {
            //Filter message for profanity and replace with asterisks for each profane character.
            let profanities = responseJson.abuse.filter(item => item.type === "profanity").sort((a, b) => b.offset - a.offset);

            profanities.forEach((profanity) => {
                let start = profanity.offset;
                let end = start + profanity.length;
                let replacement = "*".repeat(profanity.length);
                message =  message.substring(0, start) + replacement + message.substring(end);
            });

            request.message.text = message;
            return request.ok(); // send the original message, or the stars
        }

        //No profanity found, return original text.
        else {
            return request.ok();
        }
    }).catch((err) => {
        console.error(err);
        return request.abort();
    });
};
As soon as a message is received that contains a pattern that matches the wildcard subscribe channel, the message is passed through Tisane’s NLP. If there is any content that Tisane considers abusive, the original message is filtered to replace the abusive content with * characters while leaving the rest of the message intact. If there is no abuse, the original message is simply sent back to the application.
If you would like to see an example of how to implement language translation and abusive language filtering in an Unreal Engine game, be sure to check out our Unreal Engine Showcase Game, which was built in Unreal Engine 5.4.4 and based on Epic Games's Lyra.
What’s Next
In this how-to guide, you’ve learned how to add language translation and moderation to your Unreal Engine game. With Functions, you can host code to intercept messages to translate and filter for abusive content in real time, ensuring your players can safely interact with players from around the world, creating a safer, more welcoming, and more engaging player experience.
Keep in mind this is the tip of the iceberg with Functions. Since everything is computed at the edge for low latency, you can do everything from IoT sensor data aggregation, chatbots, and AI integrations such as Open AI ChatGPT, to geofencing and geo-triggering, as well as implementing a leaderboard system in your Unreal Engine game.
Learn more with the following resources and stay informed with the latest topics:
Read our documentation.
Breakdown and add a real-time chat in Unreal Engine using our how-to guide.
Understand how our Unreal Engine Showcase Game utilizes Language Moderation and Moderation to translate and filter for profane messages in real time.
Dive into the Unreal SDK source code.
Feel free to reach out to the Developer Relations Team at devrel@pubnub.com for any questions or concerns.