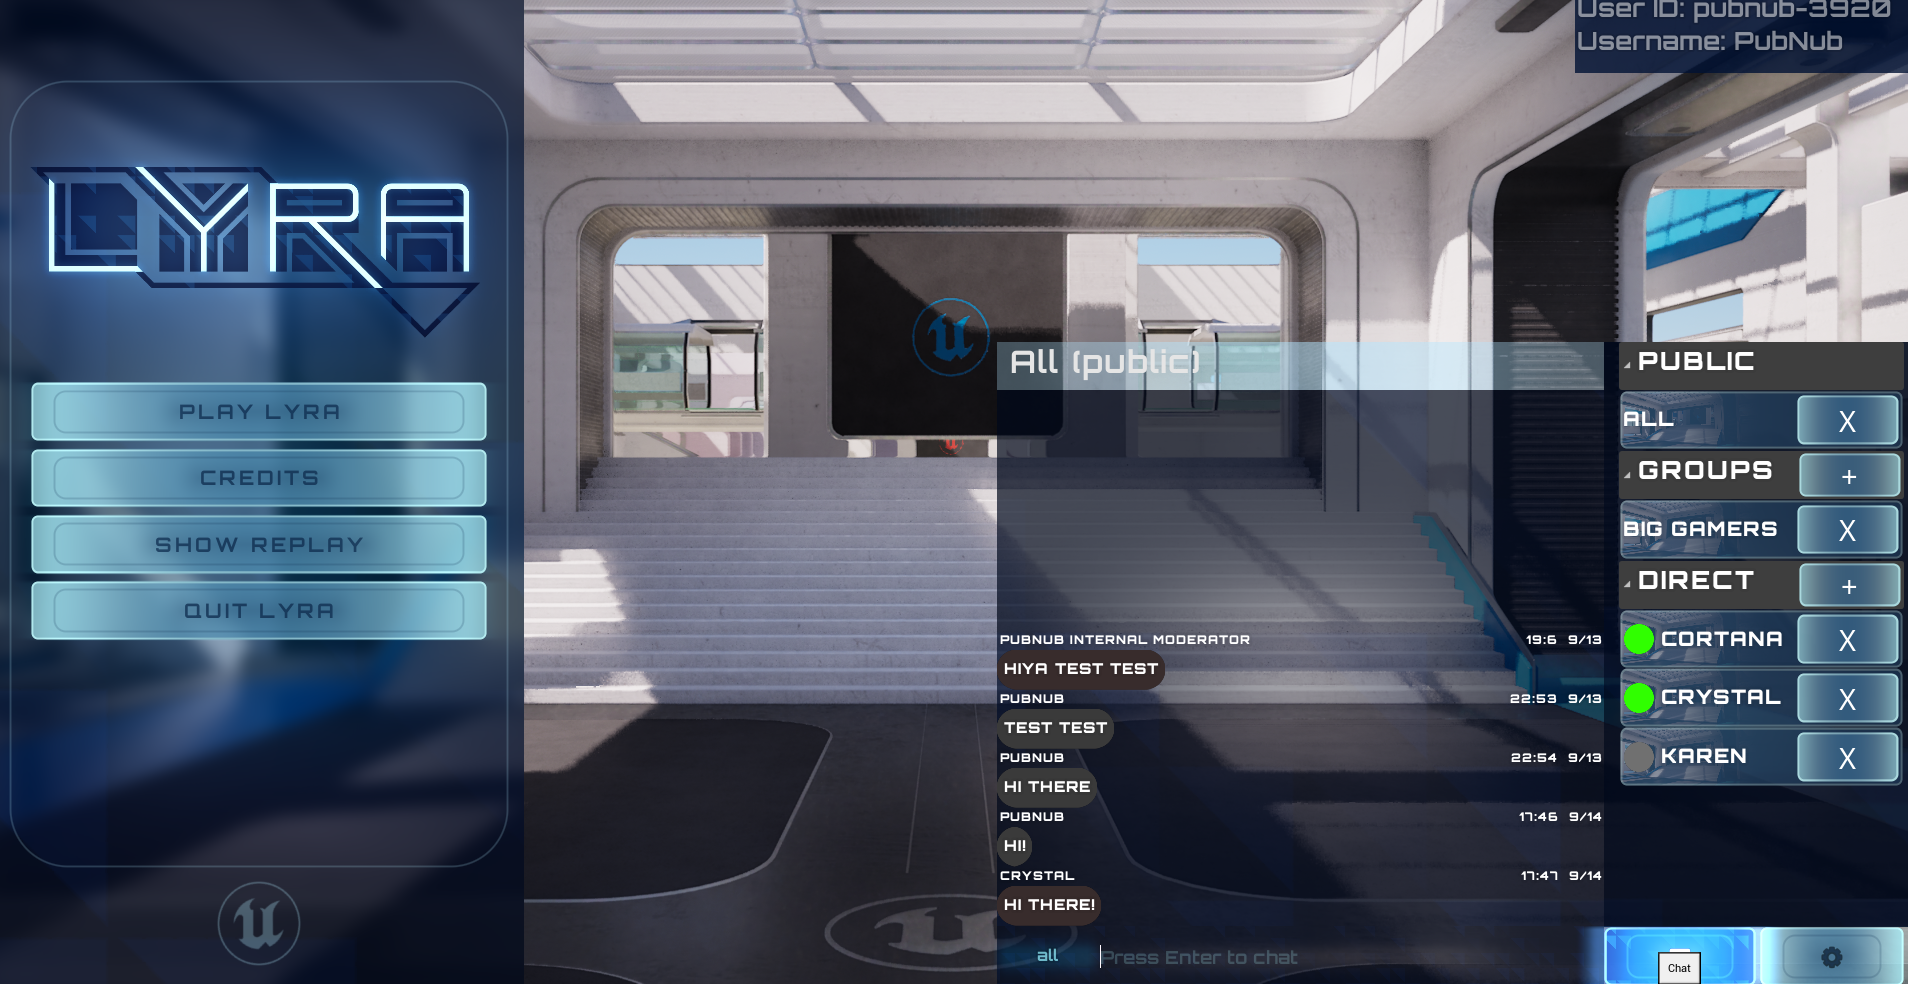
How to Add Real-time Chat to Your Unreal Engine Game
Real-time chat or in-game chat increases player engagement and aids user retention. It allows players to communicate with each other, fostering a sense of community and providing a platform for social interaction that makes a more enjoyable gaming experience.
Incorporating real-time chat is easier said than done. To start from scratch, it takes a lot of resources to build, maintain, and scale when your player count increases. Luckily, PubNub has made it easier than ever for game devs to inject real-time functionalities into Unreal Engine games with our real-time, low-latency API platform. We take care of the infrastructure layer of your apps so that you can focus on your application. Whether you're developing for Windows, Mac, or going cross-platform, our Unreal Chat SDK has you covered.
Continue reading to learn how to add real-time chat to your Unreal Engine video game with PubNub’s Unreal Chat SDK, which is tailored specifically for quickly implementing a robust in-game chat.
Note: This how-to guide will highlight functionality and references to our Unreal Engine Showcase Game, which utilizes both the Unreal Chat SDK and the Unreal SDK when implementing functionality and it’s recommended that you clone the repository and follow along to understand how to implement text chat yourself. Instructions for set-up will be provided in the following section.
Getting Started with PubNub
Before you begin to understand how to set up your in-game chat, you’ll need to understand the PubNub platform and how to configure your application to take advantage of the platform’s features.
Overview
PubNub is based on the Pub/Sub (Publish/Subscribe) model. A user will publish a message, which is essentially a payload that contains all relevant information, to the PubNub network. Users who want to receive or listen to the message and other generated events will subscribe to the PubNub network and parse the message. Event listeners are used to catch messages and events generated in the PubNub Network and trigger based on an action taken place. The message can contain anything you’d like, as long as it’s under 32 KB (and preferably in JSON).
To ensure the message gets to the right recipients, channels are used as the mechanism through which the data is transmitted from one device to another. Channels are required each time a device wants to publish and subscribe to the PubNub network. While a user can only publish one message at a time, a user can subscribe to many different channels at a time. While you need to specify the exact channel name when you publish a message, you can subscribe to multiple channels at once via multiplexing, which is simply subscribing to one or more channels by providing the channel names as an array of strings.
Install and Configure the PubNub Unreal SDK
To begin, you'll need to install any PubNub dependencies and configure the PubNub Unreal Chat SDK to connect your application to the PubNub network. While you can use either the core Unreal SDK instead of the Unreal Chat SDK to implement text chat, we will be utilizing the Unreal Chat SDK, as it’s more tailored to chat. Learn more about the difference between the Unreal Chat SDK and the Unreal SDK by reading this blog. The best part about either of these SDKs? You can either use the visual scripting language Blueprints or C++ to perform this functionality!
For the sake of simplicity, we will be focusing on the Blueprints approach of this SDK. While the code snippets will be images, our documentation has interactive blueprints that you can directly copy the nodes from and paste into your project. Each feature discussed will have links to our documentation to implement either Blueprints or C++.
Download Unreal Engine 5.0 or higher. The Unreal Chat Showcase game was built using the latest version, which at the time of this article is 5.4.4.
Install Visual Studios, XCode, or Rider as your IDE, depending on your system and preferences.
Clone the repository of the Unreal Engine Chat Showcase game and follow the installation instructions in the readme to install the Unreal Chat SDK. This also includes obtaining your free API keys via your PubNub account, which is necessary to connect to the PubNub infrastructure. You’re also welcome to create your own Unreal Engine project or utilize an existing application.
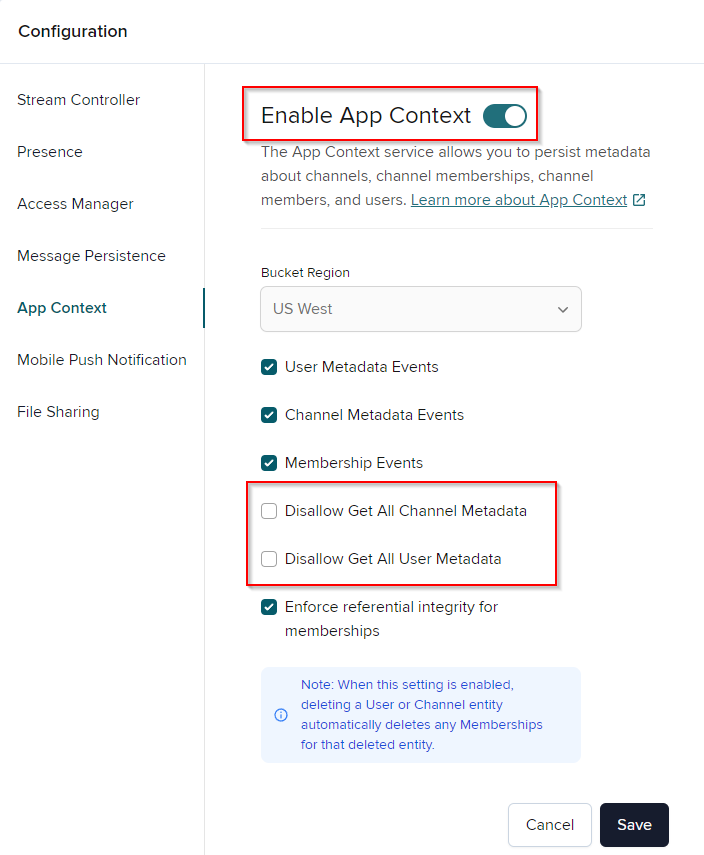
For your keyset, ensure you enable App Context, Message Persistence, and Presence. At a minimum, App Context is required for the Unreal Chat SDK to initialize and build chat.
Once you’ve downloaded the game, add the SDKs to the correct
Pluginsfolders and open the game project in the Unreal Editor.Navigate to
All/Content/UI/B_LyraFrontendStateComponent.Give yourself a User ID that is required by all PubNub SDKs to connect to the platform.
Double-click to open the function
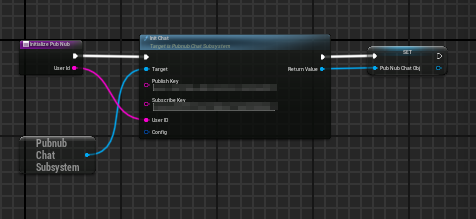
InitializePubNub, which lives in the GameInstance.Add the PubNub keys to the
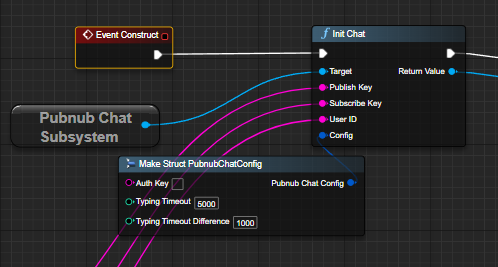
InitChatBlueprint.
Before you can start publishing to send messages to other devices and subscribing to receive messages from publishers, as well as incorporate other useful message features, you need to understand the basics of the Unreal Chat SDK, so you can utilize this information when setting up your application.
Understanding the Chat SDK: Chat Entities
The Unreal Chat SDK is part of our Chat SDKs, which offer specialized abstractions for chat use cases and provide more intuitive, chat-focused APIs you can add to new or existing applications.
Every Chat SDK consists of what we call Chat entities, which are the building blocks that make up the SDK so you can easily build, manage, and access all levels of your chat app. Every entity has different methods and properties that allow you to build your chat system. We’ll briefly go over the basics of each of the chat entities, but it’s highly recommended that you go through our extensive documentation to understand each entity and the methods available to each entity.
Chat Entity
The chat entity is the core component you interact with once the Unreal Chat SDK is initialized. It provides access to various methods like creating channels, managing users, and performing operations such as deleting a channel or checking user subscriptions. Initialization requires a Publish Key, Subscribe Key, and User ID, with optional additional settings, as we did in the earlier steps.
You can only have one instance of the chat entity active at a time, so it’s recommended you store it in your GameInstance to access between various levels.
Channel Entity
The channel entity allows you to manage chat channels in your Unreal Engine game. You can create, update, delete, and fetch information about specific channels. Channels are central to organizing chat spaces and can be used to group users together for conversations. You can also retrieve metadata and manage user memberships within each channel.
User Entity
The user entity represents individual users in the chat system. It allows you to create, update, delete, and retrieve information about users, as well as manage the online status of users known as Presence. You can also manage user metadata and track which channels they are a part of. This entity helps you manage user-specific data and actions, ensuring smooth interactions within the chat environment.
Message Entity
The message entity handles sending, retrieving, updating, and deleting messages within your chat application. It allows you to manage the flow of communication between users, ensuring messages are properly delivered and stored. With this entity, you can also track message metadata and manage various message-related actions, such as threading or reactions.
Membership Entity
The membership entity manages the relationship between users and channels in your chat system. It allows you to add or remove users from specific channels, retrieve membership details, and update membership-related metadata. This entity helps maintain user participation within channels and ensures users are subscribed to the right chat spaces.
Event Entity
The event entity allows you to handle real-time events within the chat system, such as user presence, message actions, and channel updates. You can listen to these events to trigger specific actions or updates in your app. Additionally, you can create custom events to extend chat functionality, allowing you to define and respond to unique actions beyond the default chat events, providing greater flexibility and control over your chat environment.
There are a few other entities, but these are the most common and ones you should focus on understanding. Once you’ve read through the documentation on these entities, you are now ready to start building the chat.
Initialize the Chat Entity Object
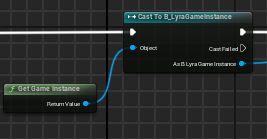
The first step in initializing chat is to call InitChat from the All/Content/B_LyraGameInstance to construct the chat entity object. You provided the UserID and the publish/subscribe keys earlier when the function InitializePubNub is called from All/Content/UI/B_LyraFrontendStateComponent.
If the User ID you use to initialize the SDK does not exist in the keyset’s App Context metadata, it will automatically create a PubNub User using that User ID. You can update your User metadata using the UpdateUser method to edit the metadata of an existing user.
As mentioned previously, you can only have one instance of the chat entity object constructed at a time, which is why you should keep a reference to the chat object in the project’s GameInstance so it can be referenced anywhere in the project.
Establish Channels
Once you’ve initialized your chat object, you’ll need to create a channel entity of one of the following types to establish a connection between you and interested subscriber(s): Public, Direct(1:1), and Group.
When you create each type of channel, you’ll need to give it a Channel ID, similar to how you had to provide a User ID for the chat entity creation. While PubNub doesn’t enforce specific channel names, it is recommended to follow our channel naming conventions to help dictate their purpose and the types of messages being sent over those channels.
Public Channels
Public channels, or conversations, let players engage in open conversations with many people. Anyone can join public channels, but there exist limitations for attempting to implement things such as typing indicators, invites, or read receipts since these features are not practical for a large number of users in one channel.
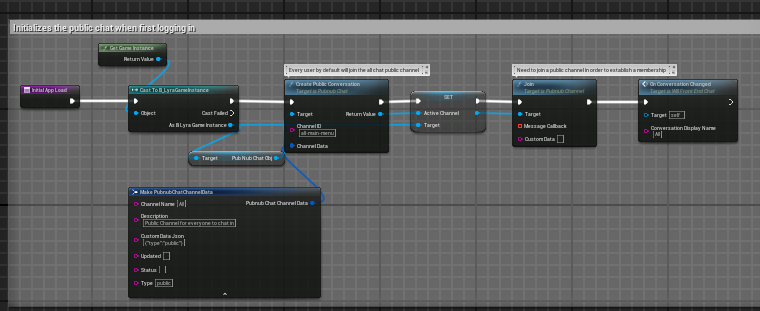
To create a public channel, call the function CreatePublicConversation by providing it with a Channel ID and some metadata about the channel. Let’s take a look at an example, located in the function InitializeAppLoad in /All/Content/PubNub/FrontEnd/WB_FrontEnd_Chat:
While not required, you should always provide channel metadata about the channel entity you are creating. Most importantly, update the Type field by denoting the type of conversation.
It is also important to note that when you establish direct or group channels, the function calls will automatically create the channel membership for the channel member and sends an invite for another user(s) to join the channel. Since anyone can join a public channel, this membership is not established. If you would like to establish a membership between the user of the chat object and the public channel, you’ll need to join the membership as indicated in the above screenshot.
Direct Channels
Direct channels enable private conversations between two players. One player will initiate the chat and send an invitation to another person.
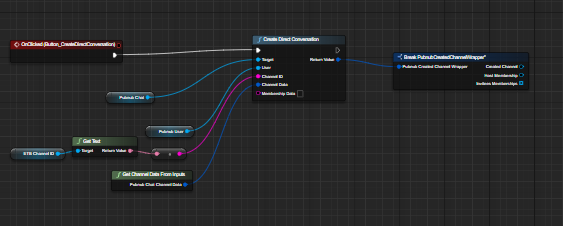
Call CreateDirectConversation to create a direct channel between two players:
In order to establish the connection with another player, you’ll need to create or get a PubNub User from App Context. Similar to creating a public channel, you should also provide some useful metadata about the channel.
CreateDirectConversation will automatically perform the following for you:
Automatically sets the channel membership for the channel owner so that they can join the channel.
Invites the other player to join the channel. As a result, an event of the type
invitegets created and you can listen to these events in your chat app and notify the invited players. More on that later.
Group Channels
Group Channels enable communication between multiple players and can only access the channel when invited from another player.
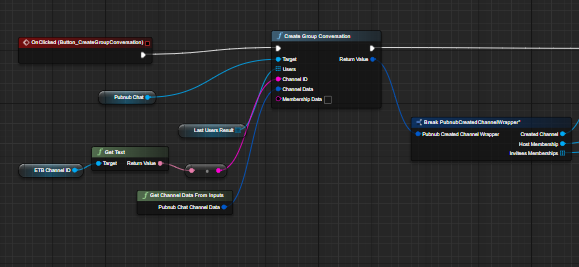
Call CreateGroupConversation to create a direct channel between two players:
In order to establish the connection with other players, you’ll need to create or get an array of PubNub Users from App Context. Similar to creating a public/private channel, you should also provide some useful metadata about the channel.
CreateGroupConversation will automatically perform the following for you:
Automatically sets the channel membership for the channel owner so that they can join the channel.
Invites the other players to join the channel. As a result, an event of the type
invitegets created and you can listen to these events in your chat app and notify the invited players. More on that later.
Send and Receive Messages in Conversations
Now that you’ve established the different types of conversations for your app, you need a way to be able to publish and receive messages sent across the PubNub platform.
To be able to send and receive messages, you will need to utilize a PubNub Channel object type to perform this functionality. Regardless of the type of channel you create, each returns a structure that contains the created PubNub Channel object type that you can utilize for both sending and receiving messages for that conversation.
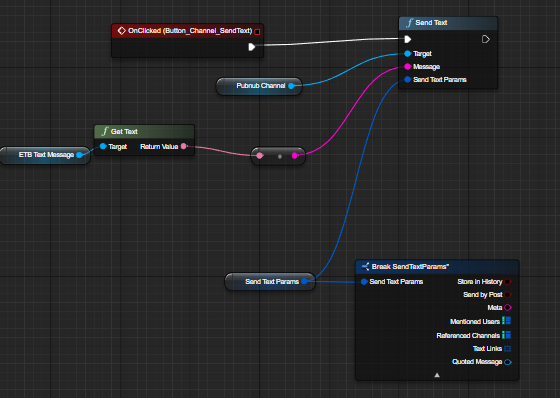
Send Messages: <code class="text-[.838em] bg-blue-lightest border border-navy-200 rounded-[5px] px-[5px] py-[3px]">SendText</code>
To be able to publish a message on a specific channel, you can call the SendText function to prepare the final message content for publishing, which includes the text itself and any relevant metadata about the message. The metadata parameters are not required:
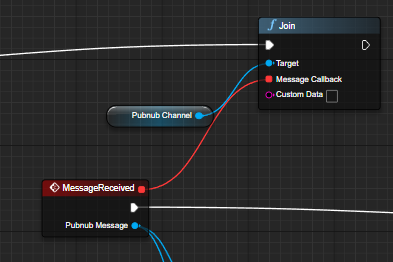
Receive Messages: <code class="text-[.838em] bg-blue-lightest border border-navy-200 rounded-[5px] px-[5px] py-[3px]">Connect</code> and <code class="text-[.838em] bg-blue-lightest border border-navy-200 rounded-[5px] px-[5px] py-[3px]">Join</code>
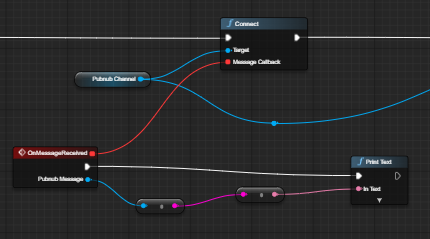
To be able to receive messages on a specific channel, there are two methods you can utilize to do so: connect and join. Both enable users to receive messages but have different distinctions.
Connect enables you to let players watch a given channel without the need to join the channel as members. This is useful in case you have an invitation-based system, where a player who gets invited to direct and group conversations doesn’t actually want to join the channel as an official member.
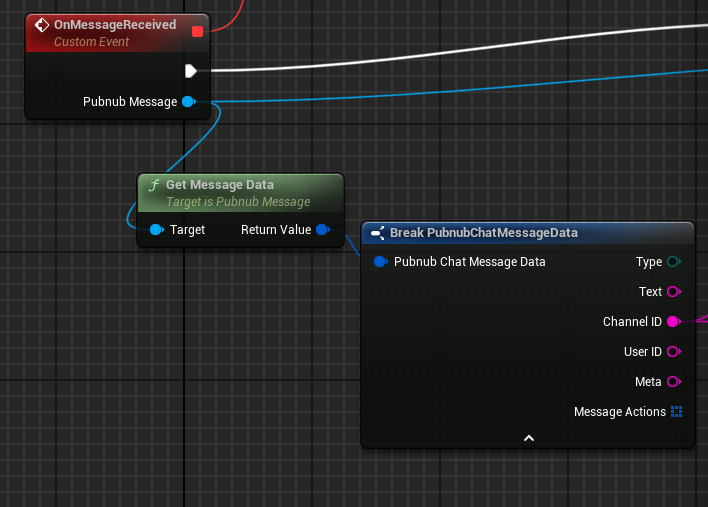
You define a callback and can listen for messages on this channel as they occur.
The PubNub Message contains useful information about the message.
Join also connects a player to a given channel, but also sets its membership. This way, the chat users can both watch the channel’s content and be a full-fledged member.
Remember, CreateDirectConveration and CreateGroupConversation both set the channel memberships, so you can simply call connect to listen for messages for those types of chats.
Congratulations, you’ve established the foundation of the chat system for your game! There’s a lot more you can do with the Unreal Chat SDK, including getting the online status of players, loading previous conversations, in-depth message features, and more. Continue reading to learn how to implement these features for your own game.
Conversations
When you first start your application, you’ll want to load the conversations the logged-in player is a part of and load the messages themselves. Players should also be notified of any notifications, should as mentions, unread messages, system messages, and more while they are gone or in a different part of the game.
Retrieve Conversations
To load which conversations the player is associated with, you’ll want to utilize the method GetMemberships. This method returns the list of all channel memberships of a given player:
Remember, when you create a Direct or Group channel, you automatically have the membership set that associates the player with that channel (the same is true with join calls). You can utilize the channel data from each of these channels to display, such as for group conversation and public channel names.
Once you have the channels that the player is associated with, you can call GetMembers to return the list of all channel members for each channel.
You can extract each user entity from the returned Memberships array to retrieve user data to display on the screen. The Unreal Showcase Game displays these conversations and pulls from each user entity’s username to display on the UI.
Fetch Message History
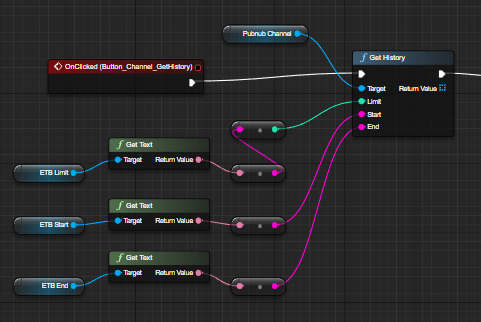
Since you’ve called GetMemberships, you now have access to each of the channel entities that the logged-in player is associated with. You can then fetch historical messages from each of these channels using GetHistory. This method returns an array of message entities.
In order to store and retrieve messages for your application, you’ll need to ensure you have enabled Message Persistence in the Admin Portal.
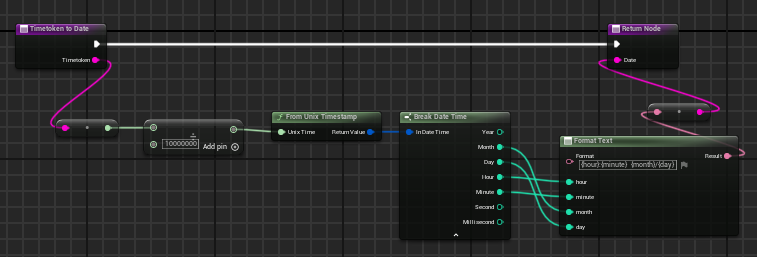
When adding each message from the conversation to the UI, you’ll probably want to display the date of each message. Each message entity has a function called GetTimetoken. This is the 17-digit precision Unix time (UTC). To convert this timetoken to Unix timestamp (seconds), divide the time token by 10,000,000. Here is how the Unreal Engine Showcase game converts a PubNub time token to a Unix timestamp (located in the function TimetokenToDate in /All/Content/PubNub/FrontEnd/W_ChatEntry.
Display Unread Messages
As you load the conversations and obtain the messages that the conversation has, you might want to signal or notify in some way to the user that they have missed some messages. This could be a notification on each conversation or a pulsing color, indicating how many messages they have missed while they were gone.
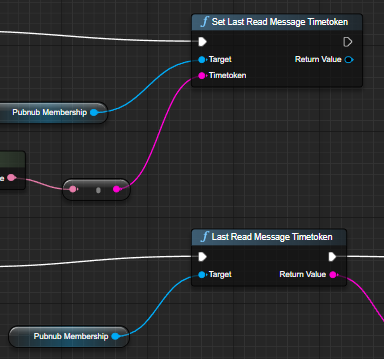
The Unreal Chat SDK stores info about the time token of the last message the current user read on a given channel on the lastReadMessageTimetoken property. lastReadMessageTimetoken is available on the custom parameter of the Membership object. It is automatically set for a user when they first establish the membership, but you will need to decide what player actions will trigger to update the lastReadMessageTimetoken property, such as clicking on the conversation, a button to clear the notification, and so on.
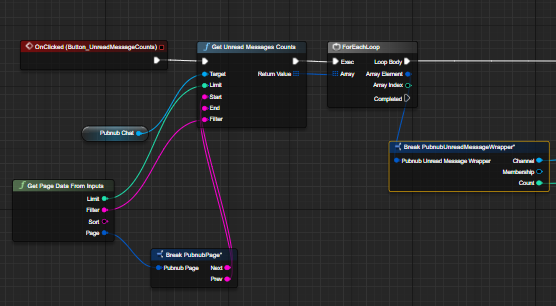
When you first load into the app, you can utilize the function GetUnreadMessagesCount to return information on all of the messages for the user.
This returns every channel entity that the user has a membership for, as well as the count of missed messages.
If a channel does have a count that is higher than zero, you can then display your UI notification on the missed message. Utilize the lastReadMessageTimetoken property associated with each of the returned membership entities in the PubNubUnreadMessageWrapper to determine how many messages the user has missed. Utilizing the method LastReadMessageTimetoken can determine the time token of the last message the player read on a given channel.
Since you have fetched the message history earlier, you can check which messages haven’t been read yet based on the time token. You can also utilize the end parameter in GetHistory to pull this specific subset of missed messages, where end (without start parameter) would be the lastReadMessageTimetoken, as you only want to receive messages from that end time token and newer. Once you have the array of missed messages, you can display these in a unique color so the user can see which messages they have missed. You would then repeat this process for each channel that has any missed messages.
Once a user has seen these messages in each conversation, either by scrolling through to the bottom of the conversation or clearing the notification, you will need to update the membership entity associated with that channel’s LastReadMessageTimetoken.
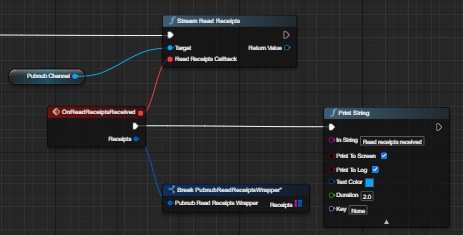
After updating the lastReadMessageTimetoken, you should call the SetLastReadMessage as it lets you implement the Read Receipts feature and monitor which channel members read which message. You can then call the StreamReadReceipts method and attach a callback to listen for the read status of the channel members.
Presence
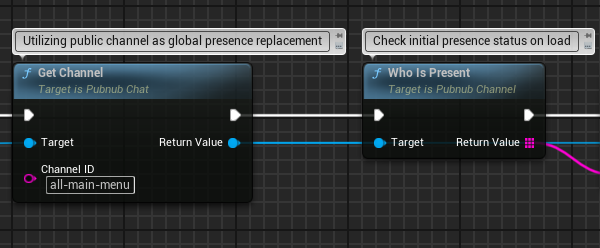
In the chat, you probably want to graphically show up-to-date information on all users present in the game or on a given channel, showing if they are online, offline, active, or away. The Unreal Chat SDK provides methods to determine user presence on the channel, as seen in the Unreal Showcase Game:
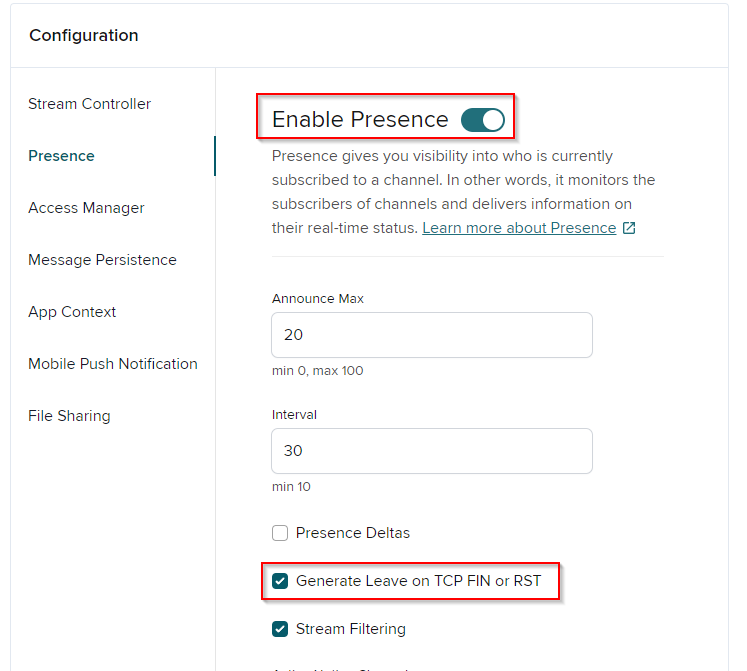
Depending on how you want to handle presence, it’s generally recommended to have a global channel that every user is subscribed to in order to track general presence updates. You can also perform the next steps for individual channels, but for the sake of simplicity, we only care about one channel’s presence updates. Regardless of how you wish to utilize Presence, you’ll need to ensure that you enable Presence for your keyset in the Admin Portal. Also, ensure that the Generate Leave on TCP FIN or RST option is enabled, as it helps detect the connection termination of a network layer and report it as a PubNub leave event, helping generate events more accurately.
When you first load the game, you can call the WhoIsPresent method to return all users present on a given channel.
This method returns a list of user IDs that are currently online. Then, you can then go through each of your conversations that were loaded earlier and update the online status of players associated with each conversation, since you called GetMemberships earlier.
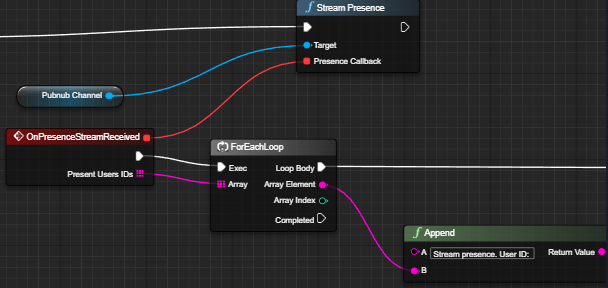
Once you’ve done the initial load, you can stream presence events with the channel entity you wish to track presence events on by calling the method StreamPresence and attaching a callback to listen for any presence events to update your UI.
Search for Players
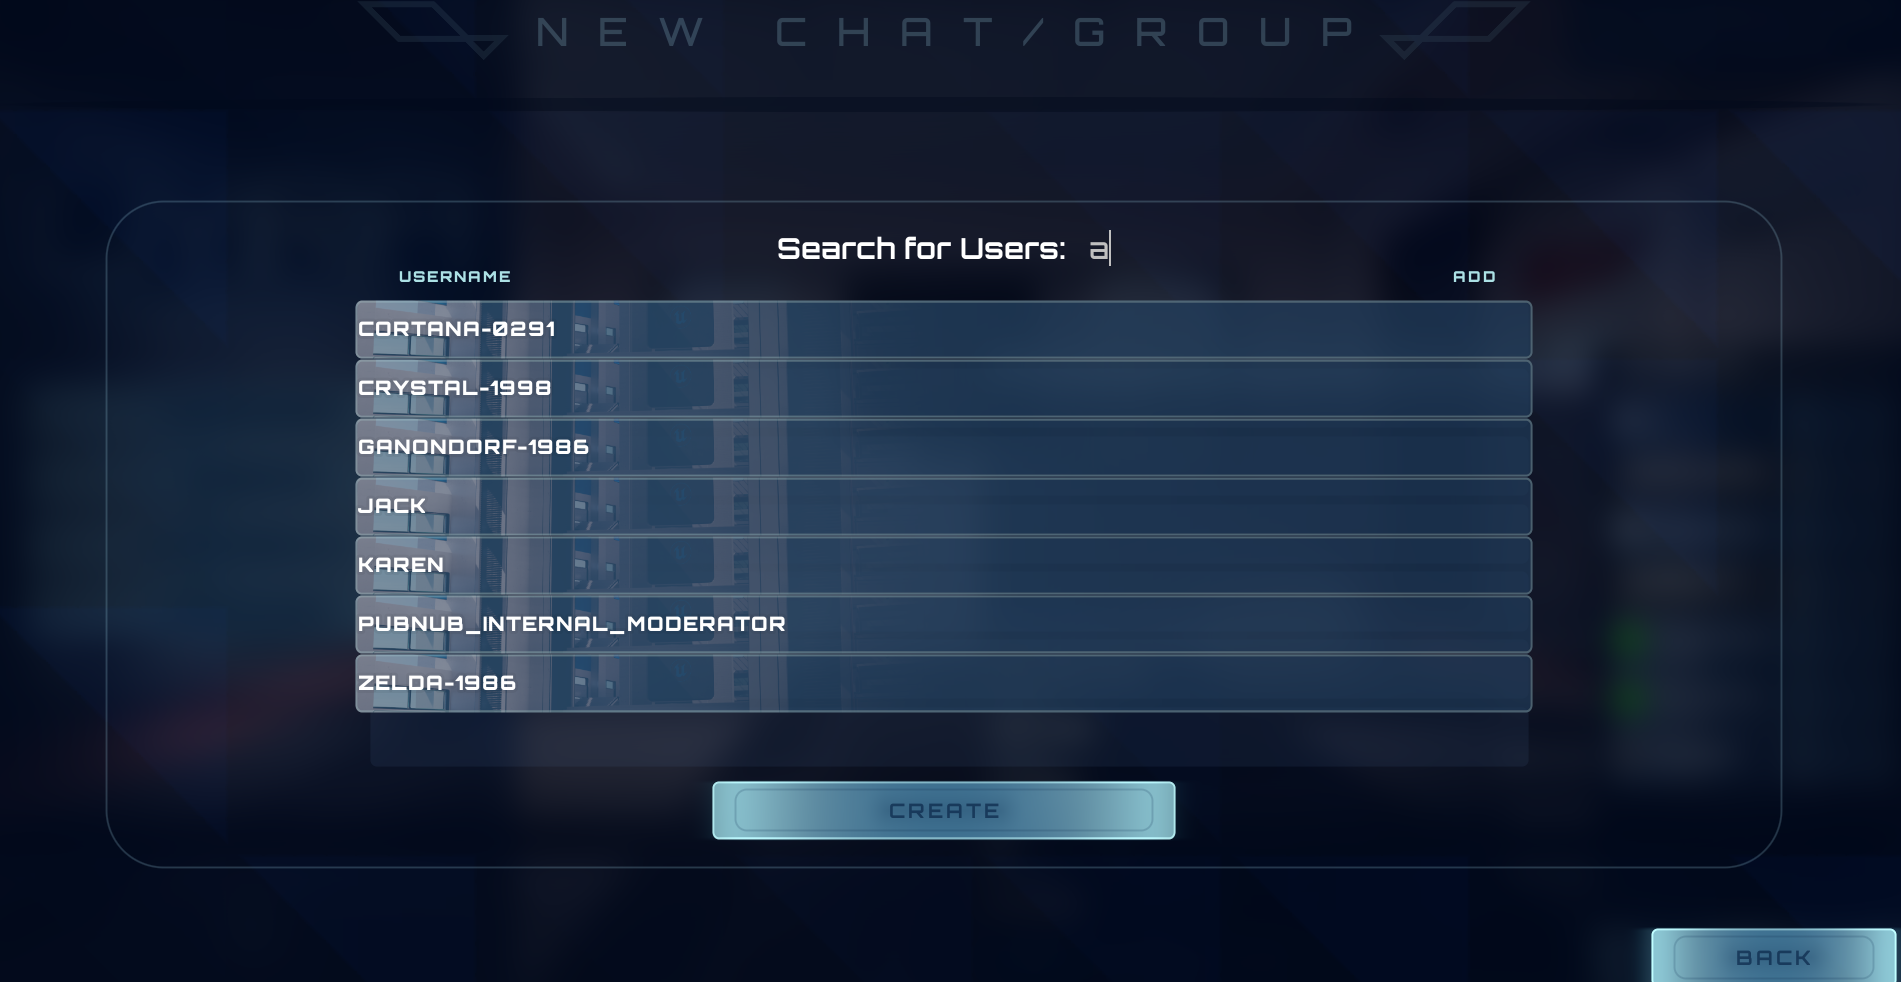
When you want your players to be able to search for other players, you should add a UI that allows them to type names and populate a list of users that match that list. You can utilize the PubNub Chat SDK to perform this task: you can set and get user metadata information via our App Context feature.
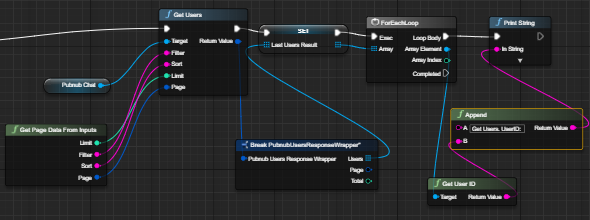
You can utilize the GetUsers method to get a paginated list of all players and their details.
This method returns a structure that includes an array of user entities that you can extract and display on the UI. You’ll need to make sure you not only have App Context enabled in the Admin Portal (which is required to use the Unreal Chat SDK) but also ensure that the Disallow Get All Channel Metadata and Disallow Get All User Metadata options are disabled.
Advanced Message Features
Once your conversations are loaded and users have caught up on any missed messages, they should be able to interact with messages by performing various actions that are common in other messaging applications such as Discord, Messenger, and WhatsApp.
Typing Indicators
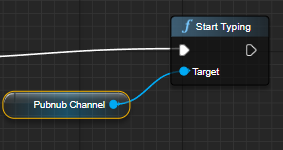
The [typing indicator] feature provides real-time feedback when someone is composing a message. As a user begins typing, you can call the [StartTyping] method, which activates a typing indicator on a given channel, such as each channel entity obtained from loading the conversations earlier via GetMemberships.
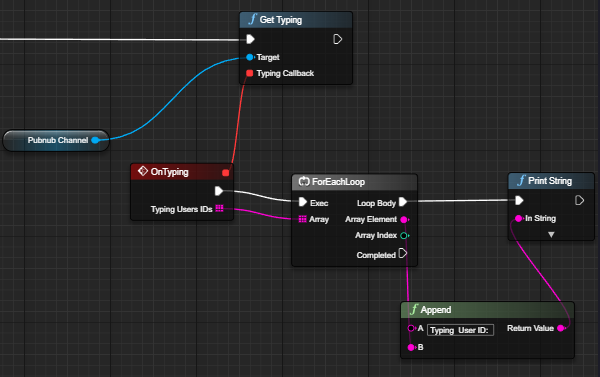
Other players can listen for these typing events via the method GetTyping.
You can then loop on each of the users that are currently typing in that specific channel to display in the UI.
While there is a StopTyping method that can be called to deactivate a typing indicator on given channel, the Unreal Chat SDK has a default typing timeout set to 5 seconds during the Unreal Chat SDK initialization. The StartTyping method substracts 1 second from the default timeout to cause an intentional delay between typing signals, as a way to ensure that the system responds to a user’s actual typing behavior.
Message Reactions
The Reactions feature allows players to interact with messages by adding reactions commonly found in other chat apps.
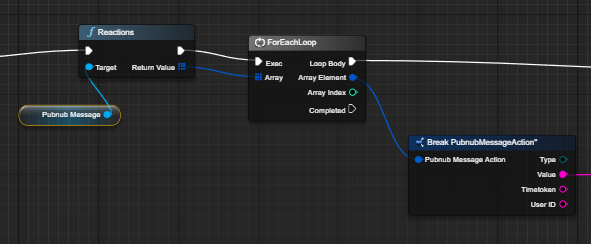
When you load a conversation, GetHistory will not only retrieve messages but also all reactions and metadata attached to the message.
If you would like to determine which reactions are associated with a specific message (as well the ID of the user who added it and the time token stating when this action was added), you can utilize the Reactions method.
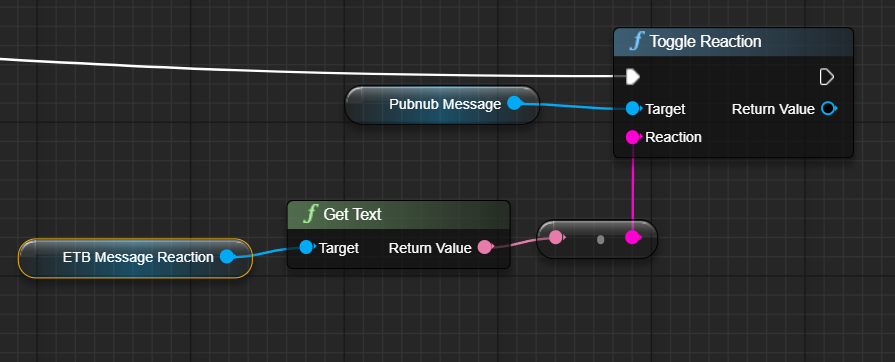
To actually toggle (add/remove) reactions on a message, you can utilize the ToggleReaction method for both adding and removing message reactions.
These reactions can be your own custom emojis that you’ve mapped internally, but you can also utilize text emojis. An example would be \u{1F44D} for the thumbs-up emoji.
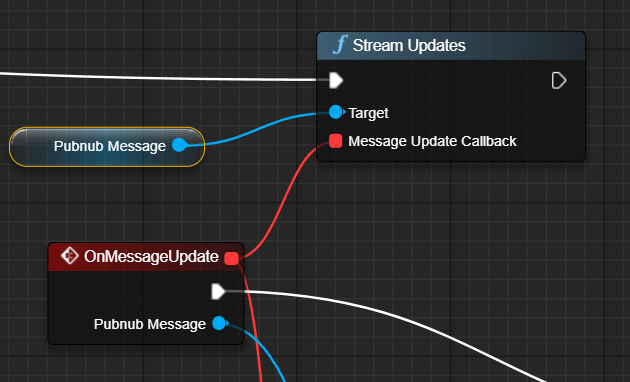
To trigger these message reactions for other users to visualize and see, you can call the StreamUpdates method. This method’s callback is invoked whenever someone adds, edits, or deletes a message, or adds or removes a message reaction to/from the specific message(s).
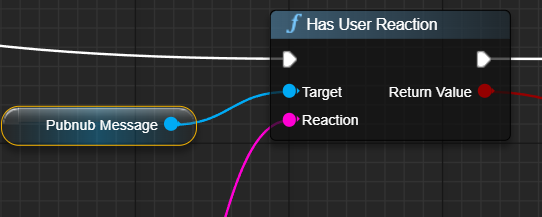
Once a user receives an update, you can check to see if the message has a message reaction via `HasUserReaction’.
Pinned Messages
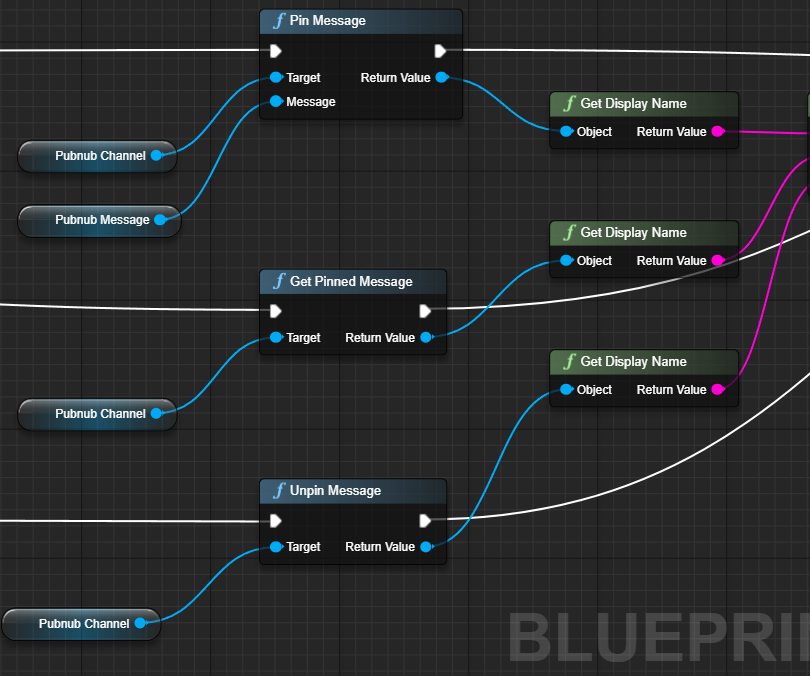
Using Unreal Chat SDK methods, you can implement UI features allowing users to pin/unpin a message to a channel by selecting a sent message and placing it on top of the channel for everyone to see and access it easily.
Users can Pin a message via Pin Message, get the pinned messages by calling the method Get Pinned Message, and also call `UnpinMessage’ to remove the message pin.
Message Threads
Message threads allow for organized, focused conversations within a larger chat channel by grouping related messages. With threads, users can reply directly to a specific message, creating a structured conversation flow that helps prevent important discussions from getting lost in the main chat. Each thread is associated with a parent message, and users can send, retrieve, and manage thread messages just like standard chat messages.
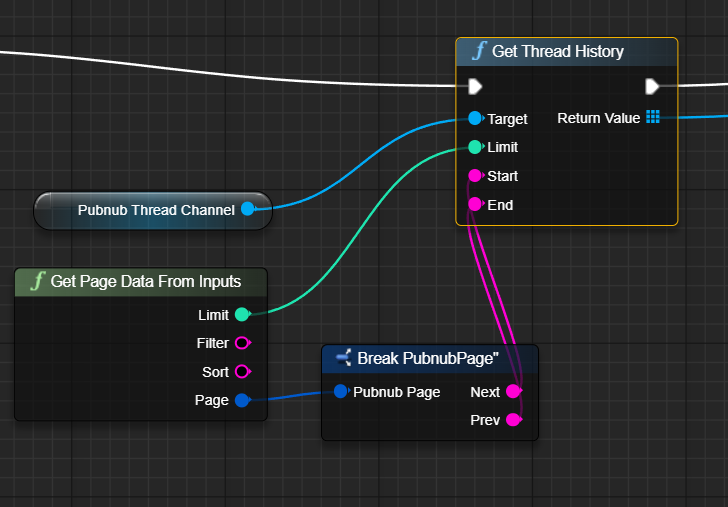
When you first log into the app, you can call GetThreadHistory on the threadchannel](https://www.pubnub.com/docs/chat/unreal-chat-sdk/learn/chat-entities/thread-channel) entity to load the initial thread messages from that thread channel.
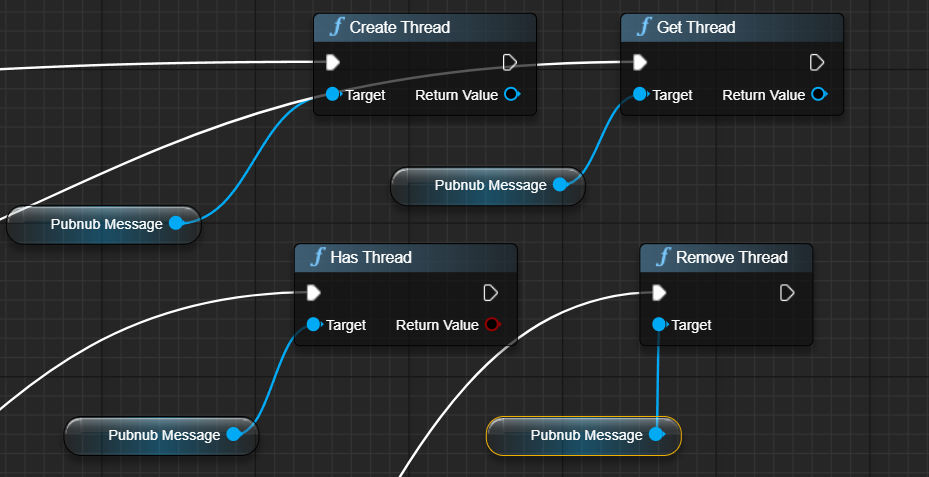
In order to get the Thread Channel entity, you can call the Create Thread and Get Thread methods, both of which return the ThreadChannel entity.
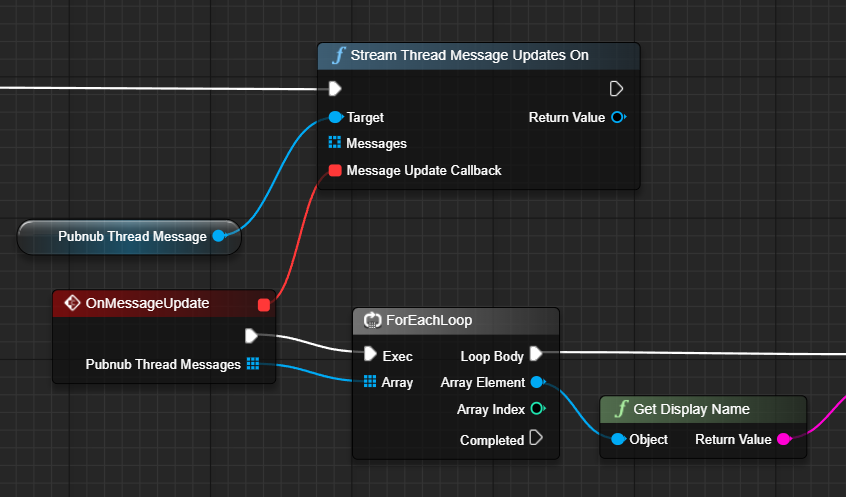
Players can then receive updates when specific message threads and related message reactions are added, edited, or removed on other clients using the StreamThreadMessageUpdatesOn on the ThreadMessage object.
There is a lot more you can do with the Threads feature, so it’s highly recommended that you check out the documentation to learn more.
Secure Your Chat Channels: Moderation
The Unreal Chat SDK has chat moderation tools that provide essential features for maintaining a safe and respectful environment in your chat system.
With these tools, players can flag users/messages. Admins, in turn, can monitor conversations by muting and banning based on these flagged messages.
Based on this admin moderation, your app should check user restrictions that verifies these permissions for users to prevent them from performing some operations in the chat app. For example, you can check if a user is muted before they try to post a message on a channel or verify if they are banned before they attempt to join a given channel.
What’s Next
In this how-to guide, you’ve learned how to add a robust real-time chat system to your Unreal Engine game utilizing the PubNub Unreal Chat SDK. We've discussed everything from how to initialize a chat object in your environment, to creating different conversation types, to sending and receiving messages, and even how to implement advanced channel, messaging, and presence features.
Whether you're an indie developer working on your first game or a seasoned developer looking to enhance your multiplayer game, PubNub's real-time functionality can serve as the infrastructure to support your in-game chat, so you can focus on what matters most.
Learn more with the following resources:
Read our documentation to learn everything you need to know about adding real-time chat to your game utilizing the Unreal Chat SDK.
Want to implement more than just chat in your game? Check out our documentation on our Unreal SDK to implement core, real-time features.
Learn how our Unreal Engine Showcase Game utilizes both our Unreal Chat and Unreal SDKs to implement real-time features.
Dive into the Unreal Chat SDK source code.
Feel free to reach out to the Developer Relations Team at devrel@pubnub.com for any questions or concerns.
