Channel Monitor
Related moderation approaches
Channel Monitor provides manual moderation through a web UI. For automated content filtering, consider Auto Moderation with AI-powered spam detection. You can also add Chat SDK moderation features for user-initiated flagging. For a complete overview of all moderation options, see the Moderation Overview.
The Channel Monitor module shows live and historical conversations on your application's keyset and lets you:
Channels
To start monitoring conversations in Channel Monitor, you must select channels to preview as a moderator.
Follow these steps:
- Log in to the Admin Portal.
- In the left sidebar, go to BizOps Workspace.
- Select Channel Monitor.
- Choose an app and keyset to moderate users, channels, and messages.
- If needed, configure your keyset following on-screen instructions.
Start moderation
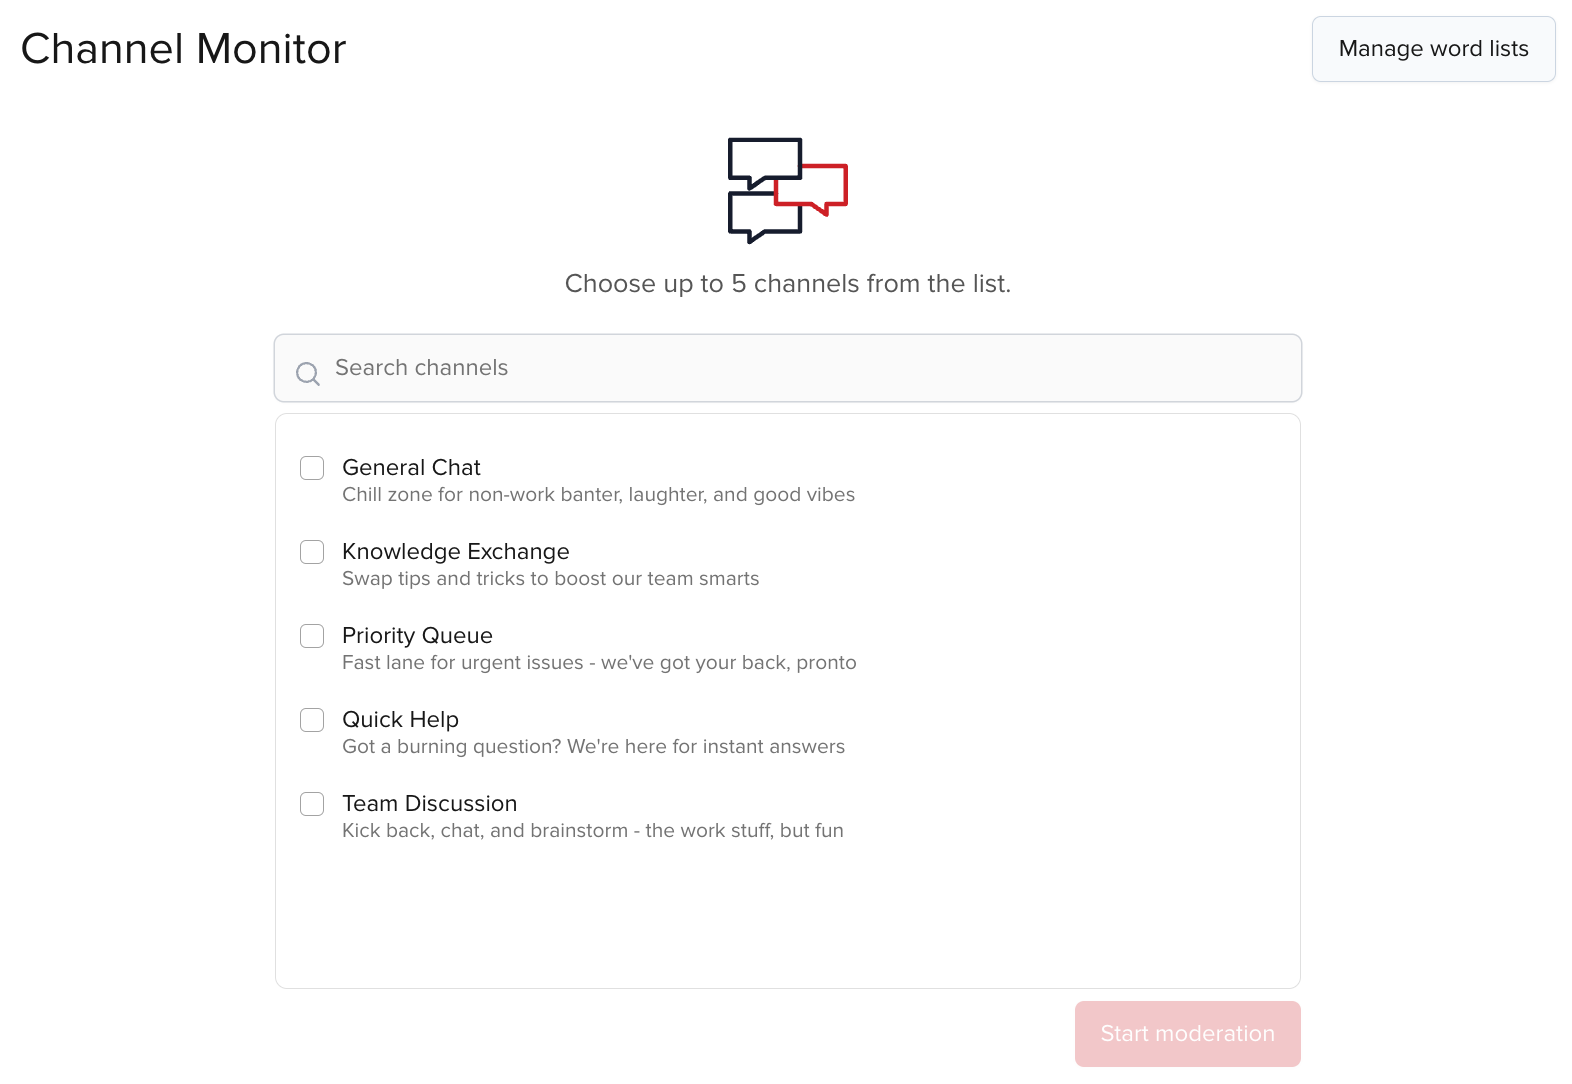
In the Channel Monitor view, you see an empty page with a search bar and a list of all channels on your app's keyset.
Empty channel list
If you don't see any channels after opening Channel Monitor, create channels first. See Channel Management for steps in BizOps Workspace.
This is where you start your journey as a moderator:
-
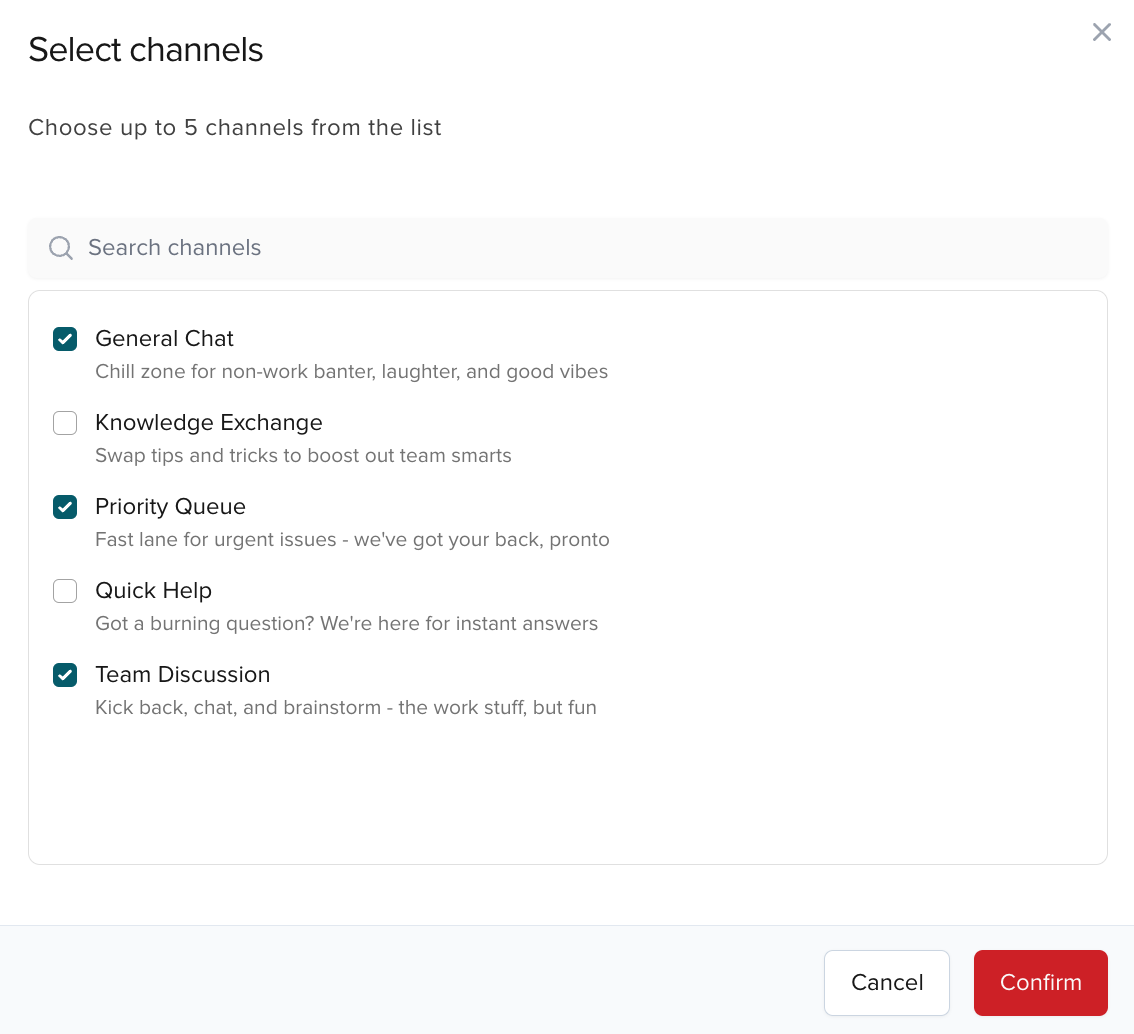
Select up to 5 channels from your app's keyset to monitor. Scroll to find channels or use search.
-
Click Manage word lists to add lists of words to monitor and highlight in messages.
-
Click Start moderation to continue.
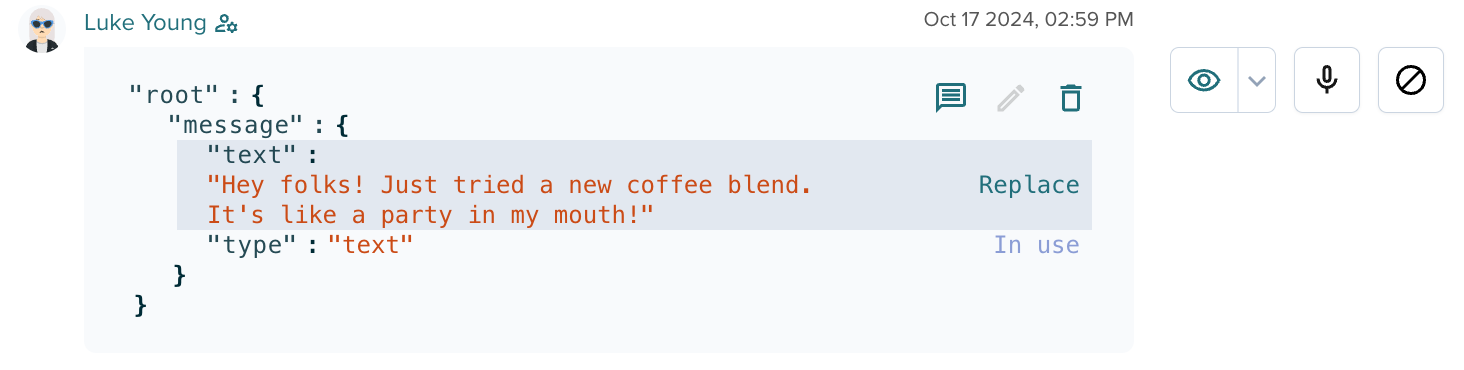
Message path configuration
If your app doesn't use Chat SDK and you haven't enabled and set up Channel Monitor Configuration on the main Channel Monitor screen to point to your app's message payload path, you'll see a popup modal requesting to provide the message path so you can see the correct message content on the moderated channels.
Under the hood
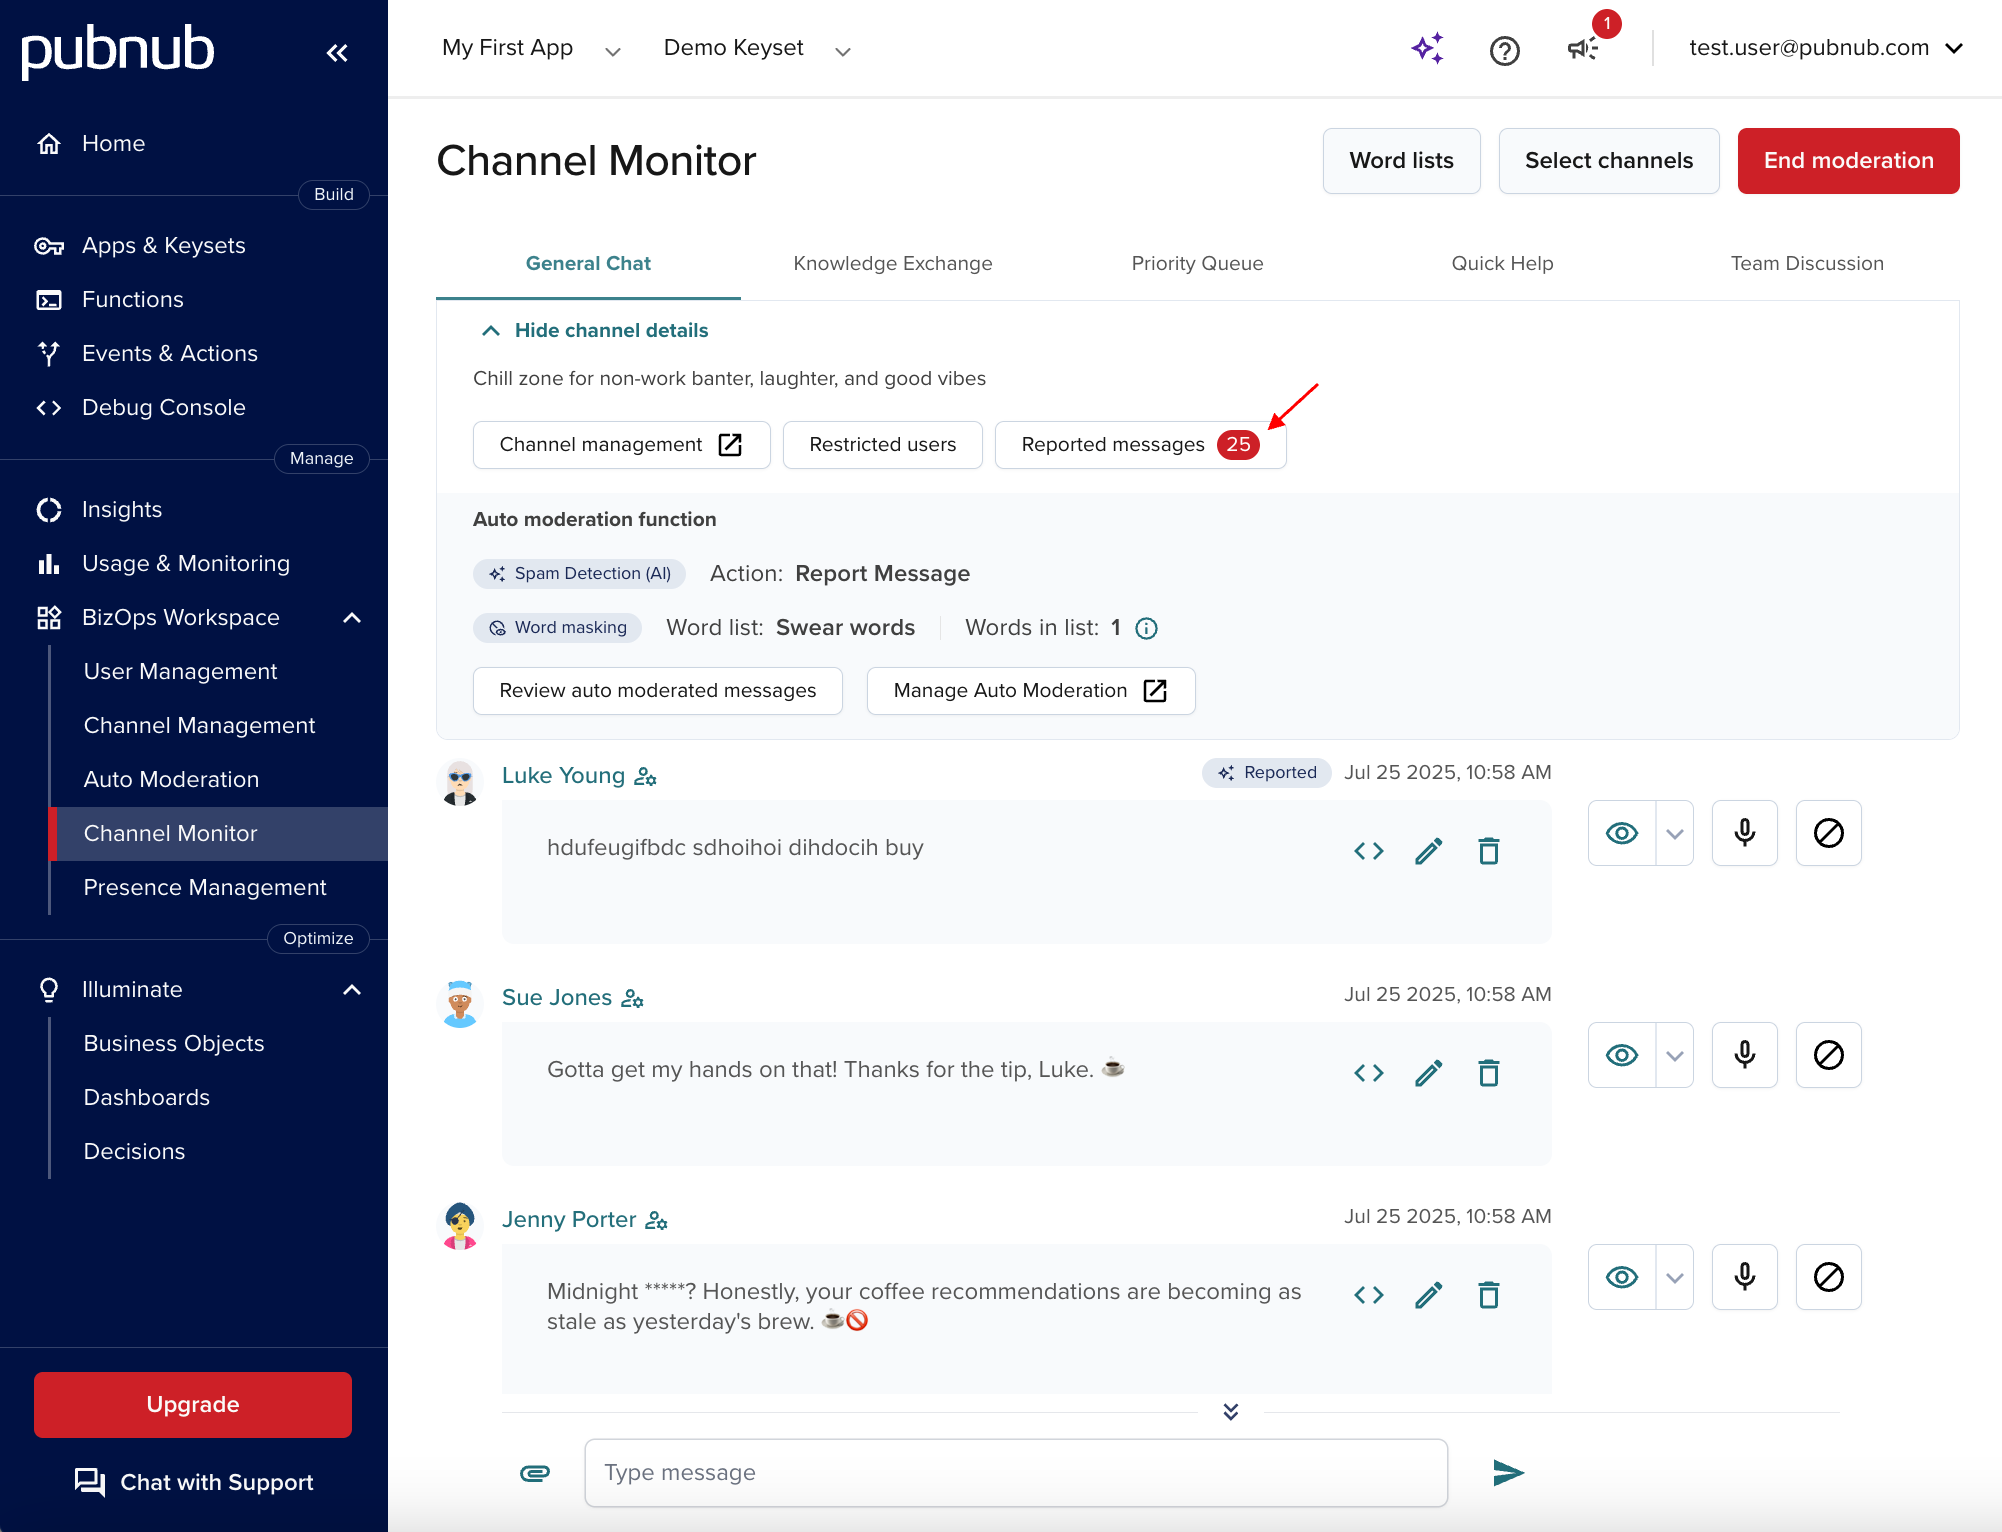
Monitor channels
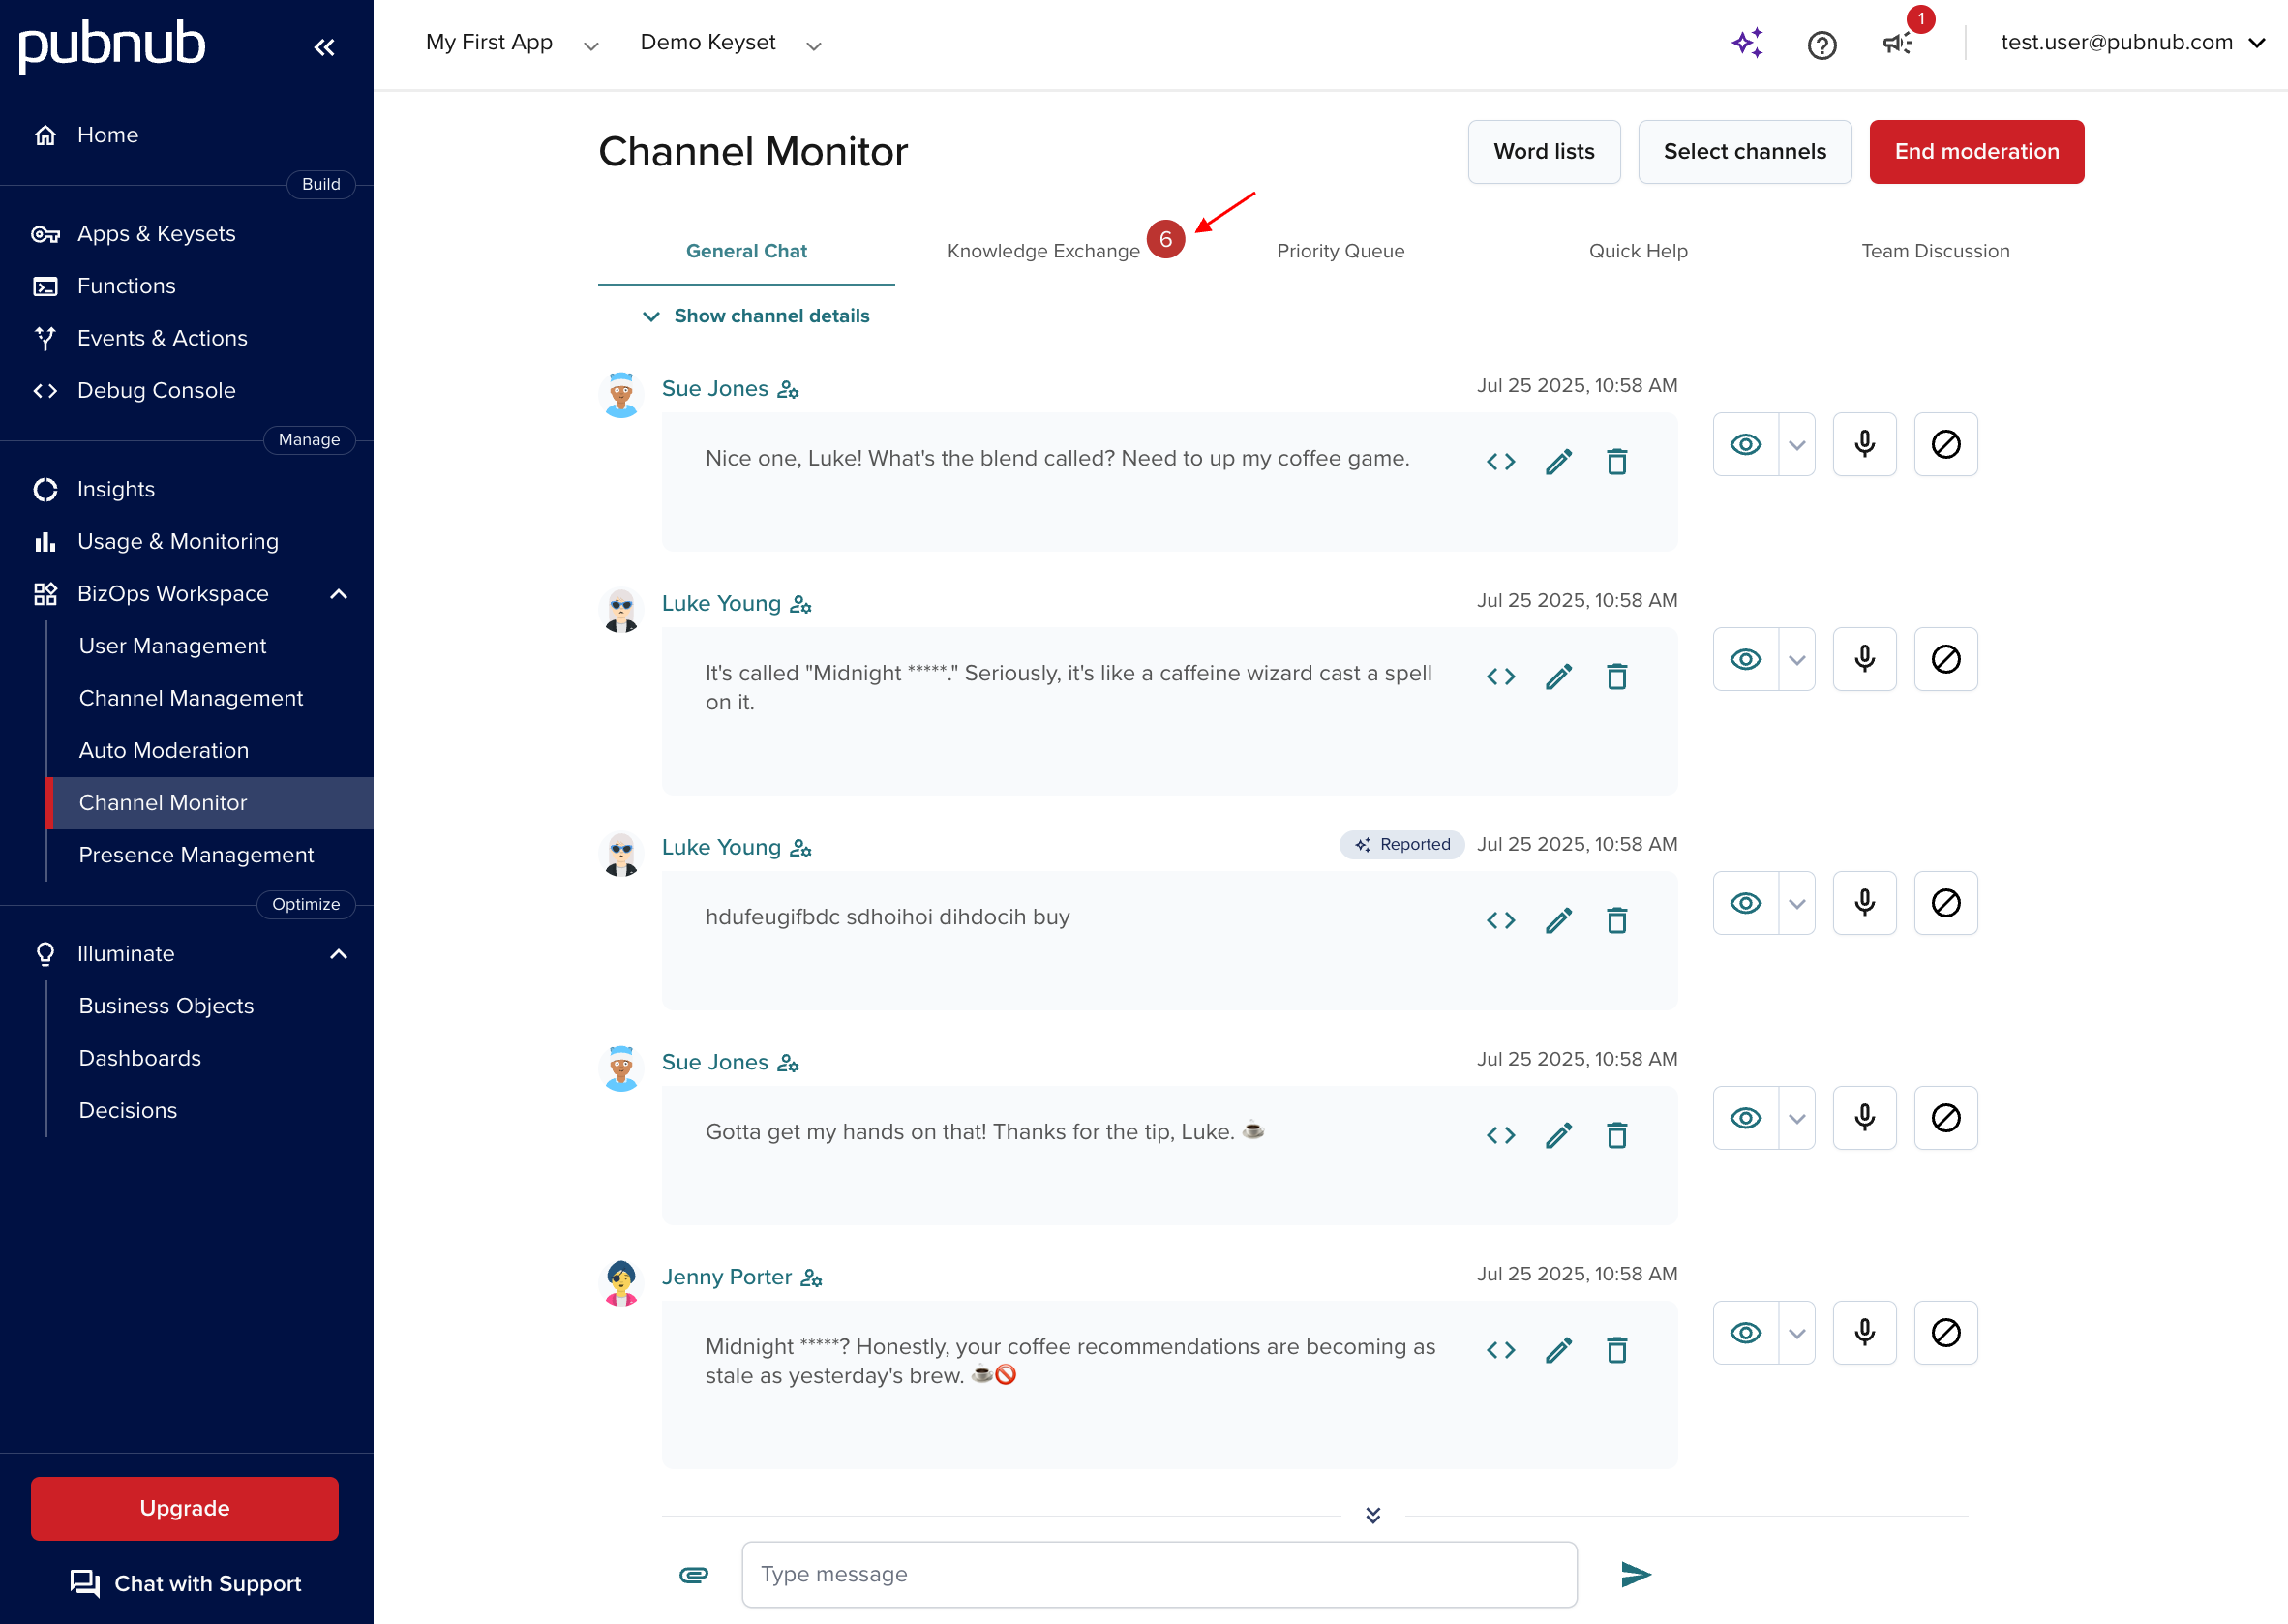
After selecting the channels, you can monitor all conversations happening there in real life.
Channels selected for moderation are shown as separate tabs. You can freely switch between the tabs to change the live chat view.
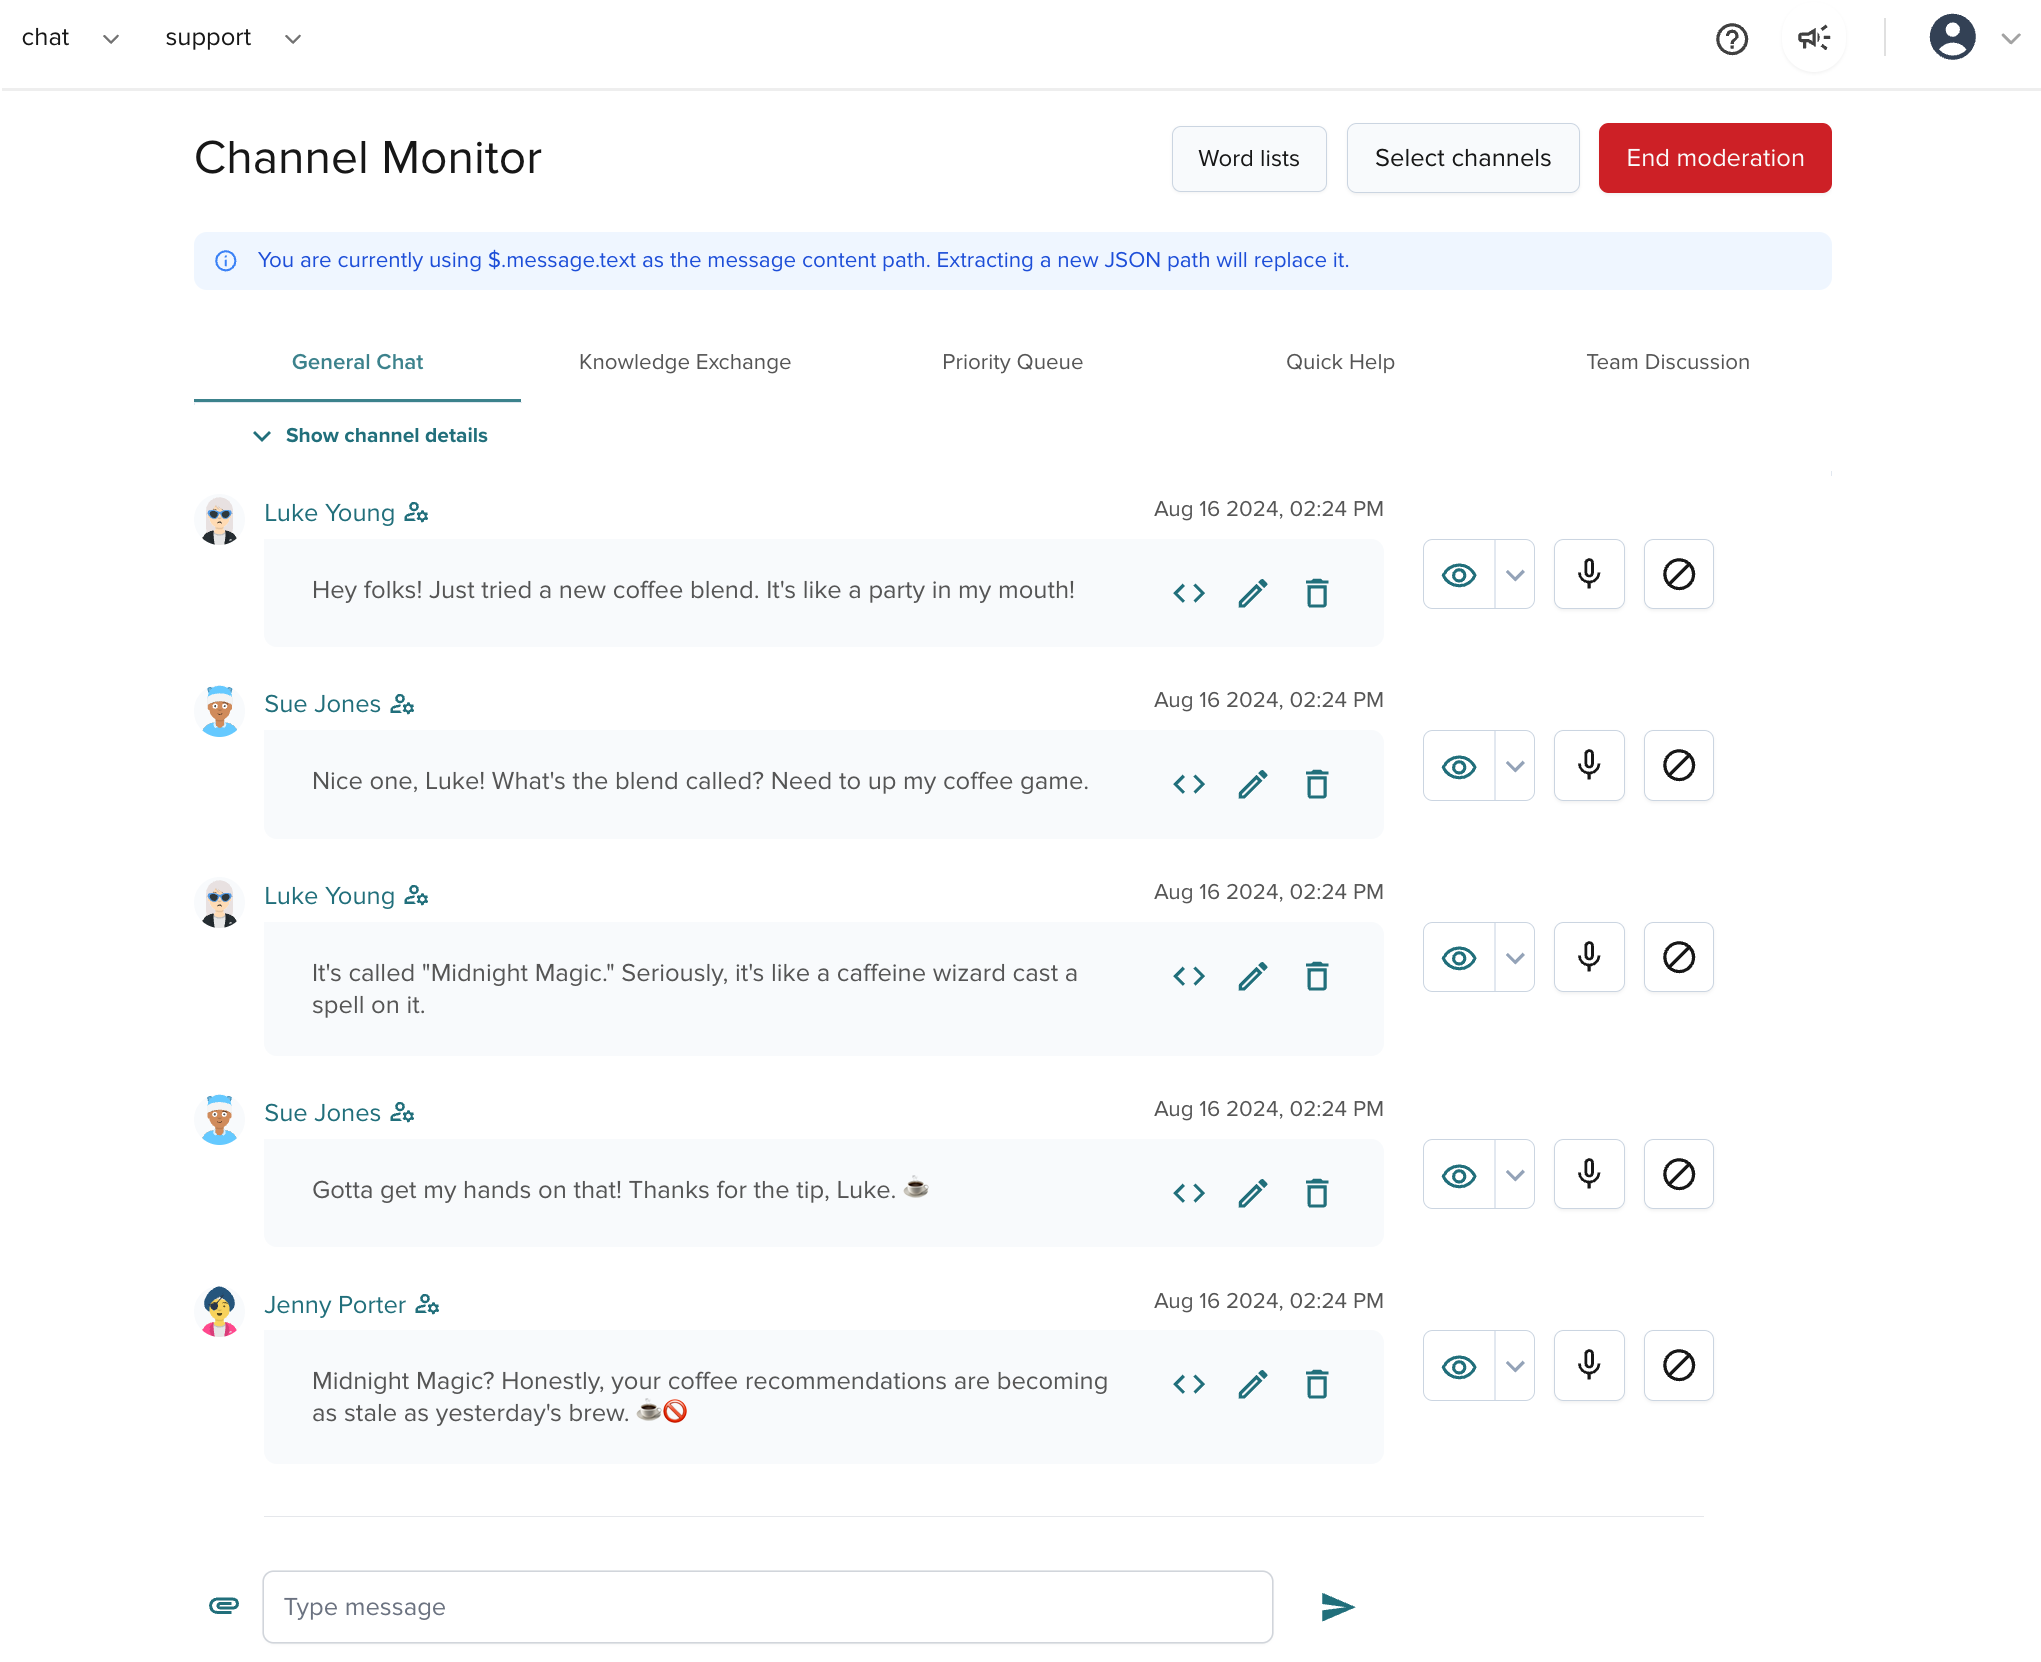
Each tab shows a live preview of a given channel with the following details:
-
Top action buttons (Word lists, Select channels, and End moderation).
-
Channel details with:
-
Channel Management which leads you to all details of the current channel.
-
Restricted users which shows all muted or banned users.
-
Reported messages which lets you review messages reported by chat members as potentially offensive and decide if you want to moderate these messages (edit or delete) or their authors (mute or ban).
-
Review auto moderated messages which lets you filter through all messages moderated by Auto Moderation functions and mark them as not spam (for feedback purposes).
-
Manage Auto Moderation which leads you to the Auto Moderation module where you can set up functions that'll automatically mask selected words in chat messages and/or detect spam messages.
-
-
List of the last 25 messages (and threads) published on the channel with the JSON-to-message switcher, edit and delete options.
-
Message authors with profiles linking to User Management.
-
Inline user moderating actions (watch, mute, ban) next to each user message.
-
Input field where you can publish a message on the channel. All channel members will see your message marked as published by the moderator.
The view also contains additional moderating options that we'll discuss in detail in separate sections devoted to user and message moderation.
Under the hood
Change channels
You can change the list of previewed conversations at any point by choosing the Select channels button in the top navigation.
When you click the button, you'll see the channel dropdown modal again, letting you select new channels or deselect the ones chosen previously.
End moderation
Select the End moderation button in the top navigation if you want to finish moderation and close all open channel tabs. This will bring you back to the initial channel selection view, where you can start moderation again.
Users
Once you have selected channels for moderation, you will see a live preview of all messages and threads (current and historical) that channel members posted on that channel.
If you notice that some users misbehave and post offensive messages on the channel, you can perform one of these actions:
- Observe a user without limiting their access rights (watch).
- Limit the user's ability to publish messages on a channel (mute).
- Limit the user's ability to publish messages on a channel and read messages published by others (ban).
Channel vs. global scope
Watching users is a global functionality - if you start observing a user on one channel, you will see them added to the watchlist on all channels you selected for moderation. Muting and banning, on the other hand, are limited to a given channel. If you want to mute or ban a user on multiple channels, you must add these actions separately on each channel.
Watch
Suppose you notice a user whose messages can potentially offend other channel members. In that case, you can observe them by clicking the Watch icon or the Watch button under the actions menu next to the message this user posted.

This indicator doesn't affect the user - they don't see they are on your watchlist. You will see that the Watch flag is enabled next to every message the watched user publishes on the channel until the browser session is open.

This way, you can monitor the user and decide whether to restrict their access by muting or banning them.
Raise counter
Clicking the Watch icon again next to another message from the same user will increase the counter.

Lower counter
To decrease the counter number on the watched user, click the Counter -1 button under the actions menu next to any message this user posted.

Reset counter
To reset the counter and stop watching a user, click the actions menu and select the Reset counter button. This will reset the counter on all moderated channels.

Mute
Enforce security with Access Manager
To successfully mute a user on a specific channel using Channel Monitor, make sure you also set up Access Manager in your application to grant or revoke server permissions from users based on their muting restrictions on UI.
Read How to Securely Moderate Chat and Users with BizOps Workspace and run an end-to-end demo showing secure moderation from both the client and server perspectives.
If you decide that a given user can no longer publish messages on a channel (shouldn't have "write" access), you can mute them.
Under the hood
To mute the user, click the "microphone" icon next to the user.

A muted user will have a red "microphone" icon next to their messages.

Unmute
Enforce security with Access Manager
To successfully unmute a user on a specific channel using Channel Monitor, make sure you also set up Access Manager in your application to grant or revoke server permissions from users based on their muting restrictions on UI.
Read How to Securely Moderate Chat and Users with BizOps Workspace and run an end-to-end demo showing secure moderation from both the client and server perspectives.
Press the red microphone icon next to the user to unmute a user and let them publish messages on a given channel.
You can do that from the main channel view or the Restricted users view (available after clicking the Restricted users button on the channel view).
- Channel view
- Restricted users view
Ban
Enforce security with Access Manager
To successfully ban a user from a specific channel using Channel Monitor, make sure you also set up Access Manager in your application to grant or revoke server permissions from users based on their banning restrictions on UI.
Read How to Securely Moderate Chat and Users with BizOps Workspace and run an end-to-end demo showing secure moderation from both the client and server perspectives.
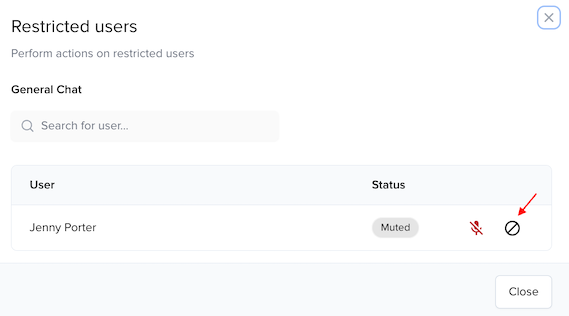
If you decide that a given user should no longer be able to publish messages on a channel and read messages published by other users (shouldn't have "write" and "read" access), you can ban them.
Under the hood
To ban the user, click the "block" icon next to the user and provide an optional reason for banning the user.
You can do that from the main channel view or from the Restricted users view (available after clicking the Restricted users button on the channel view) only if the user was previously muted.
- Channel view
- Restricted users view

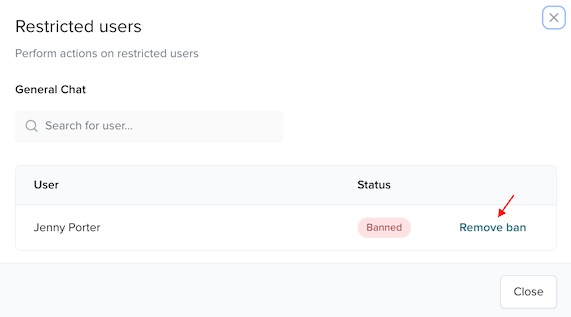
After banning the user, all moderation actions visible next to that user's messages are replaced with Remove ban and the user's name turns red.
The banned user is not removed from the channel (their membership status doesn't change). They will still be visible on the channel membership list with a visible banned status.
Unban
Enforce security with Access Manager
To successfully unban a user from a specific channel using Channel Monitor, make sure you also set up Access Manager in your application to grant or revoke server permissions from users based on their banning restrictions on UI.
Read How to Securely Moderate Chat and Users with BizOps Workspace and run an end-to-end demo showing secure moderation from both the client and server perspectives.
To unban a user and let them publish messages and read the channel content, click Remove ban next to the user.
You can do that from the main channel view or the Restricted users view (available after clicking the Restricted users button on the channel view).
- Channel view
- Restricted users view

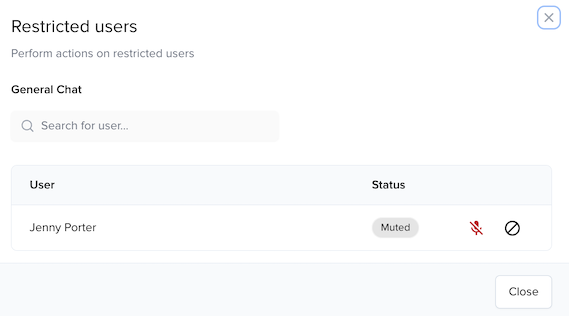
Preview restricted users
If you want to see the list of all muted and banned users and the reason why they were banned (if provided), select the Restricted users button on the main live chat preview.
The modal that pops up lets you revert the moderation restrictions (remove mutes and bans) you added when moderating users on a given channel.

Messages
Once you have selected channels for moderation, you will see a live preview of all messages and threads (current and historical) that channel members posted on that channel.
As a chat moderator, you can edit or delete messages published by other users. You can also send a message to all channel members, marked as sent by the moderator.
Message encryption
Channel Monitor does not support message encryption, so if you encrypt messages in your app, you won't be able to see the encrypted message content.
Get new messages
When you monitor a channel, you'll see all new messages as they are published.
On other tabs with channels selected for monitoring, you'll see a message badge showing the total number of unread messages on that channel. You'll see the 99+ counter if the number of unread messages exceeds 99.
Once you open that channel, all new messages will be visible at the bottom of the screen, separated from the already-read messages by a separator.

Use the scroll-down button to see the newest messages.
Get historical messages
By default, you'll see a maximum of 25 messages on a given channel. To get historical messages, scroll to the top to see the oldest messages stored on your keyset.
Retention settings
Historical messages depend on the retention period for Message Persistence on your app's keyset in the Admin Portal. If you set Retention to 7 days, you won't see older messages on any of the channels on your app's keyset.
Edit messages
To edit a message, click the "Pencil" icon next to the message.

The edited message will be highlighted, and its content will appear in the input field at the bottom of the channel preview. Once you edit the message, click the Save button.
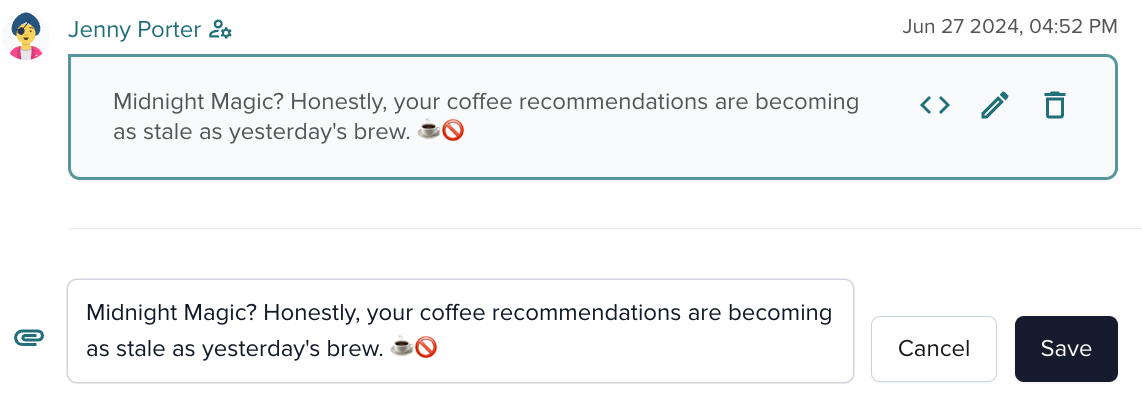
The changed content will be published on the channel with the (edited by moderator) annotation.

Under the hood
Delete messages
To delete a message, click the "Bin" icon next to the message.

Once you delete a message, it will appear as greyed out on the screen.
Under the hood
Restore messages
Since you can only soft delete messages in Channel Monitor, their content remains stored in Message Persistence. Thanks to that, you can undo your action by clicking the Restore button next to the deleted message.

Under the hood
Send messages as moderator
Besides monitoring and moderating messages published by others, you can post your own messages to all channel members.
To do that, type in a message in the input field at the bottom of the channel preview and click the "Arrow" icon to send the message.

By default, all messages a moderator publishes have Moderator set as their author, a default avatar, and a navy background (to distinguish them from other messages).

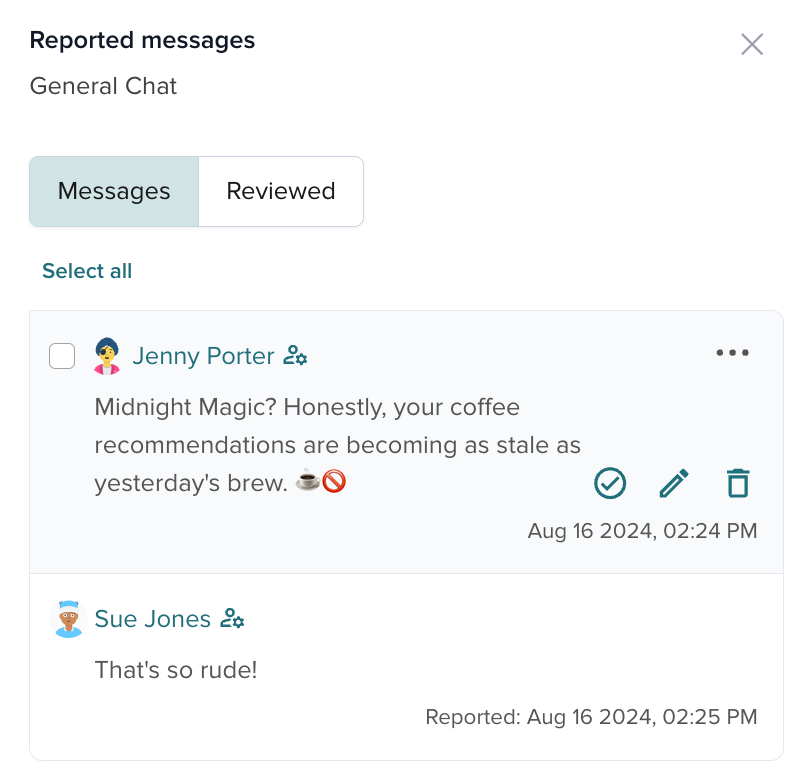
Review reported messages
If a chat user notices an inappropriate message on a channel, they can flag it and provide a reason for doing so. After clicking the Reported messages button, all such messages will appear in a pop-up drawer.
As an admin, you can review each reported message, verify why it was flagged, and check who did it.
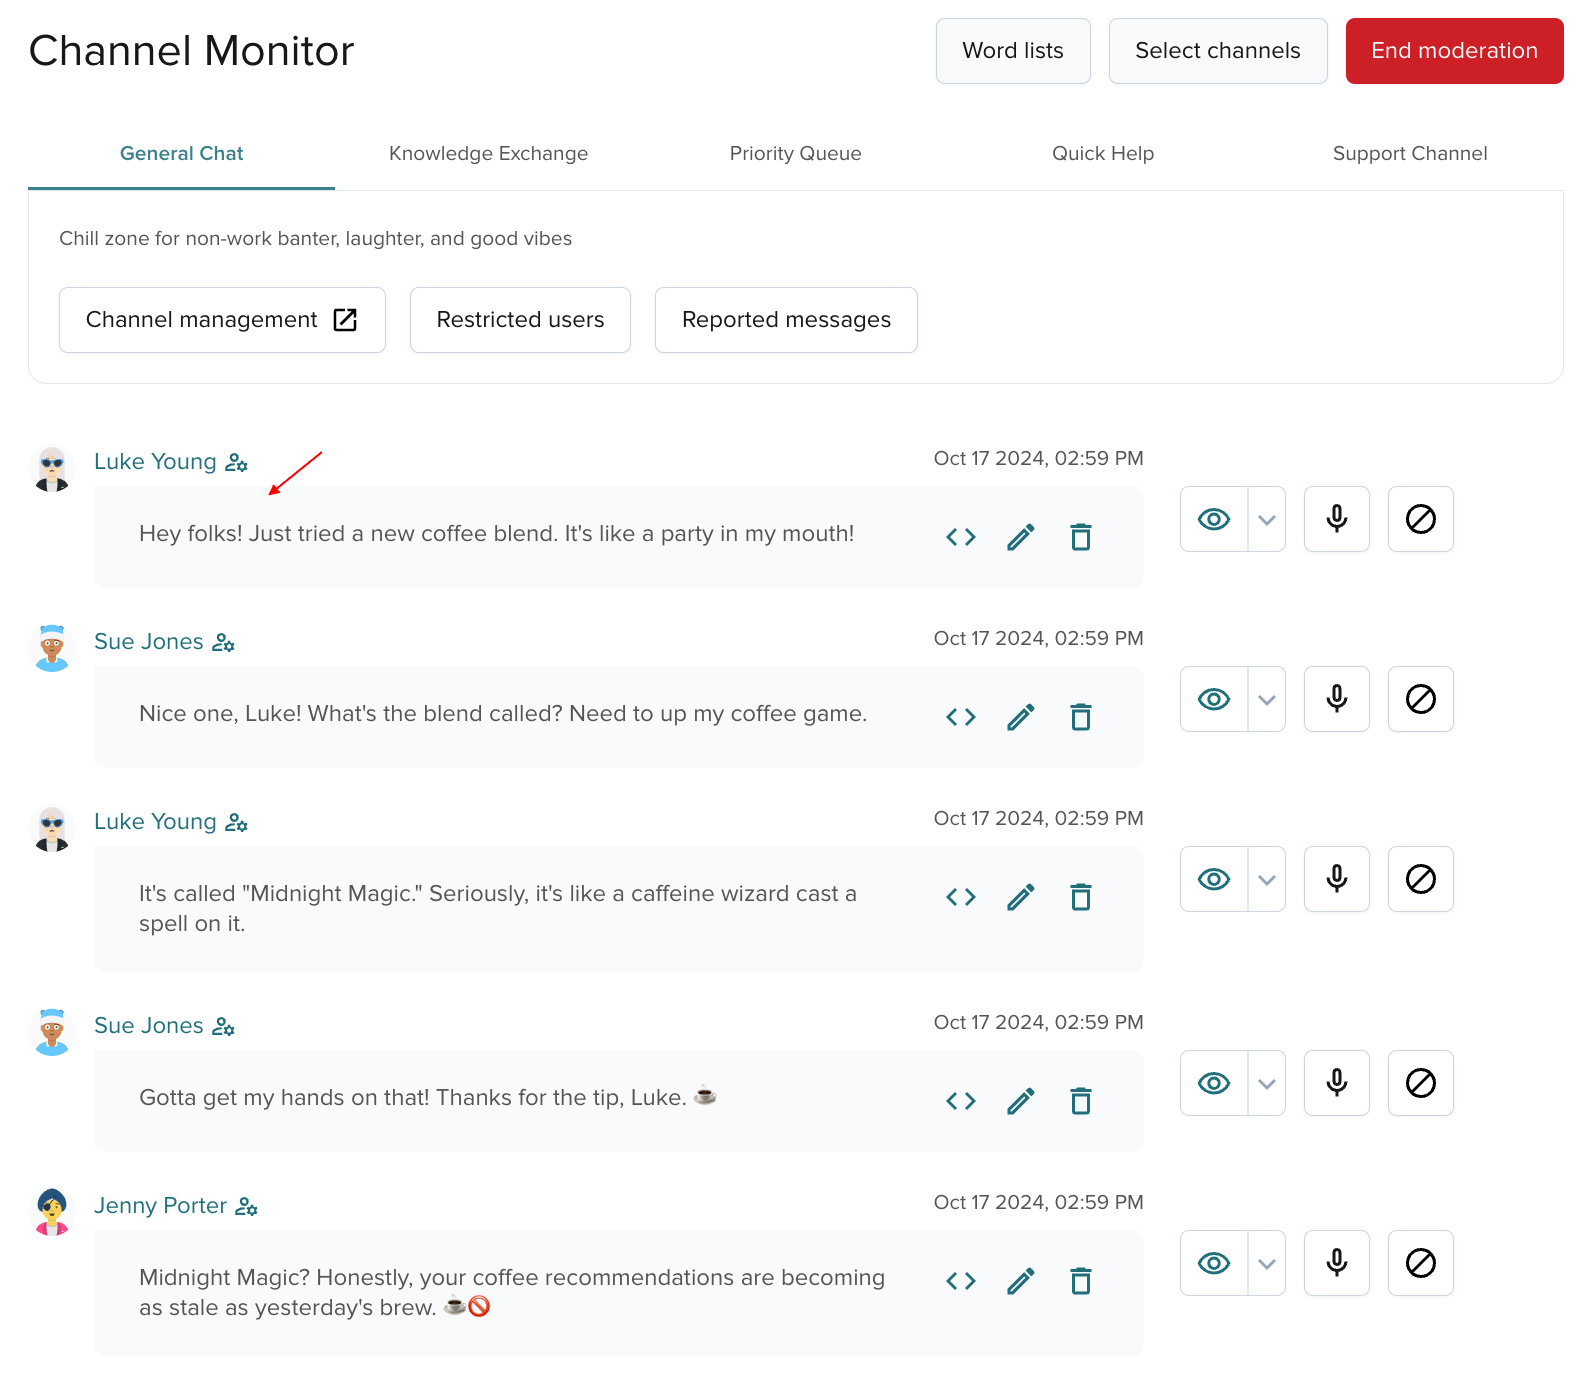
In this example, you can see that Sue Jones reported to the admin the message posted by Jenny Porter and provided the reason for reporting it ("That's so rude!").
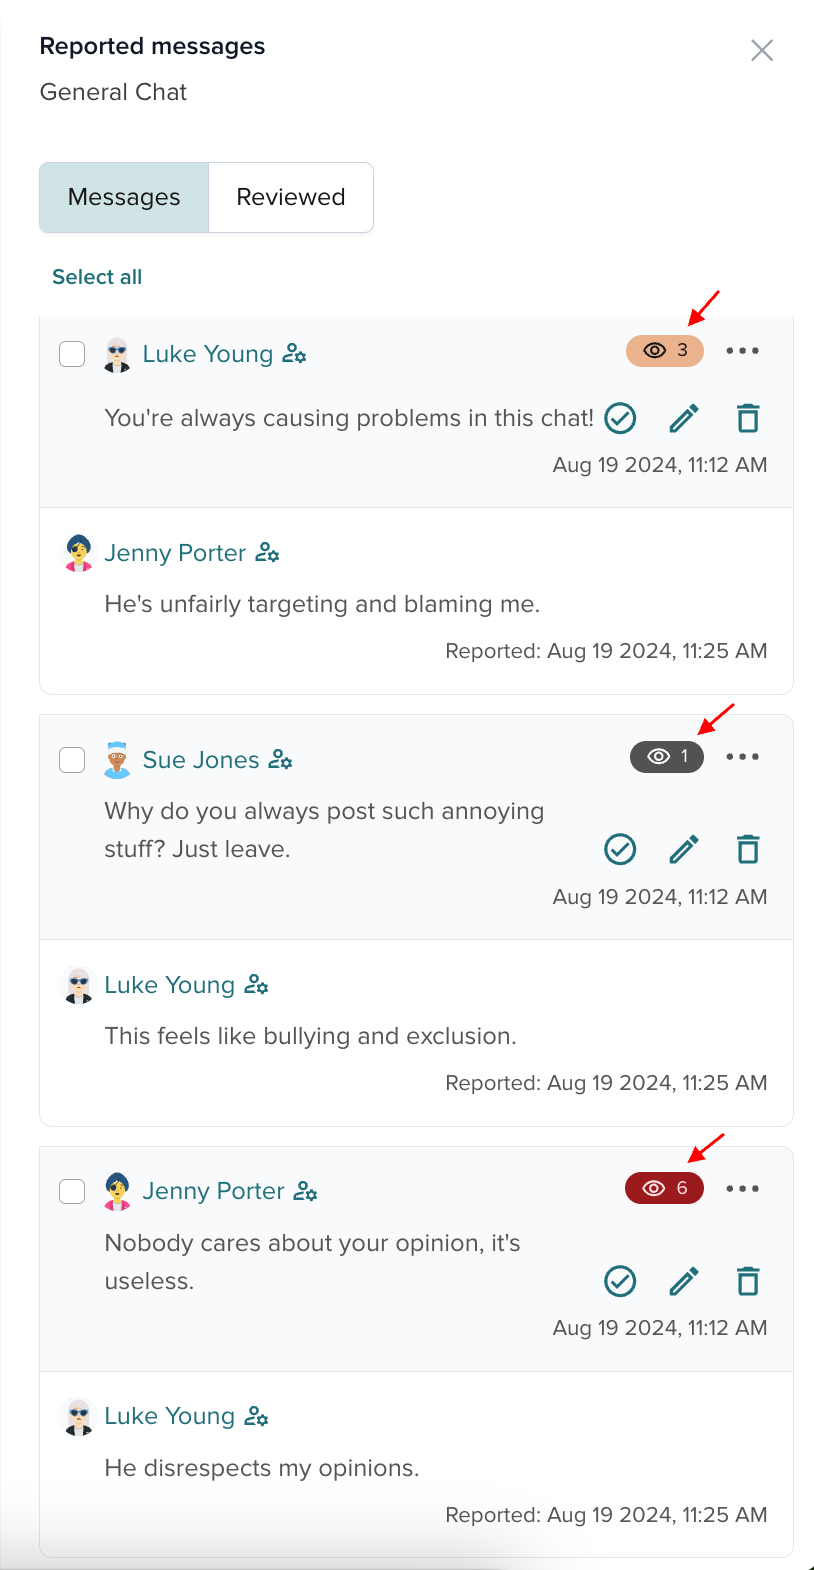
The colorful watch badges visible next to the user's name show how many times you decided to "watch" that person before and can help you decide if it's high time for you to mute or ban them:
- Grey flag — 1 watch
- Orange flag — 2-5 watches
- Red flag — 6 and more watches
If you decide to act on a reported message, you can either mark it as reviewed, edit, or delete it. Alternatively, you can mute, ban, or watch the message author.
If you decide to review the message by selecting the checkbox icon, the message will be moved to the Reviewed tab.
Retention time
Flagged messages are visible on the report for their lifetime, which depends on the retention time you set in the Message Persistence on your app's keyset in the Admin Portal.
This way, if you have retention set to 7 days and a published message was reported by a different user 7 days after it was published, there is a chance this message won't appear on the report.
Under the hood
Review auto moderated messages
If you use Auto Moderation, all channel messages that contained masked words or were considered spam are visible in the Auto Moderated Messages section:
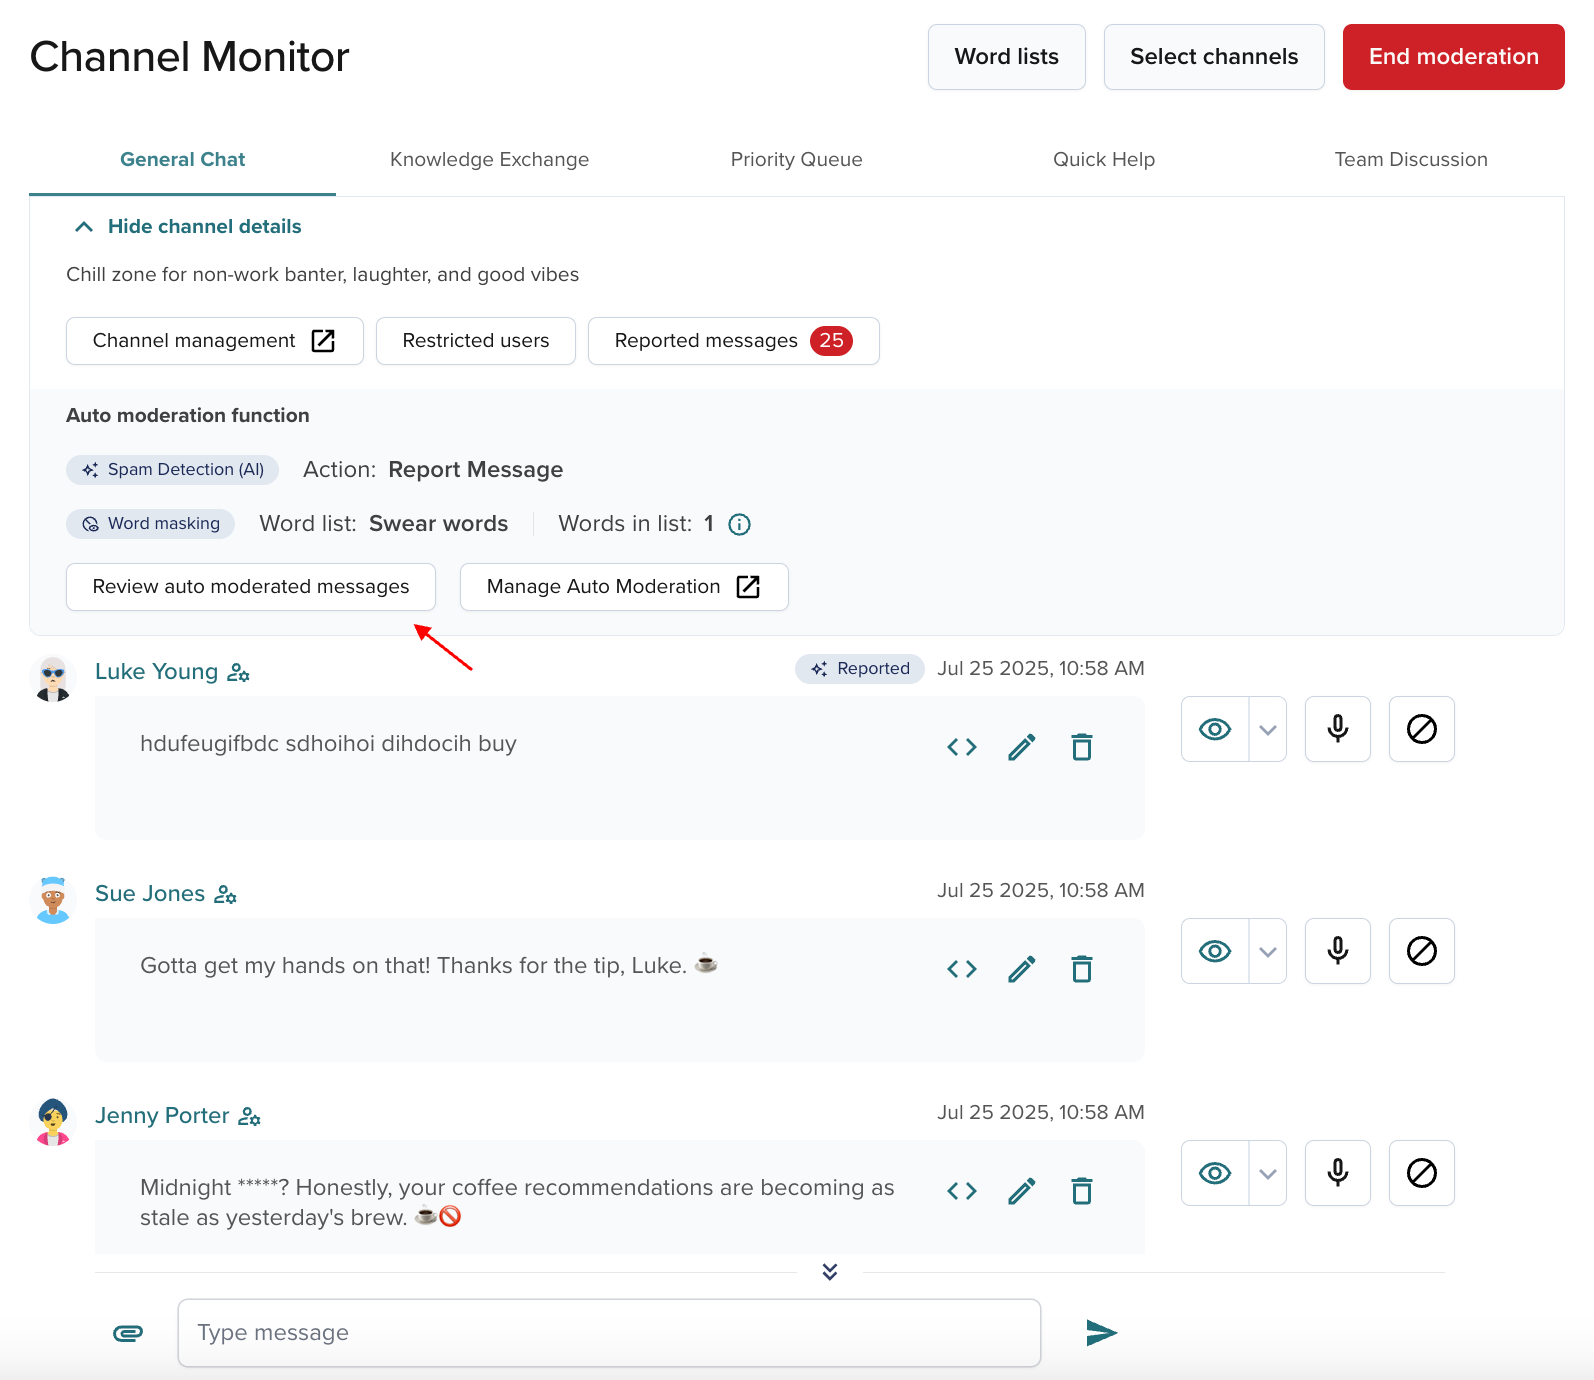
This section lets you review the content of all of these message types:
Blocked— messages not published in the channel, as the Spam Detection (AI) function considered them spam.Reported— messages published in the channel, but reported to an admin for review.Words masked— messages published in the channel in a moderated form (with certain words masked).
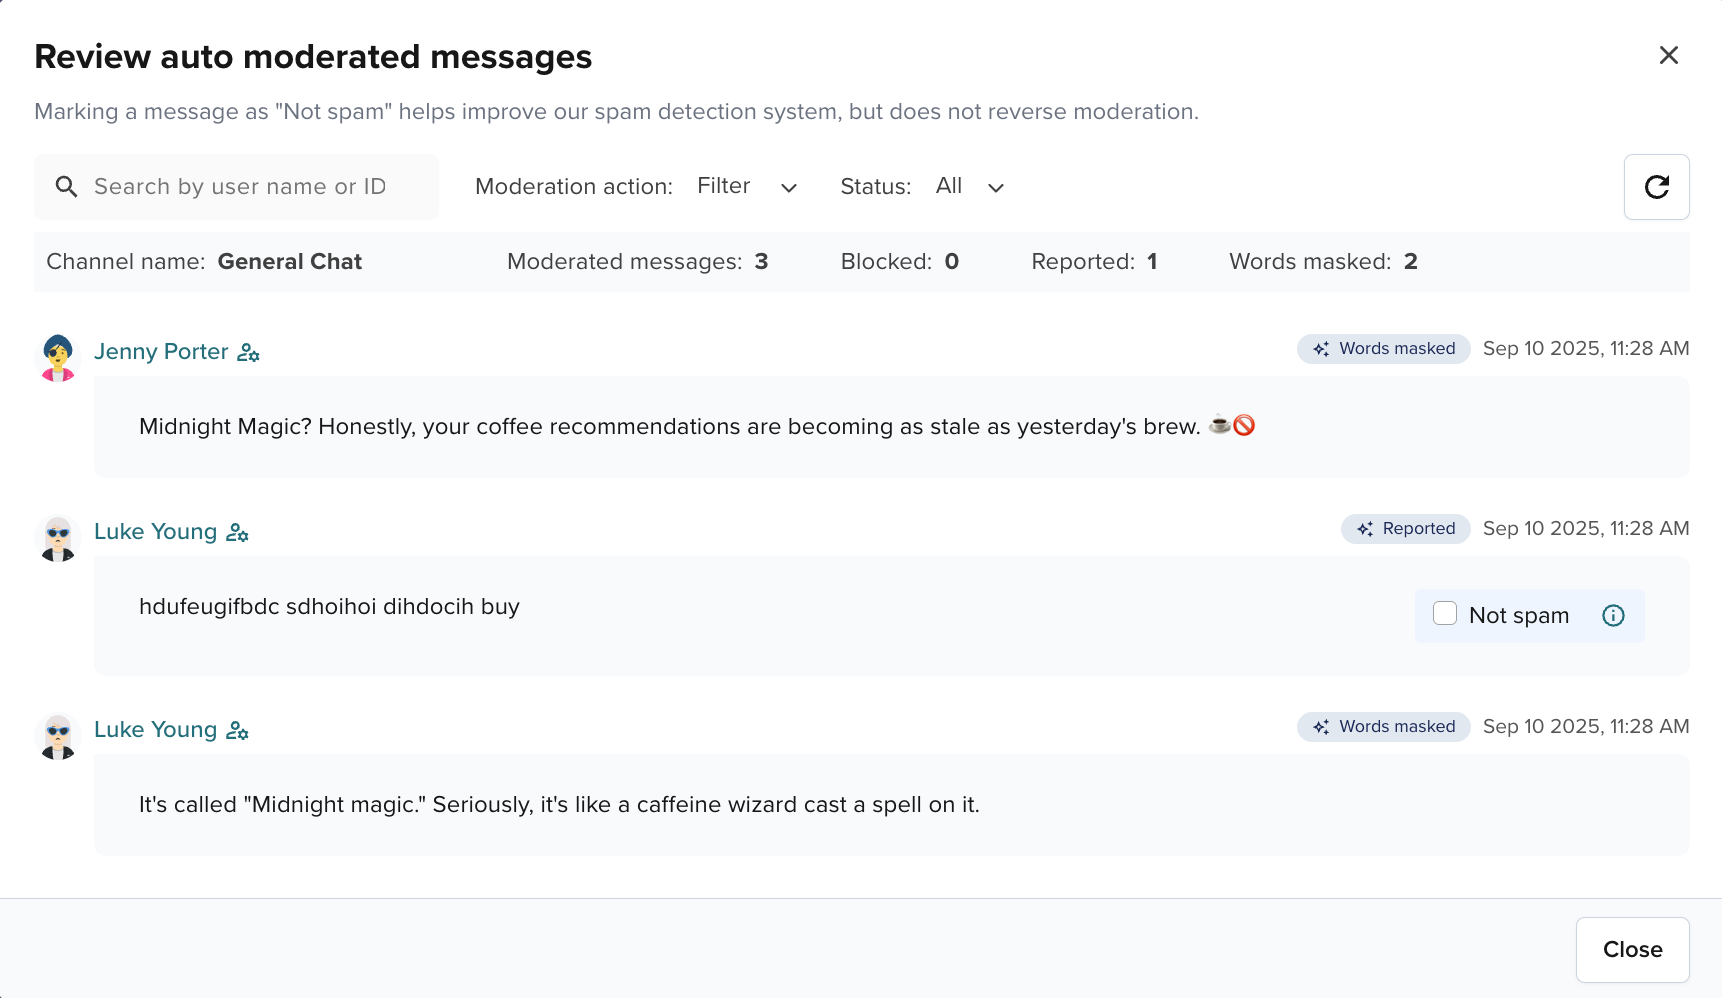
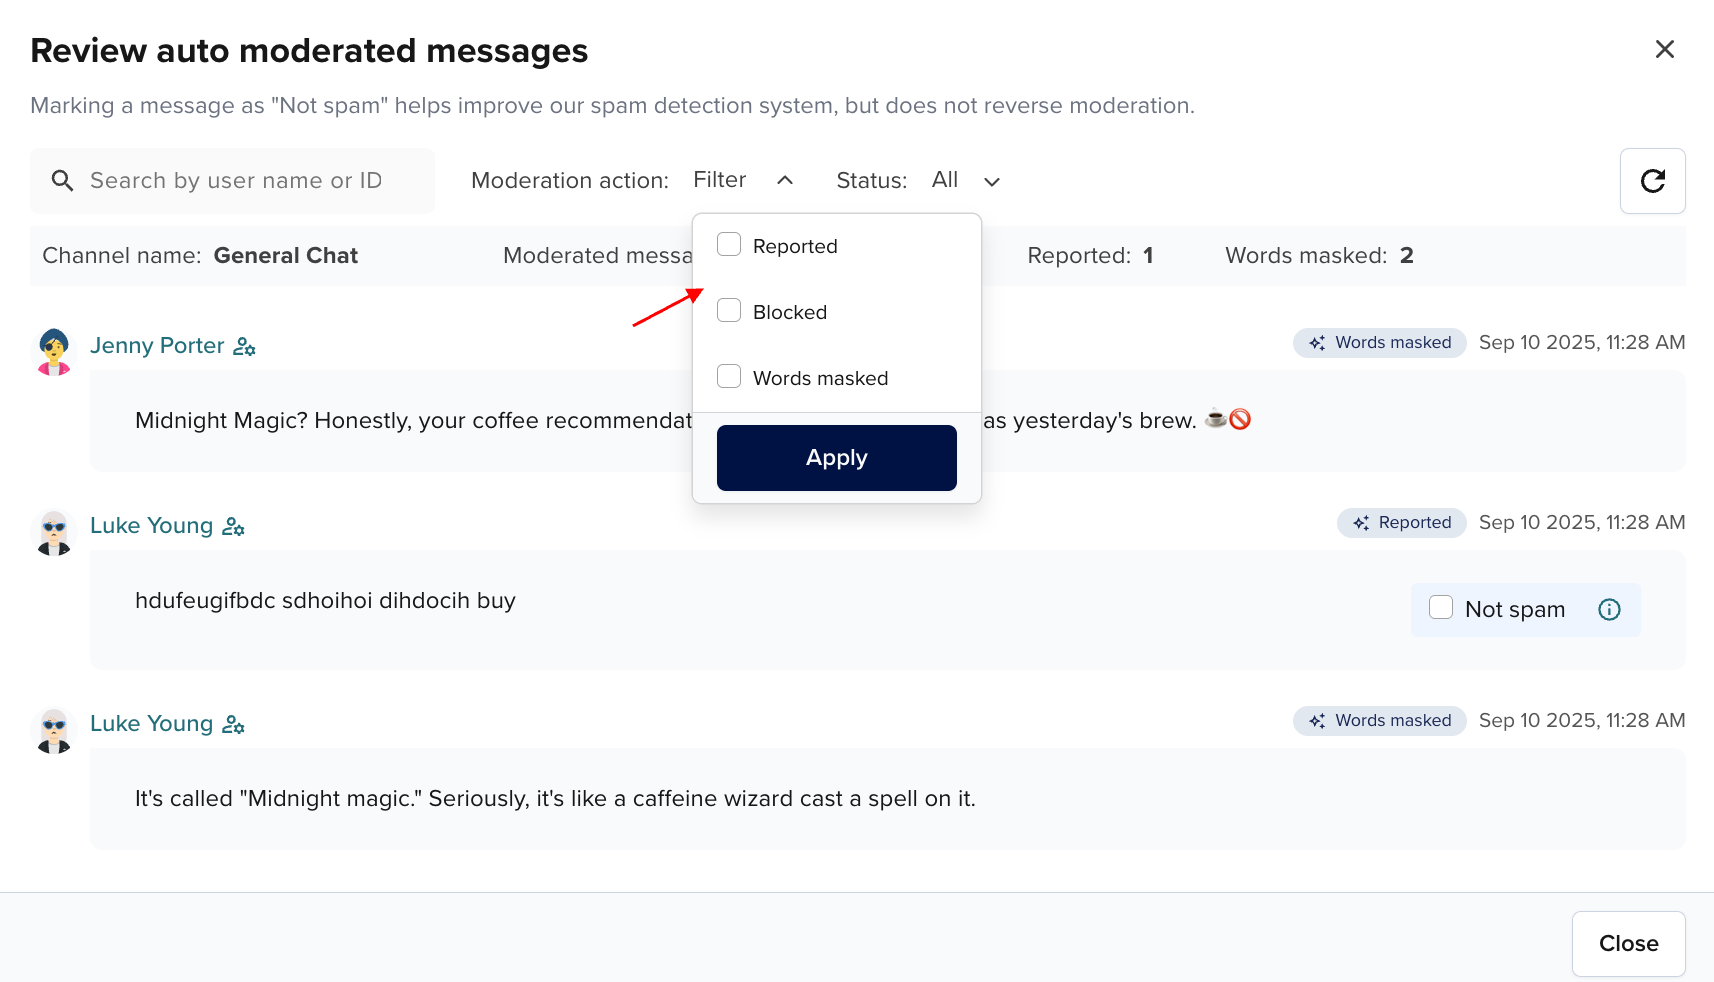
You can filter these messages for better visibility:
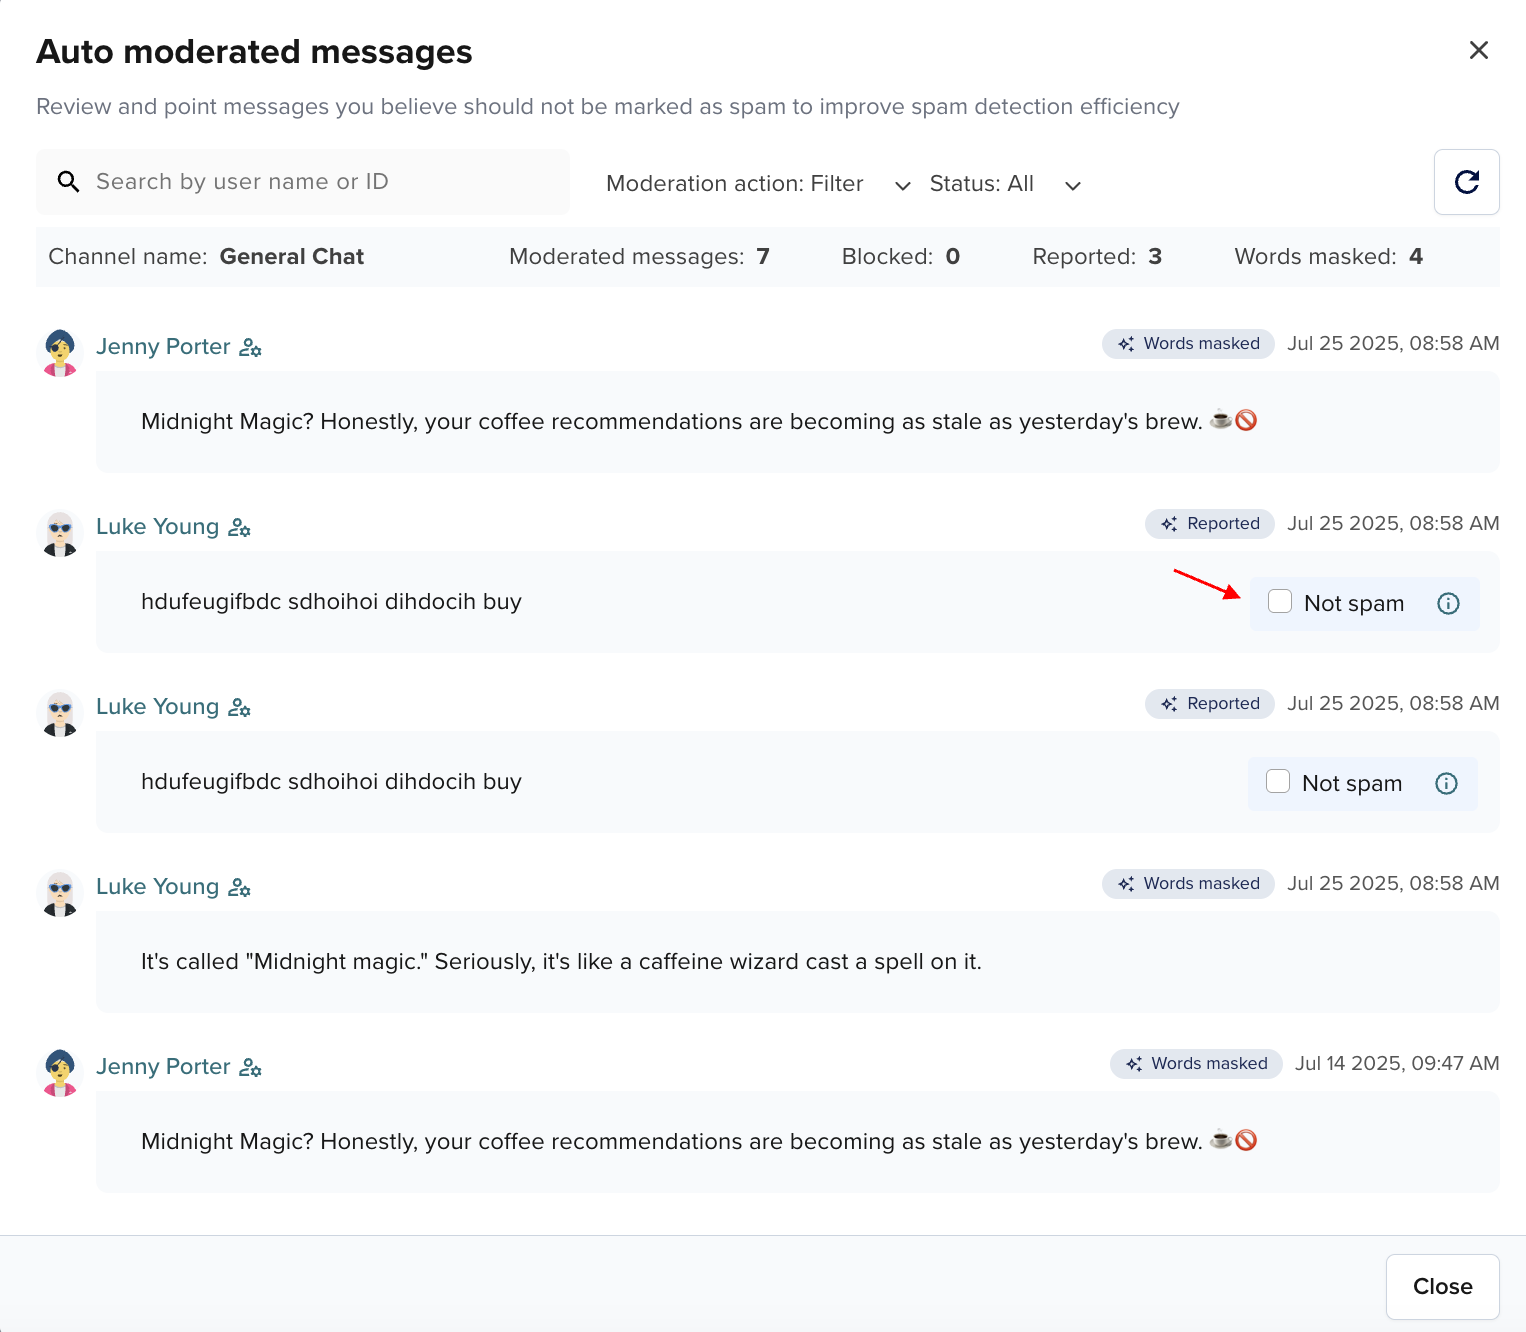
You can also act on Reported or Blocked messages and mark them as Not spam. This action doesn't reverse the moderation, but provides the PubNub maintainers with valuable feedback, which helps improve the spam-checking mechanism behind the Spam Detection (AI) function.
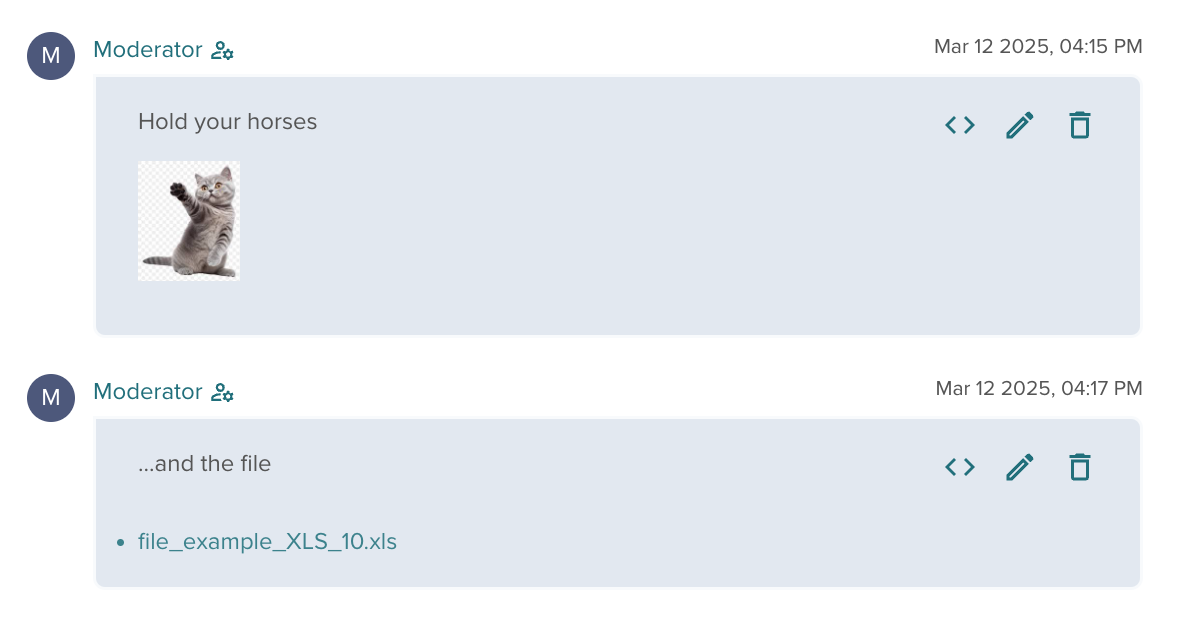
Upload files
Channel Monitor lets you view files uploaded by chat members in messages. As a moderator, you can also upload files to messages.

This functionality works independent of the SDK your chat app is built on, which means you can view or send files in Channel Monitor regardless of the SDK you use (Core or Chat).
While Chat SDKs support multi-file upload, Core SDK methods for sending files let you upload only one file in a single message. Due to this restriction and for unification reasons, Channel Monitor allows for displaying and attaching only one file per message.
There are no restrictions as to the format of the attached file as long as it is up to 5 MB in size.
If a browser is able to display a given file format, it presents the content in a standardized visual format with a height of 80 pixels and unrestricted width, which you can expand to its original size by clicking on the file.
In cases where the browser cannot display a particular file format, it is shown as a clickable link. This link lets you download or open the file using a compatible application.
Persistence
Contrary to messages, Channel Monitor does not store attached files in Message Persistence.
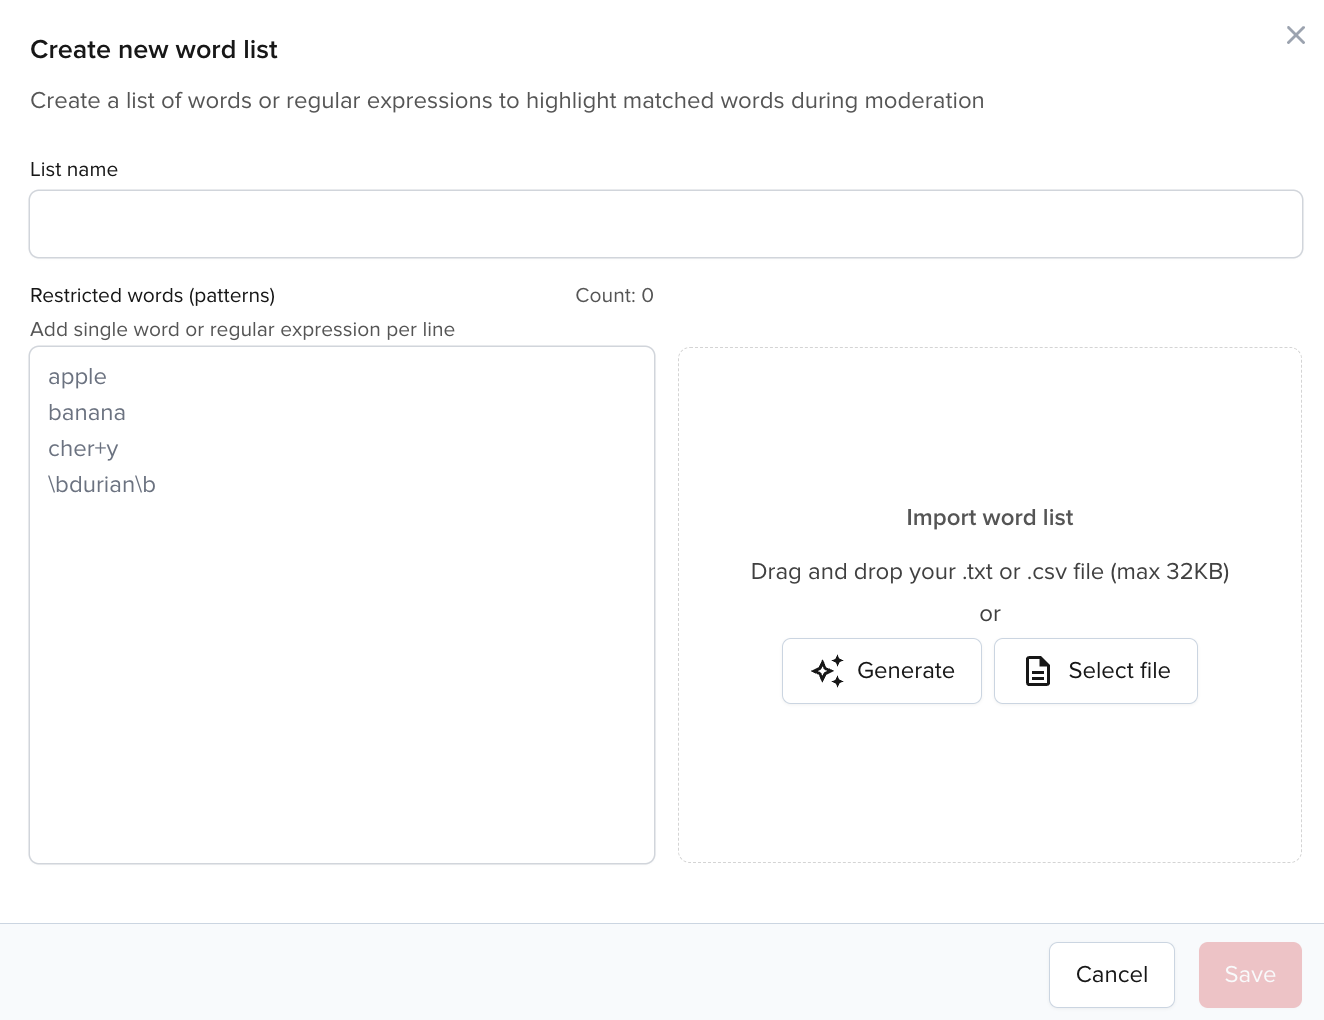
Manage word lists
You can facilitate your moderation activities by using the Word List feature in Channel Monitor.
Word lists allow you to collect all words you consider offensive or forbidden in one place. Let Channel Monitor review selected channel conversations and highlight these words whenever they appear in published messages.
It will be easier for you, as a moderator, later to spot such words and decide if someone is crossing the line and should be muted or banned or if a message must be edited or deleted.
To add such a word list, click the Manage word lists button when selecting channels for moderation.

Channel Monitor lets you manually create a list, use a pre-made one with English swear words (Generate), and upload or drag-and-drop your own list.
Follow the wizard to add a word list with these rules in mind:
- You can upload/drag-and-drop only
.txtor.csvfiles. - Each word in a list must be written in a new line.
- Word lists can contain single words or regular expressions.
- The size of a single word list must not exceed 32 KiB.
Once you add a word list, you must activate it through a slider.
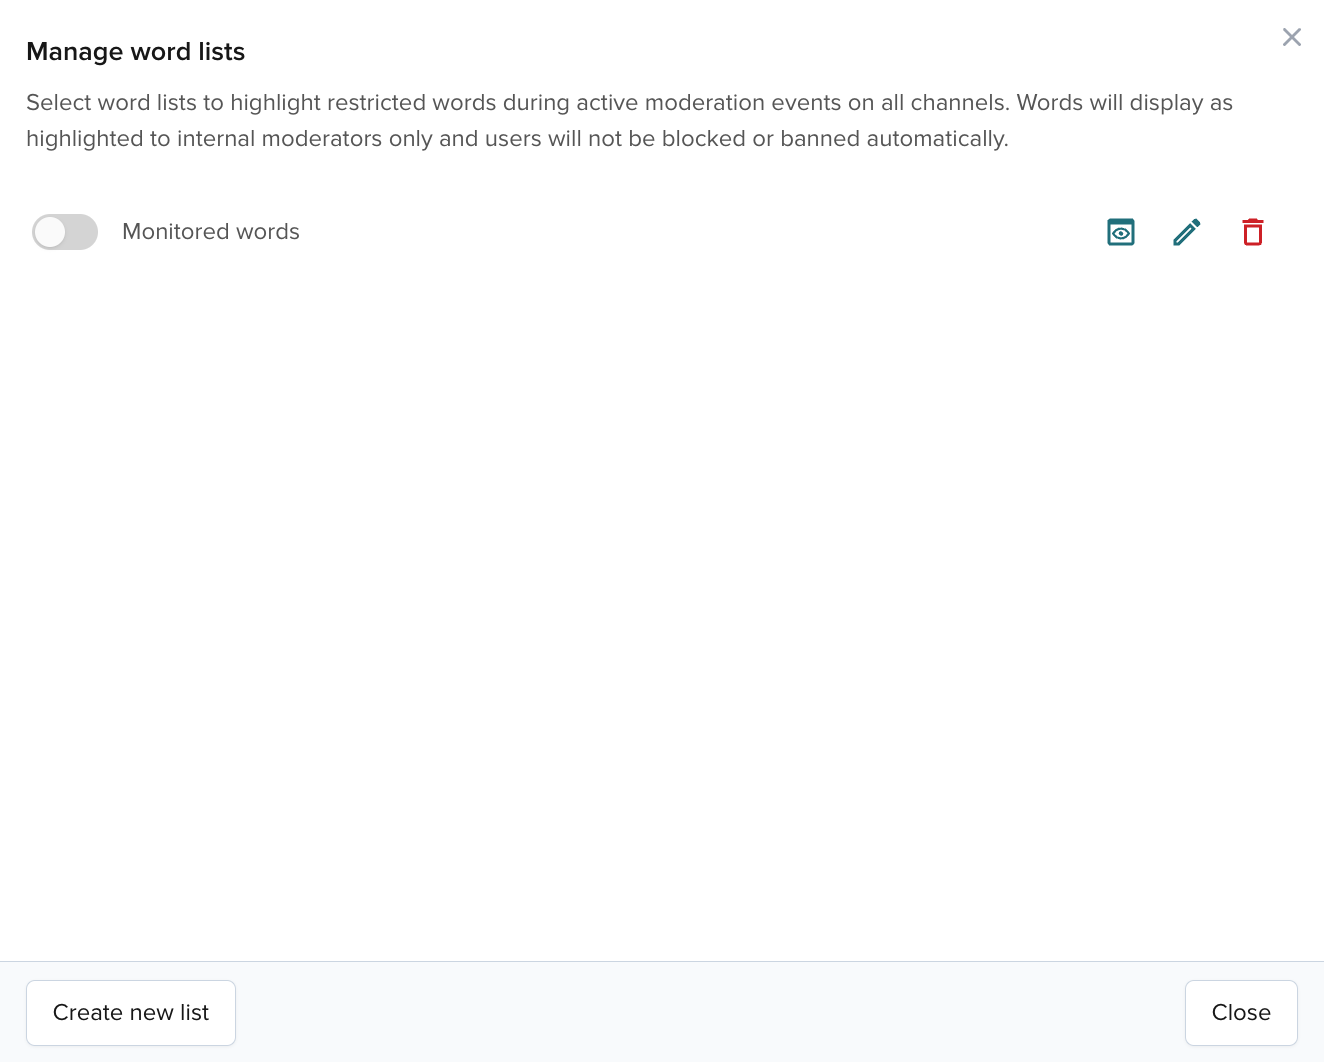
Words from the active lists will be highlighted in messages published on the selected channels.

Word masking Function
If you prefer words from the word list to be automatically masked (with asterisks) after publishing, configure the Word masking Function.
Message path configuration
You can see the following popup once you click the Start moderation button.
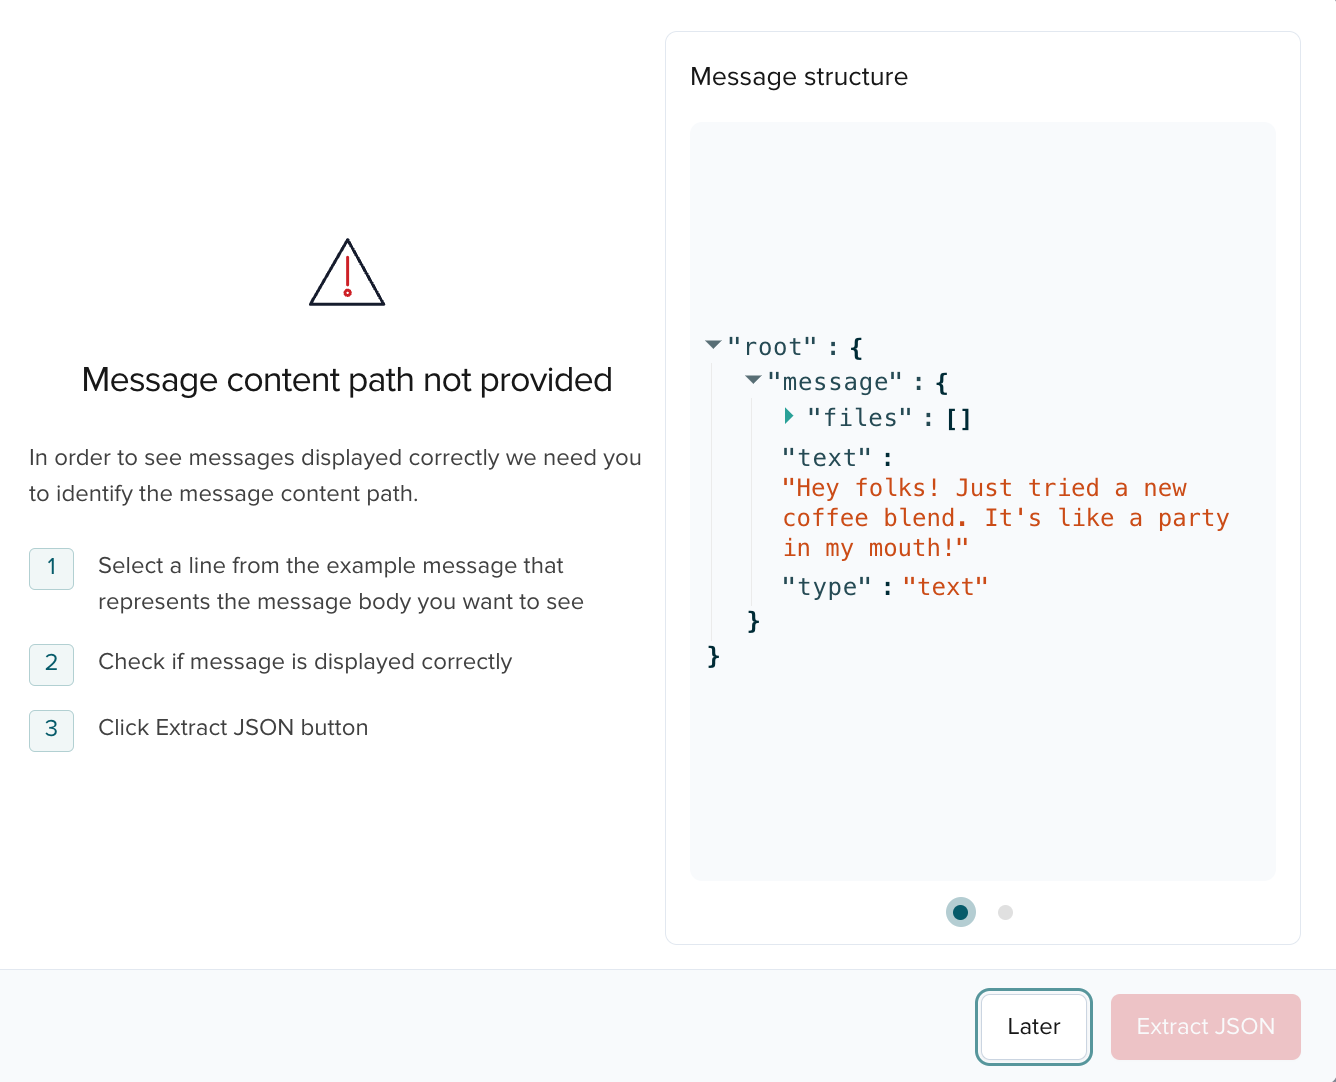
This popup means your app doesn't use Chat SDK with a fixed message payload structure, and you didn't enable and set up Channel Monitor Configuration on the main Channel Monitor screen to point to your app's message payload path.
The modal shows the JSON structure of a sample message published on one of the channels you selected for moderation.
Follow the on-screen instructions to point to the place in your code where message content is located, like $.message.text. This way, Channel Monitor can correctly display the content of all messages published on the moderated channels.
If you provide an incorrect path to your message payload, like $.message.type instead of $.message.text, Channel Monitor displays whatever is underneath (in this case, the type of the message) instead of the message content.

To change the path:
-
Click the "code" icon next to any message (path selection applies to all messages on your keyset).

-
Hover over the correct line on the JSON preview and click it to extract this JSON path.
-
Confirm your choice.
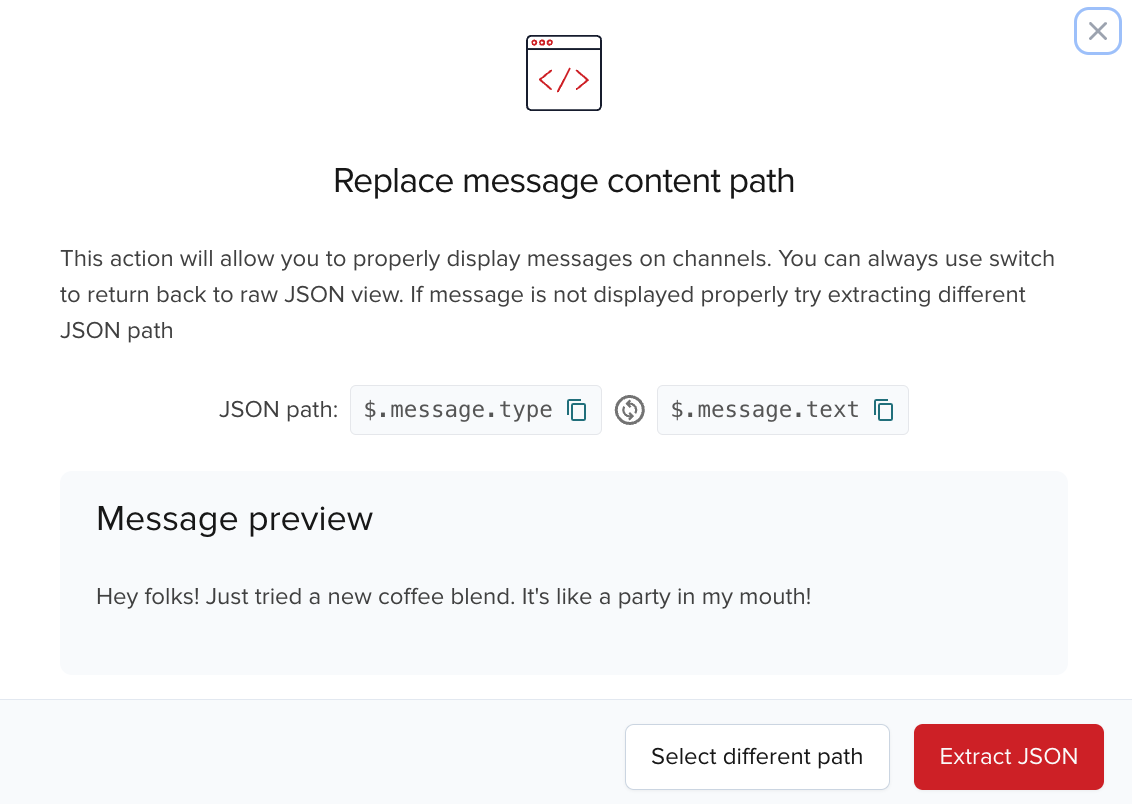
You can now see the correct content of all messages that share the common structure.