Unity API & SDK Docs v8.2.0
This page outlines the steps to follow to create a simple Hello, World application with PubNub. This covers the basics of integrating PubNub in your application: setting up a connection to PubNub, and sending and receiving messages.
WebGL compatibility
The PubNub Unity SDK is compatible with Unity WebGL builds. For information on how to configure your project for WebGL, refer to WebGL configuration.
PubNub account
Sign in or create an account to create an app on the Admin Portal and get the keys to use in your application.
When you create a new app, the first set of keys is generated automatically, but a single app can have as many keysets as you like. We recommend that you create separate keysets for production and test environments.
Download the SDK
SDK version
Always use the latest SDK version to have access to the newest features and avoid security vulnerabilities, bugs, and performance issues.
Download the SDK from any of the following sources:
Get the source code
https://github.com/pubnub/unity.git?path=/PubNubUnity/Assets/PubNub
Install via Package Manager
-
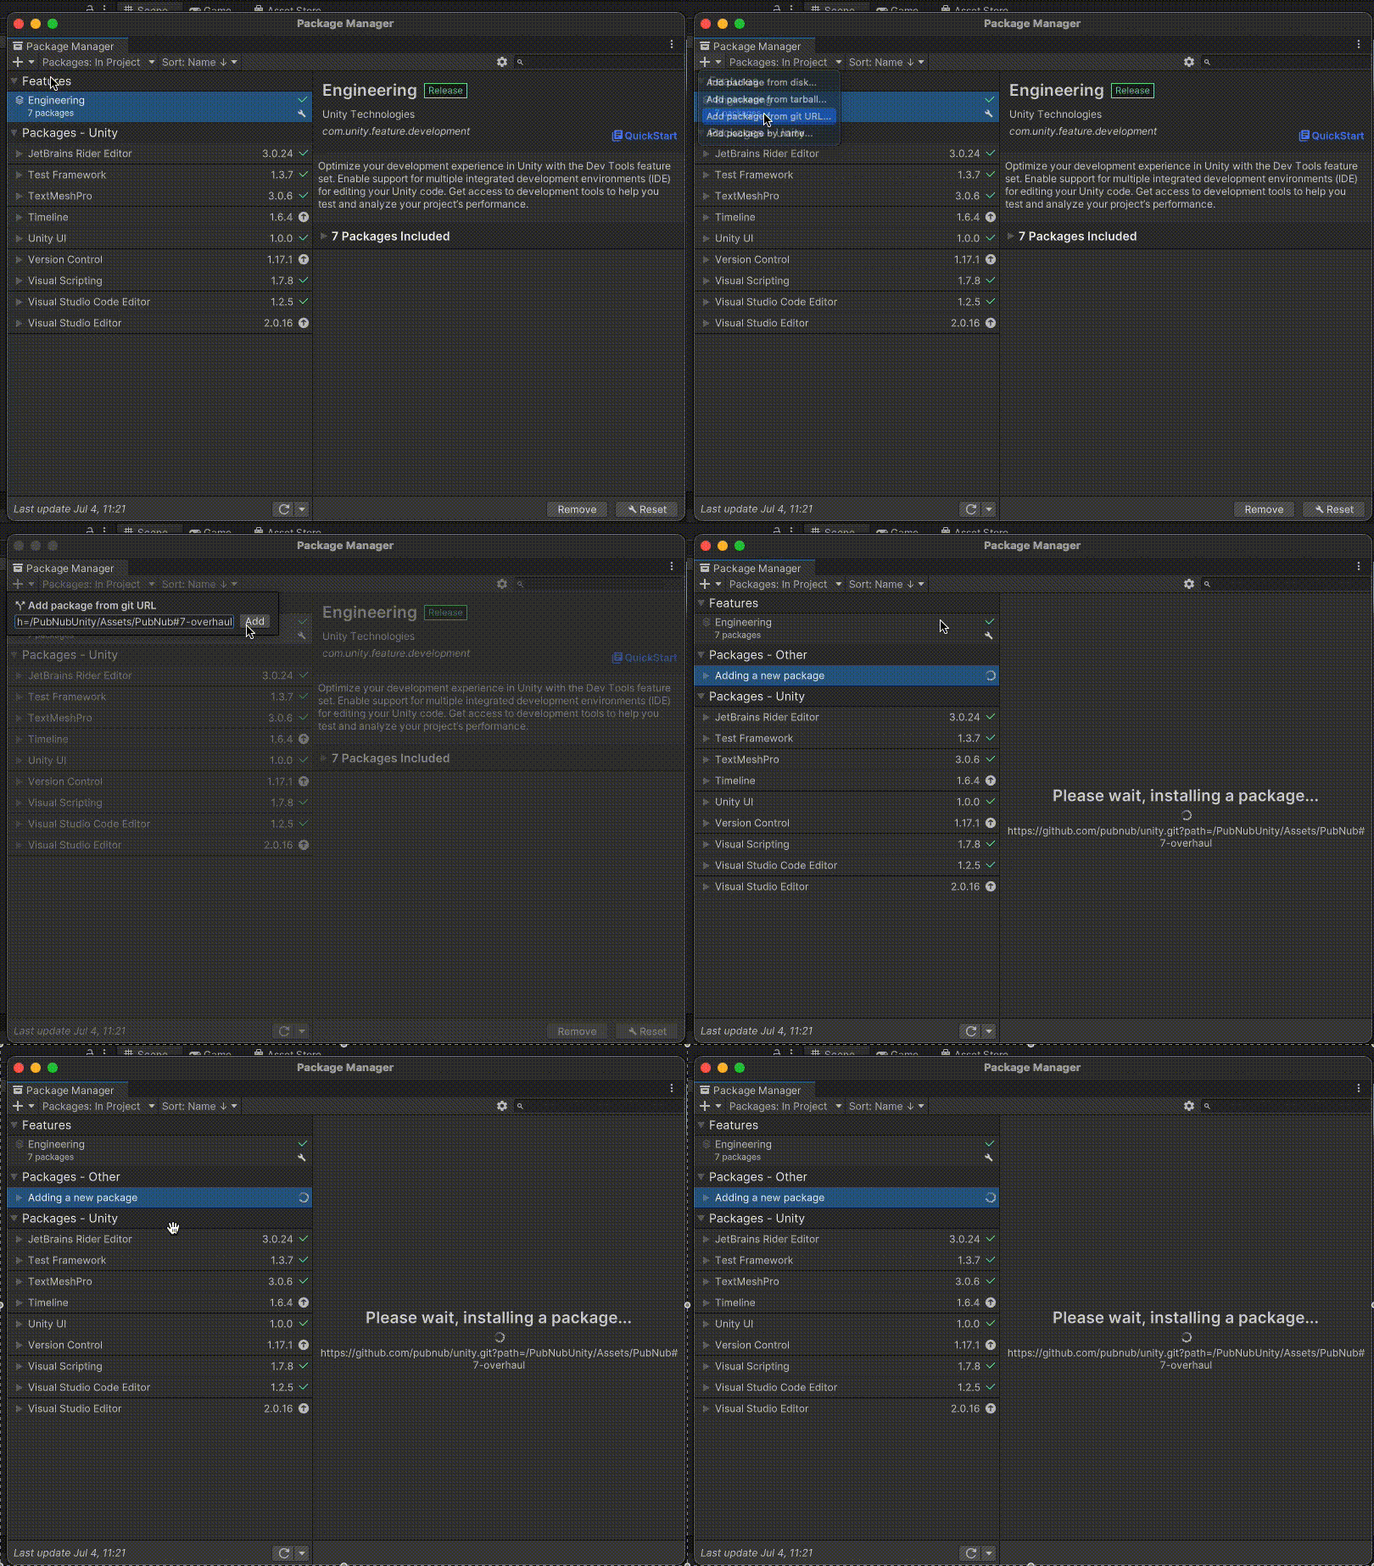
Open Unity Editor and navigate to Window -> Package Manager.
-
In the Package Manager window, click + and select Add package from git URL.
-
Paste the PubNub Unity package link and click Add.
https://github.com/pubnub/unity.git?path=/PubNubUnity/Assets/PubNub
-
Navigate to PubNub and click Set up templates.

-
Restart Unity Editor.
Configure PubNub
You can configure PubNub in Unity Editor alone. You don't have to write a single line of code to make PubNub work within your project. To configure PubNub in Unity:
-
In your project tree, right-click any folder, and navigate to Create -> PubNub -> PubNub Config Asset. This creates a new scriptable object where you provide your PubNub account information.

Generated User ID
In this Unity example, the value of the mandatory
userIdparameter is automatically generated for you. In production, always ensure you can identify your client by its user ID. For more information, refer to Users & Devices. -
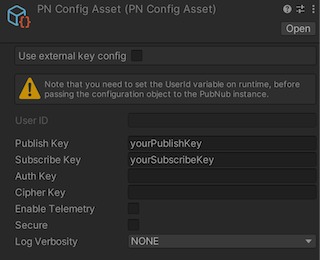
Open the newly created scriptable
PNConfigAssetobject and provide your publish and subscribe keys. Other configuration items are optional. -
In your project tree, right-click a folder, and navigate to Create -> PubNub -> PubNub Manager Script. This creates a script that initializes PubNub, adds a listener, subscribes to a channel, and sends a message. We will go into detail about this later on.

-
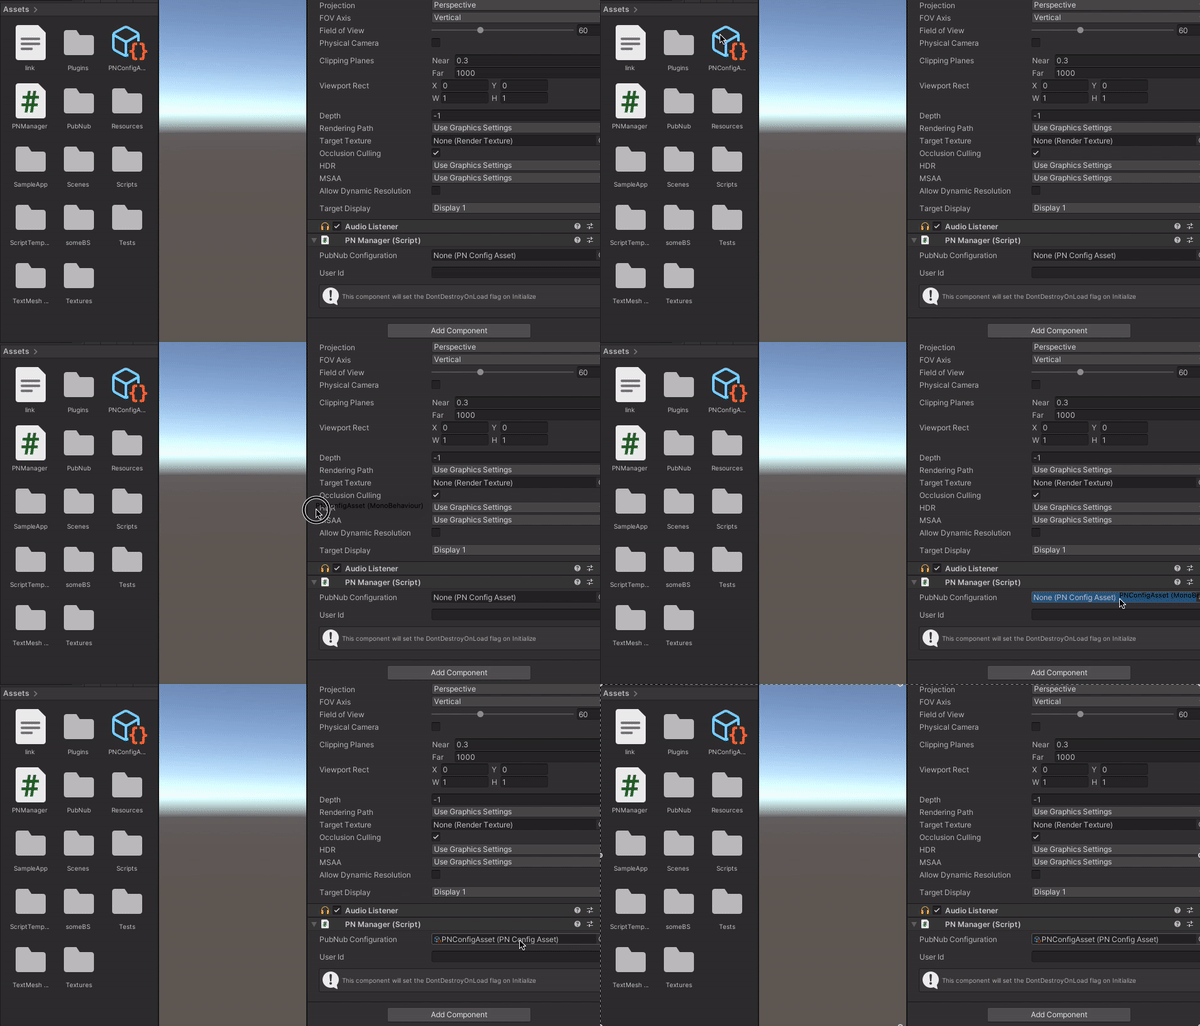
Drag
PnManageronto any game object in your scene. That addsPnManageras a component. -
Drag
PnConfigAssetonto the PubNub Configuration field inside PnManager (Script).
-
Enter Play mode, and you should see
Hello World from Unity!printed in the console.
Add event listeners
Listeners help your app react to events and messages. You can implement custom app logic to respond to each type of message or event. Even though we didn't work with code directly, it's still there. Let's take a look at the code of PnManager:
listener.onStatus += OnPnStatus;
listener.onMessage += OnPnMessage;

void OnPnStatus(Pubnub pn, PNStatus status) {
    Debug.Log(status.Category == PNStatusCategory.PNConnectedCategory ? "Connected" : "Not connected");
}

void OnPnMessage(Pubnub pn, PNMessageResult<object> result) {
    Debug.Log($"Message received: {result.Message}");
}
Publish and subscribe
To receive messages sent to a particular channel, you subscribe to it. When you publish a message to a channel, PubNub delivers that message to everyone subscribed to that channel.
To subscribe, you send a Subscribe() call. It is best to define the message before you introduce the listeners and send the subscribe call, so make sure to place the relevant code in the appropriate places in your code. Again, let's inspect the code of PnManager:
Channel channel = pubnub.Channel("TestChannel");

Subscription subscription = channel.Subscription();

subscription.Subscribe<object>();
await pubnub.Publish().Channel("TestChannel").Message("Hello World from Unity!").ExecuteAsync();
// OR
await pubnub.Publish().Channel("TestChannel").Message(transform.position.GetJsonSafe()).ExecuteAsync();
Putting it all together
A simple Hello, World implementation in Unity consists of:
- a Unity scene with a game object
PnConfigAssetPnManager
As PnManager is where most of PubNub operations are performed, let's take a look at it:
using System.Collections.Generic;
using UnityEngine;
using Newtonsoft.Json;
using PubnubApi;
using PubnubApi.Unity;


public class PNManager : PNManagerBehaviour {
	// UserId identifies this client.
	public string userId;

	private async void Awake() {
		if (string.IsNullOrEmpty(userId)) {
			// It is recommended to change the UserId to a meaningful value to be able to identify this client.
			userId = System.Guid.NewGuid().ToString();
Walkthrough
Instead of focusing on the order in which you configured PubNub, let's focus on the order in which the code runs. The scene you just created does a few things with PubNub:
- Configures a PubNub connection
- Adds the
OnPnStatusandOnPnMessageevent listeners - Subscribes to a channel
- Publishes a message
Configuring PubNub

The PnConfig asset is the minimum configuration you need to send and receive messages with PubNub. For more information, refer to the Configuration section of the SDK documentation.
Add event listeners
Listeners help your app react to events and messages. You can implement custom app logic to respond to each type of message or event.
You added two listeners to your code: OnPnStatus, and OnPnMessage. The message listener listens for incoming messages on a particular channel. When it receives a message, the code simply prints the received message. This is why you see "Hello World from Unity!" displayed in the console.
The status listener reacts to connectivity events. In this example, when you connect to PubNub, the Connected category event is printed out to the console.
// Listener example.
		listener.onStatus += OnPnStatus;
		listener.onMessage += OnPnMessage;

	void OnPnStatus(Pubnub pn, PNStatus status) {
		Debug.Log(status.Category == PNStatusCategory.PNConnectedCategory ? "Connected" : "Not connected");
	}

	void OnPnMessage(Pubnub pn, PNMessageResult<object> result) {
		Debug.Log($"Message received: {result.Message}");
	}
For more information, refer to the Listeners section of the SDK documentation.
Publishing and subscribing
PubNub uses the Publish/Subscribe model for real-time communication. This model involves two essential parts:
- Channels are transient paths over which your data is transmitted.
- Messages contain the data you want to transmit to one or more recipients.
When you want to receive messages sent to a particular channel, you subscribe to it. When you publish a message to a channel, PubNub delivers that message to everyone who is subscribed to that channel. In this example, you subscribe to a channel named TestChannel.
A message can be any type of JSON-serializable data (such as objects, arrays, integers, and strings) that is smaller than 32 KiB. PubNub will, in most cases, deliver your message to its intended recipients in fewer than 100 ms, regardless of their location. You can also share files up to 5MB.
The Publish() method sends the "Hello World from Unity!" message.
await pubnub.Publish().Channel("TestChannel").Message("Hello World from Unity!").ExecuteAsync();
You can subscribe to more than one channel with a single subscribe call, but in this example, you subscribe to a single channel:
pubnub.Subscribe<string>().Channels(new[] { "TestChannel" }).Execute();
For more information, refer to the Publish and Subscribe section of the SDK documentation, and to Publishing a Message.
Next steps
You have just learned to use the Unity SDK to send and receive messages using PubNub. Next, look at the SDK's reference documentation covering PubNub APIs in more detail.